

Converting an O’Day Daysailer hull into a gunning float for big water
My decisions to build my different boats over the years have typically happened at the end of long fermentation processes. While the uninformed bystander may believe that I jump in with reckless abandon, I know that the idea has been in gestation for months, years, even decades. My ideas about White~Wing have been kicking around in my head – and heart, of course – since my youth, but I did not think about actually building her until about a month ago (late September 2013).
I was on Long Island visiting my family, as I try to do every couple of months. I spend a couple of days visiting, usually tackling a few simple chores for my Mom and brother Ted. Whenever I can, I also try to visit a few friends, most of whom are of the waterfowling persuasion. The September trip was a little out-of-the-ordinary because I knew there was a duckboat involved. In fact, I hauled down my flatbed trailer to carry back north a 2-man scooter acquired by good friend (and retired DU rep) Craig Kessler. As I am intimately familiar with the world of “free boats”, I brought with me a reserve of skepticism. I had seen but a single cell phone photo of the craft and was not sure what I would be retrieving. I had agreed to haul it back to Pencil Brook Boatworks and get it back into gunning condition. I knew only that the coamings probably needed to be replaced and that there was a bit of rot in the stern. It was very difficult to judge the dimensions – or even the shape – from the photo.
“Juniper Junior”
The vessel was in dry dock at the home of waterfowl guide Red Oster, in Sayville. Craig arrived at Red’s house moments after I did and so three veterans – all of whom had grown up shooting Broadbill on Great South Bay out of scooters – began the process of examination, exploration and conjecture that is half the fun of old duckboats. We do not know yet who built it, but it was noteworthy that a phone number – the builder’s? owner’s? – was scratched onto the aft coaming. It has its own historic value because the exchange began with two letters – JU for Juniper – and not the two numbers – 58 – that replaced the more colorful designations sometime during my school days. The boat is very low, with just a couple of inches of freeboard and pointed at both ends – she recalls the Civil War ironclad Monitor. It has a tall coaming and a cockpit that is on the small side – a little short (at 6-feet) and a little narrow (at 42 inches). There is no room beneath the decks for elbows or boots. While I happen to command the ideal 5-foot-10-inches of altitude, Craig easily exceeds the outlandish 6-foot threshold and a couple of his gunning partners are even taller – or, more to the point – longer whilst lying on their backs in a scooter. Fitting the intended crew into this craft would take some creativity…..
The boat was found to be sound enough – definitely needing new coamings and some surgery around the aft hardware (always a good spot to allow moisture through the ‘glass skin into the vulnerable wood framing) – but no fatal flaws. The prime concern was the size – but safety also came in the discussion. This boat would be hard-pressed to accommodate two gunners and even one gunner would not have much protection from sloppy seas. And, it would be a bear to tow.
We talked about removing the decks and building in much more crown. Red suggested it could be made into a fair one-man boat but fitting two guys in would be a challenge. I pulled up my Gilgo Gunboat on my laptop and we talked about the direction I would try to take “Juniper Junior” – adding a cowling, a lap canvas, and a “tiger stripe” paint job. Craig would cover the materials costs and I would have the all the fun of customizing a duckboat – to see saltwater again later this Fall.
Gilgo Gunboat
My mind was already swirling with all kinds of alternatives on the drive back to East Islip. It seemed that tearing off the existing decks would be the minimum – for thoughts of the fleet back at Pencil Brook Boatworks kept creeping in. The fleet includes mostly boats that are fully functional – or will be soon. Several canoes have gotten my attention and and are ready-to-go, used most every season. Others, like my Sneakbox and my Scooter, are mid-restoration. My Rhodes 19 needs new floor frames before it can sail on Lake Champlain next summer. But, a couple are admiitedly “questionable”. The one I kept thinking of was one of my two O’Day Daysailers. One needs a minor repair and cosmetics but the other is just a beat-up hull. My plans have been to salvage all of the hardware from the latter – the hardware is like new because it’s a freshwater vessel – and cut the hull up for the landfill. Another fate, though, was in its future – aided by its 6-foot beam and 17-foot LOA.

Decrepit Daysailer in the Pencil Brook Boatworks “marina”
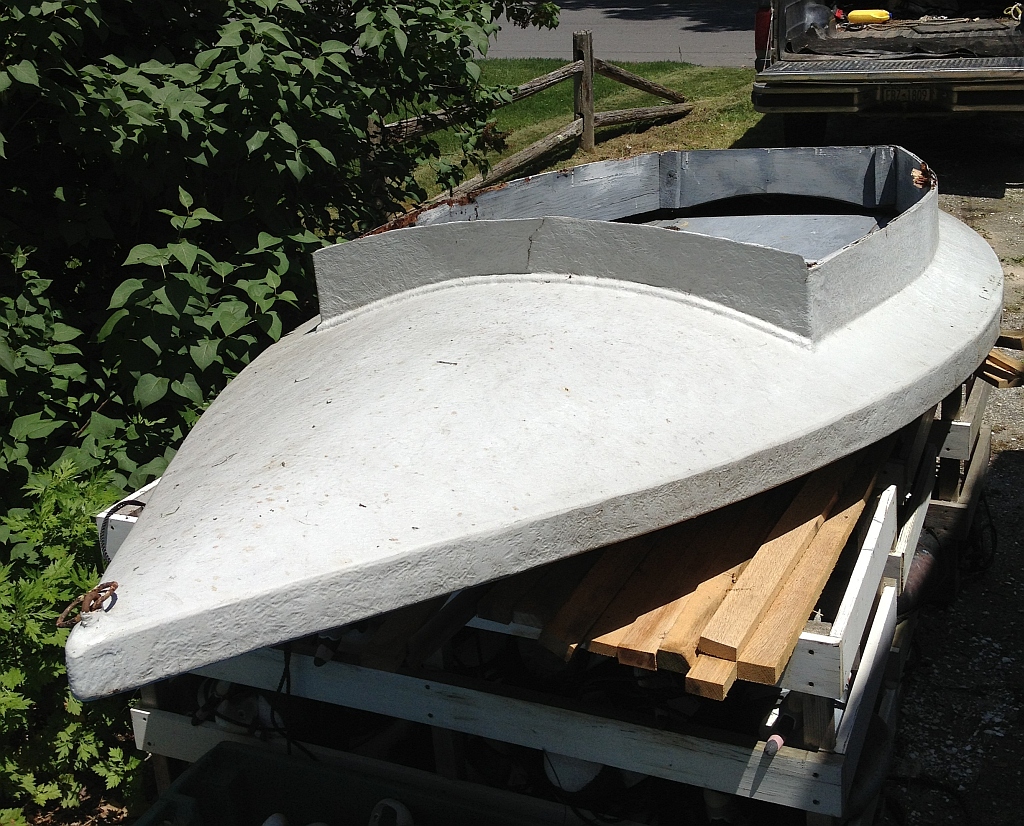
The Cut-down
The moribund Daysailer has now been reborn as a 2-man scooter. On a Sunday morning in late September, my chore list included simply putting this Daysailer on a trailer and hauling it up next to the shop. It involved first off-loading the other (good) Daysailer from one of my boat trailers. This task took a half-hour or so and, when I got her next to the shop – and within reach of electricity – I could not help but ask: I wonder how the Sawzall will work on that hull? About an hour later, she was intact only below her waterline. The rest had been cut into manageable chunks, ready to be stripped of hardware and ultimately taken the the landfill.
Gallery 1 – Phase I


The Design
The design phase first required the services of a Hunt Test Dummy, size XL. Gunning partner “Uncle Al” is 6-foot-3 and is really skilled at lying on his back without moving. Before he stirred, I was able to locate both ends of the cockpit. Whereas a real boat designer would perform complex calculations involving volumes and surface areas along the length of the hull, I rely instead on intuition. To cover my bets, I erred on the side of the bow being a bit too buoyant and the stern being awash – a low bow and high stern would be both bad for gunning and potentially unsafe. Because so much of the hull would be altered – especially at the stern – there was no practical way to float test it first. Only the “sea trials” would tell me if I guessed correctly.
The design includes considerations of function, history and aesthetics. While the original Great South Bay Scooters evolved for working in, around and over ice on tidal waters in shallow bays, their use in the open bay did not, I believe, come into its own until batteries were outlawed early in the 20th Century. Scooters were used instead. Like the batteries, they were tended by a large “mother ship” and a stool boat. Gunners took turns. Although some retained the traditional ice-like white paint, many were instead painted a dark “Battleship Grey”, to hide among the waves in the Bay’s rich salt waters. And, their shape changed. “Whaleback” scooters had low gunwales and high-crowned decks; “pumpkinseeds” were wide and low. Most were built to accommodate one gunner at a time but, two-man scooters were built. The first one I saw – when I was still in elementary school – was a square-sterned skiff/punt belonging to Charles Horal, of East Islip. Charlie was a close friend of my Dad’s and owned one of the local gas stations – a Sinclair franchise when I was young. This boat – complete with a pair of butcher-coat-clad gunners – was featured in a Sports Afield article by Norman Strung in the November 1968 issue.
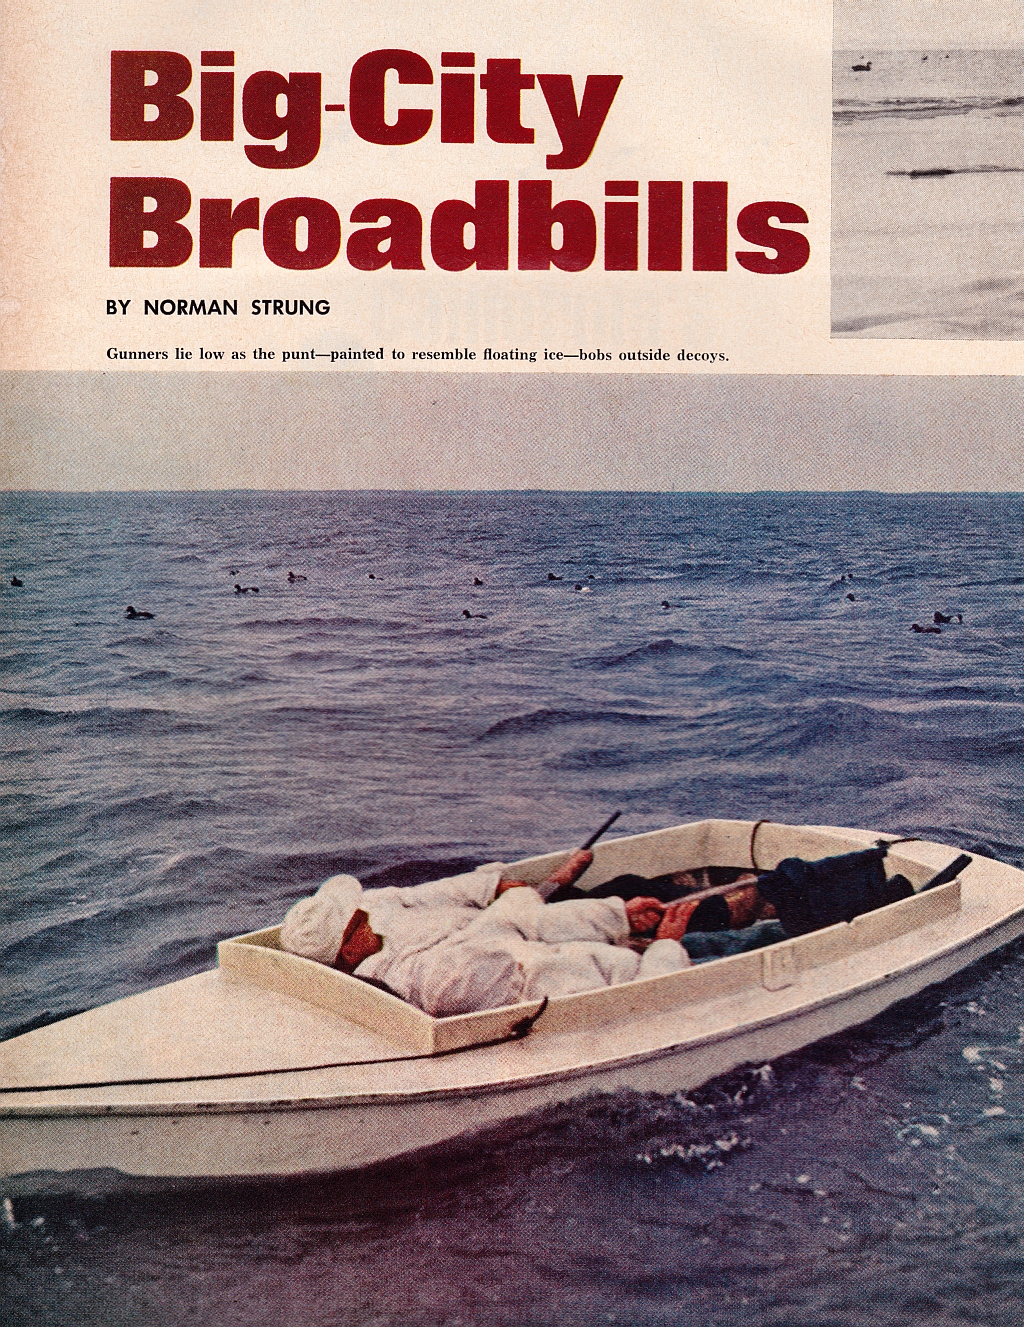
Horal 2-man Gunning Punt
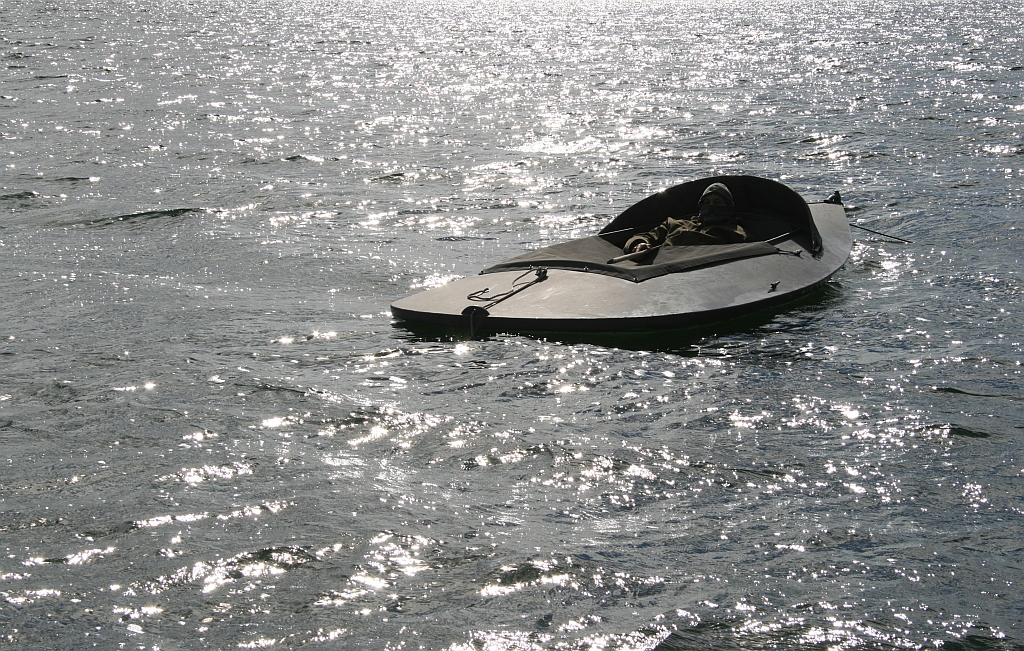
One feature I knew I would incorporate is a rounded stern – the fantail. It is practical – because it hides better than a conventional transom stern – it is beautiful, and it is a challenge to build. Our one-man Scooter – built by Benjamin Hallock of East Moriches – has such a stern.

Hallock (Sanford) Scooter
Gallery 2 – Design


Framing
A little bit of framing – installing the inwales – had to be done before the rest of the design could begin with any real accuracy. These inwales – longitudinal framing members on the interior of the hull where the sides meet the deck (the gunwales) – were made from nice, clear vertical-grain Douglasfir. My neighbor salvaged the lumber from the old gym bleachers at the local high school. Luckily for me, he could not use the “lip” of each board for flooring, so I now have a lifetime supply of these rippings in the loft – for future boats.
Because the hull from the Daysailer is fairly stiff and because these decks will not be walked on, the framing could be fairly minimal. Bulkheads are needed at both ends of the cockpit. Two partial bulkheads – knees really – are needed in the middle of the long cockpit to support its longitudinal frames (purlins). And, I wanted airtight floatation chambers at both ends and a storage compartment ahead of the actual cockpit for safety equipment and the like. So, a total of 3 bulkheads and 2 knees were fitted and ‘glassed into place.
Gallery 3 – Framing


The Bottom
The bottom, of course, is probably the most important part of any boat – it is also the toughest part to build. So, cutting down an existing hull saved lots of time and lots of work. Best of all, though, the shape of a Daysailer’s bottom is about perfect for an open water boat like White-Wing. Its wide beam and flat sections amidships ensure a roomy and stable shooting platform. Its fine and deep forefoot – unknown among conventional Scooters – will soften headseas and avoid the hard slapping that can happen when a shovel-nosed Scooter or Sneakbox is anchored mid-bay. The flat run – the aftermost third of the bottom – will make it easy to fair up to the fantail, at about the waterline.
Another major consideration is that this boat will be towed – no motor, oars or sails. I will do what I can to make sure she does not pitch or yaw or pound when pulled through a foot or two of a chop that could come from any quarter. She should behave predictably and arrive at “the spot” with a dry cockpit. Hence, the skeg – or is it a keel? I ran this “underwater fin” from just ahead of the centerboard slot back to where the run started to tuck up toward the fantail. So, it serves the role of a typical skeg but is located where a keel might be. Whatever its proper name, I am hoping it will help White-Wing stay on the same course as the towboat.
Gallery 4 – The Bottom


The Air Chambers
Traditional Scooters, of course, did not provide what we think of today as “floatation”. Craft built largely of white cedar would most likely float if filled with water – especially in salt water – but we now expect that a boat will float level with a full load of gunners and guns and provide a bit more time for rescue from a mid-winter bay.
Gallery 5 – Air Chambers


Installing the Decks
Putting the decks on any duckboat really brings the whole picture together. This step is especially exciting when you “design-as-you-go-along” as I like to do.
Gallery 6 – Decking


Coamings, Hardware & Floorboards
Now I’m coming down the home stretch. The boat itself is fully established – to my satisfaction – but it is often the details that make its use a pleasure – or not. This is the first round of details – the final touches come with the canvas and then rigging anchors and lines. Everything has to work together.
I am using conventional coamings – installed alongside the deck framing – to help stiffen the cockpit opening. I am using some nice clear treated Yellow Pine. The fore and aft coamings are the full 3/4-inch thickness but I planed the sides down to 1/2-inch – so they would bend into place.
Because this boat will be towed, there is not much deck hardware. The well-reinforced bow eye is for towing and to serve as the fairlead for the bow anchor. A pair of conventional cleats fore and aft of the cockpit secure the anchor lines (or maybe a painter up forward). The stern fairlead keeps the stern anchor in place – the anchor itself – a smallish mushroom – is a must in any open-bay boat, to prevent yawing and to keep the gunners pointed in the optimal direction. The pair of thumbcleats will keep the “lap canvas” (more about this later) in place but allow for easy freeing. Finally – as is typical on all of my gunning boats in recent years – I carved a sleeping duck into the bow handle. The sleeping posture avoids any annoying projections and the line of the “side pocket’ makes a comfortable hand-hold.
The floorboard and headrest keep everybody dry and comfortable. The floorboard is held in place with a cleat of the forward bulkhead and is held in place by a single wooden turnbutton. I decided against an actual drain (tube and plug) – at least for now – but left a “well” at the foot of the cockpit so any bilgewater can be sponged out at the end of a hunt.
Gallery 7 – Coamings, Hardware & Floorboards


Canvas
There are 3 pieces of canvas that work together to make this vessel safer, more comfortable, more effective and more convenient. The “cowling” is like a low spray dodger. It keeps errant seas out of the cockpit – and off gunners’ necks – but, more important, it keeps the wind out of the cockpit and it hides the silhouettes of the gunners heads. I decided to make it fixed (not lowerable) and out of canvas – but it could have been made out of plywood or ‘glass.
The “lap cover” serves similar functions. It keeps the gunners drier and warmer and also hides most of them. It is fastened (with “Common Sense” turn-button fasteners) to the deck at the aft end but is held in place up forward by shock cord looped over thumb cleats. This allows the gunners to sit up unimpeded when shooting and also to flip the cover off instantly.
The third piece of canvas is just a temporary substitute. I had not quite enough Sunbrella (a polyester canvas made for boat upholstery and covers) on hand – so I sewed up a cockpit cover to keep rain and snow and leaves (and varmints) out when the boat is not being used. I will sew a better cover that fastens around the cockpit and cowling with turn-buttons.
Gallery 8 – Canvas


Sea Trials
White-Wing’s first “sea trials” took place on a “sheltered” bit of water – the half-acre Hemlock Swamp here at Pencil Brook Farm. When full-to-the-brim, the Swamp’s waters can reach up above your knees. But, it served its purpose. The real purpose of the first test was to see how she trims. Up to this point, my design was driven by my educated guesswork. It is also useful to see how White-Wing would go on and off her trailer.
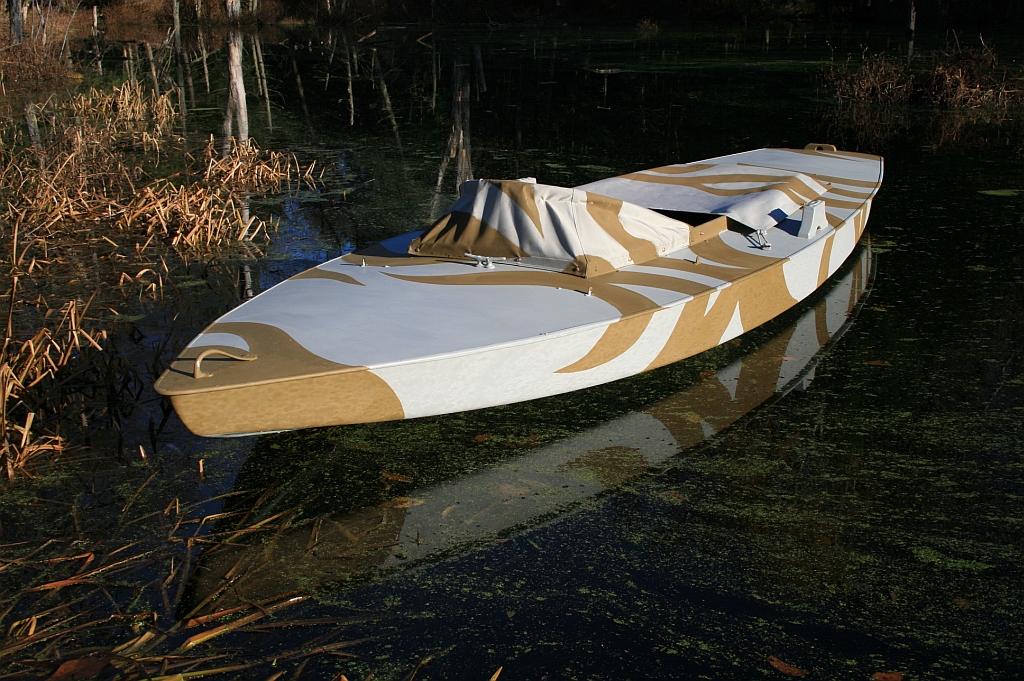
The real sea trials took place on her intended waters – Peconic Bay – a beautiful piece of tidal salt water between Long Island’s North and South Forks. She towed and laid well and – best of all – her new owner was very happy with her.
Gallery 9 – Sea Trials


Now we just need to start racking up the hunts – and memories – in White-Wing.
![]()

Looks pretty darn good to me Steve…
I love duck hunting boats, of all types!
Steve, you and I have shared pictures previously of the LL Bean decoys I refurbished with the help of your website. I’ve been reading of late, your write-ups of various boat projects – all of which are impressive and informative. This one was particularly impressive given the re-purpose of the O’Day day sailer. Well done!!