
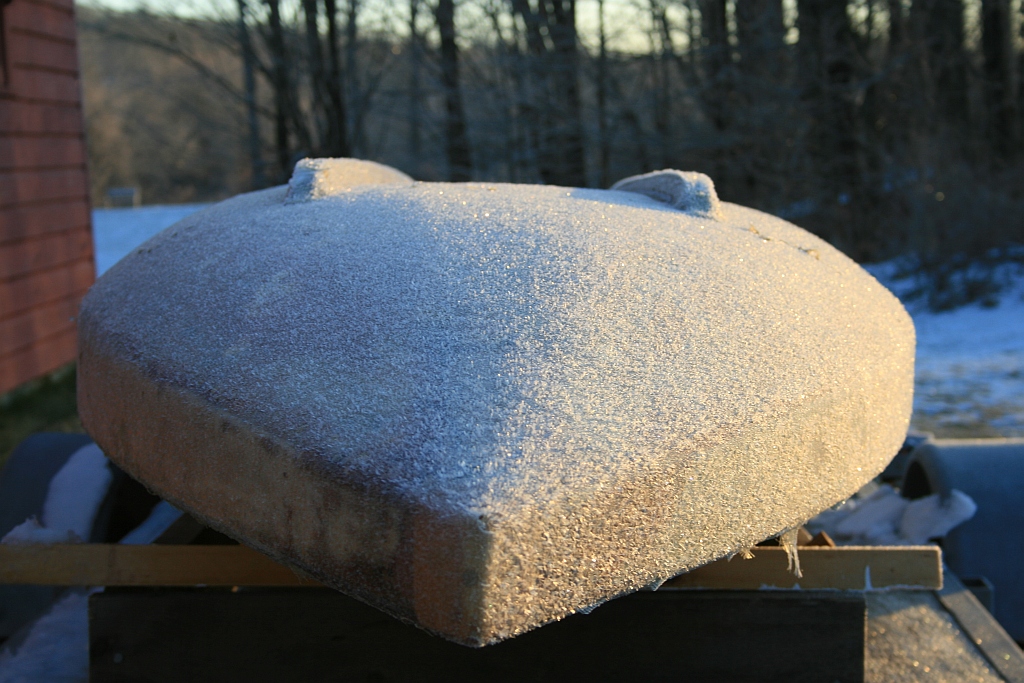
The rehabilitation of a classic Long Island gunning boat – and a family heirloom.

Here I am circa 1982 “piking” the Scooter across the ice of Great South Bay off East Islip – that’s the Captree Bridge in the background. This Scooter was built by Benjamin Hallock (of Center Moriches), probably in the 1920s or 30s. My Dad (Ted Sanford, Jr.) rescued it in 1954 or thereabouts. He designed and built the stool rack at about that time – I helped him with the “cowling” at the head of the cockpit in the late-1960s.

The basic difference between Great South Bay Scooters and Barnegat Bay Sneakboxes is the shape of the hull sections. The Scooters are U-shaped – flat-floored between the ice runners, whereas the Sneakboxes are round-floored – an arc of a circle. The Scooter was built for ice work and gets its name from being able to “scoot” so handily over the ice. I have a Scooter and a Sneakbox and enjoy them both.

As far as I know, the “cowling” and the stool rack are unique to this boat. My Dad designed and made them both. The cowling hides the gunner and keeps the wind out of the cockpit. The 6 pieces of the stool rack are all hinged together so that it folds into a single bundle that stows easily under the rear deck while gunning. We can carry as many as 35 Herters Model 72 Broadbill decoys.
Gallery 1 – Pre-op


The next phase was to strip the boat of most of its hardware and then do the major grinding – of ‘glass wherever it needs it and paint everywhere. This was an “outside job” – and I am glad to have it behind me. Fortunately, we got one of those priceless late-summer days with dry air, a light breeze and reasonable temps – what I think of as great working weather.
Gallery 2 – Getting her ready to come inside


The next steps include some simple repairs and preparation for refurbishing the ‘glass. My Dad got the boat around the time I was born (1953). I believe he ‘glassed it in 1954. He told me that he got the materials from a friend who was starting a fibreglass company and wanted feedback about the resins, et cetera. The man’s name was Niehemeyer (not really sure of the spelling….) and so the company – located in Lindenhurst – was called Neehi Protective Coatings, Inc.

The repairs included replacing the “stem” – the outermost part of a “breasthook” or “bowpiece”. It was made originally of oak and rotted when water works its way inside along the big galvanized screw eye that served as the bow hardware. The ‘glass had been compromised around the fantail, too, but there was no systemic rot there either. I was able to dry out the three pieces of oak that serve as the non-structural fairing pieces around the fantail and then saturate them with straight epoxy resin. The biggest job was identifying all of the serious imperfections in the ‘glass and then grinding, filling and fairing in preparation for new ‘glass wherever it was needed. I did not remove the runners for this job. I had replaced the original oak “stringers” with treated Southern Yellow Pine just before I left Long Island in 1994. The new stringers were bedded in 3M 5200 and got new fasteners all around. I saw no good reason to disturb all of that work – which is still sound.
Gallery 3 – Repairs


After ‘glassing the bottom, I took a hiatus from this project to build the 2-man Scooter White-Wing. So, this vessel had to “cool its heels” outside for a couple of months…..
Actually, I do not mind putting fresh epoxy out in the sun for awhile. Although it will break down after a long exposure, the Sun’s ultraviolet rays help to cure it – and make sanding and grinding a bit easier.
One of the first jobs once it came back inside was to make a new piece of hardware for the bow. The original Scooters simply bored a hole cross-wise through the oak “breasthook/stem” and spliced a painter through it. But, once the boats were covered with ‘glass, that approach invited rot too readily. My Dad installed a heavy galvanized screw eye. It served nobly for several decades but ultimately did allow fresh water to get into the oak. So, the new hardware needed to minimize any punctures through the ‘glass skin. As I anticipated, gunning partner and boatsmith Mark Mahoney had a piece of bronze rod in his shop – and so we (mostly he) fabricated a new fairlead for the bow. Because the end of the bow is no longer part of a large oak breasthook, I wanted to distribute the fasteners further aft on the hull. Six bronze screws and 3M 5200 hold it in place.
Gallery 4 – Bow Fairlead


The bottom got my attentions next. Lots of grinding and sanding with 60-grit – with my orbital sander hooked into a shop vac. I also “re-surfaced” the brass runners with 150-grit on my belt sander. The bottom now has 3 coats of flat white enamel but may get a final coat of gloss to provide a harder surface – where no ducks will see it shine.
Once upright, the decks got some fairing compound and some new ‘glass and then lots more grinding and sanding. Numerous fixtures were installed from bow to stern, each with its own critical purpose. Many of the original Scooters had canvased decks and, of course, wooden (white cedar) hull planking. So, many had a rubrail at the gunwales, at least from the forward end of the cockpit to the beginning of the fantail. I presume this protected the canvas and planking from the shovin’ oar or pike pole. Because these gunwales are well-protected with 2 or more layers of ‘glass, I see no need to install rubrails.
Gallery 5 – Bottom & Top


Finally, after turning it over in my mind for months, I decided to return this boat to its “original” pure white hull color. I was inspired to do so by 3 things. First, I visited the Long Island Maritime Museum in West Sayville (Long Island) when I was down in early January. All of those set up for the ice were pure white. Also, one of my favorite pictures of my Dad is of him dragging this Scooter over the ice off Nicoll’s Point in the early 1960s.

He did paint is in a variegated grey in the late 1960’s and I painted it a solid pale grey in the late 1980s. It’s how she was when this rehabilitation commenced. Pale grey is a good match for salt ice, particularly that right next to air holes when it can be a little “rotted” and semi-saturated with salt water. On the other hand, I really doubt it makes much difference to the ducks. If the Broadbill or Whistlers want into that air hole, a white “lump” at the edge will not keep them out.

Gallery 6 – Deck Fittings & Paint


The stool rack for this boat is an ingenious device. I am fairly certain that my Dad designed and built it. Unlike others that require hooks-and-eyes and other fasteners – often challenging to reach from within the cockpit – this 6-sided box folds up – accordion-like – and stows beneath the rear deck. It takes just seconds to rig or remove. It did, though, need lots of attention after its 2-decades abandonment. I think it’s now ready for another 20 years of faithful service.
Gallery 7 – Stool Rack


Although the interior of the hull still needs some work, I next turned my attention to most of the “accessories” that go with a Scooter. This drawing from The Hunter’s Encyclopedia shows some of the gear:
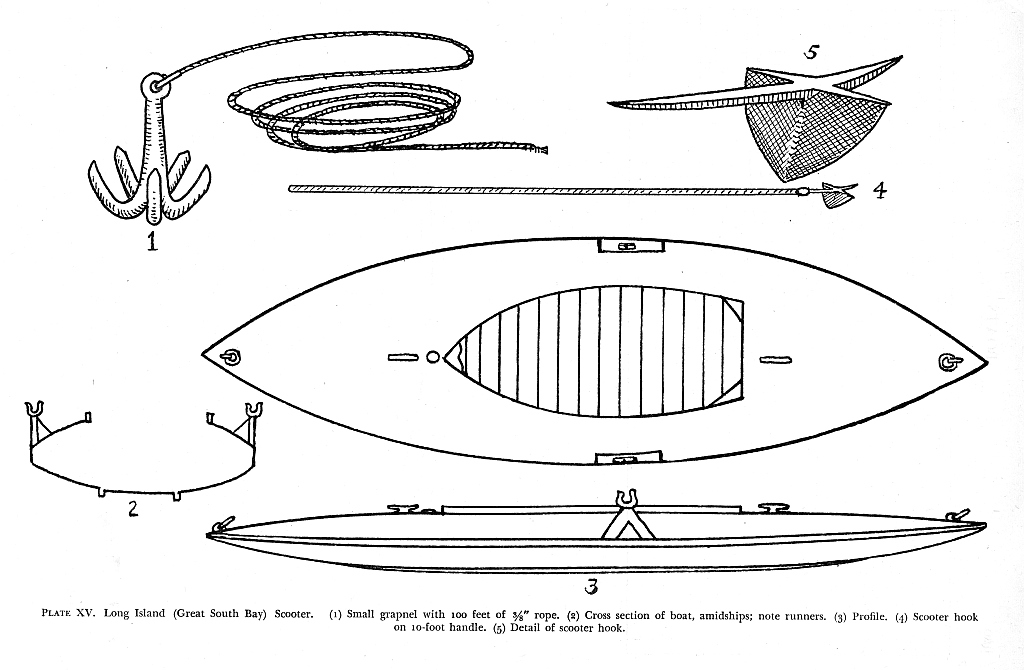
In addition to the bow anchor and the stern anchor plus the grapnel, our Scooter has always carried a pickup stick and a flag and a low stool that serves as a rowing seat and headrest. A pair of ash oars propel it in water and a pike pole gets it over and through ice and also gets you out of the water onto the ice. All of these need to be serviceable – and probably painted white.
Gallery 8 – Accessories


Next steps – repairing some frames and sewing some canvas.
Down the home stretch
There are lots of decisions to make when working your way through any project, especially very old wooden boats. Some decisions are simple, others fall into the “strategic” category. The biggest decision I had to make with this Scooter was how to deal with the many broken frames in the floor of the hull. Each of the frames was sawn from a pair of “hackmatack knees”. These knees are made from the part of a tamarack tree where the roots sweep outward from the trunk. Because tamaracks grow in wet soil, the root systems are shallow and so the roots meet the trunk at more or less a right angle. This is a good thing for small boats, whether in the floors or decks, because the grain of the wood can follow the shape of the hard bends and so retain much of the strength of the tree as it was grown. Unfortunately, however, the frames in most boats built to be light are inherently delicate. Light boats have “light scantlings”. Scantlings are the dimensions – the height and the width but not the length – of the pieces used to build any boat. The floor frames in this Scooter are 1-inch “high” (moulded dimension) by 7/8-inch “wide” (sided dimension). Each frame runs past its mate along the flat bottom of the hull and is fastened to the oak keel with copper rivets and to the whitecedar planks with copper clench nails. The flat part of the floor frames are mostly sound but most of each frame where it turns upward – at the bilges – has broken. So….what to do?

The Scooter enjoyed a comfortable winter – despite the sub-zero cold outside.
I decided to not replace each frame – and neither did I decide to use the conventional “sistering” fix (where a new frame is installed immediately next to the broken frame without removing the original). While “If it ain’t broke, don’t fix it.” does not really apply here, I do have the benefit of having lived with this boat for most of my life. As long as I can recall, these frames have been cracked or broken – and yet the hull does not move as one might expect. I have always attributed this happy accident to the ‘glass skin and the decked-over, almost “monocoque” configuration of the boat. Also, the stresses on any particular frame are probably transferred along the length of the hull thanks to the “strakes” that hold the brass ice runners. (Bilge stringers – on the inside of the hull – are often used in plank-on-frame boats for this same purpose.) Another reason (rationale, really) for not replacing each frame was that I would have had to remove most of the ‘glass to get to all of the fasteners – a job I simply did not want to do. So, my “strategy” had two parts. First, I relied on the work I had done almost 20 years previously – the last time the Scooter had been actively campaigned, just when I left Long Island. What I did then was to replace the oaken “strakes” that held the brass runners. The white oak strakes – probably 60 or 70 years old at that time, had begun to crumble. Even worse, water was finding its way through along many of the fasteners. And, whether the fasteners were in their original locations or placed there by my Dad in ’54 (when he got the boat and ‘glassed it), they also served to weaken the frames. The fasteners went right through the joint between the pairs of knees; many of the knees were cracked right at this location. So, in the late fall of 1994 I replaced the strakes with new ones fastened through the planking and not through the frames. And, I plugged the old fastener holes with dowels set in 3M 5200. The second part of my strategy was to add new floor frames in the “open space” of a few (3) frame bays. The fitted frames rely upon a bed of 5200 for most of the “fastening” job – I did not want to drill up through the sound ‘glass on the hull bottom – and a screw at each end simply served as a clamp while the 5200 cured. Time will tell if my strategy is sound.
The first job, though, was burning most of the old paint out of the hull – an “outside job” for the safety of both me and my shop.
Gallery 9 – Inside the hull


To the sewing machine
When I first knew this boat, the only canvas was a cover for a foam pad – to keep the gunner warm and comfortable on the floorboards. In the late 1960s – when I was in high school and always at my Dad’s elbow in the shop, we added the cowling. This precluded the use of the wooden hatch and so a canvas cockpit cover was needed, too. I replaced both – nothing lasts forever – in the 1980s – and I also made a lap canvas to cover most of me while actually gunning. All of these – thanks to age, weather, mice and wasps – needed replacement. Instead of the cotton canvas I had used previously, though, I would now use Sunbrella – a polyester that is the standard nowadays for boat covers and such. I use a simple Sears Kenmore sewing machine – a wedding present from my parents when Susan and I married in 1975. With the right needles and thread – and especially with pre-wound bobbins and Seamstick – the work is straightforward and – like many other “manual arts” – satisfying in its own way. Living as I do in dairy country (meaning: not boat country…), I order all of my canvas supplies from either sailrite.com or mainlandsails.com.
Gallery 10 – Canvas


All of the loose ends
After three coats of white paint – one primer, one flat, one satin – a bunch of loose ends needed attention. Winter is my time for oiling things like wading staffs, paddles, oars – so I oiled the handles on the oars – 2 coats of linseed oil with plenty of time to soak into the ash in the warm shop. I also decided to replace the cap for the mast partners – the hole in the foredeck though which the mast fits. I removed the brass sleeve, then cleaned it up and re-installed it. I guess I will never know for sure, but I think my Dad fabricated it back in the 1950s. Other Scooters I have seen simply have a bare hole bored through a reinforced section of the deck. Of my Dad’s many second jobs was one working in a machine shop – so he had the requisite tools, materials and skills. On the other hand, the cap itself was a factory-made pipe cap – heavy galvanized. I clearly recall playing with it from my earliest days – probably at age 3 or 4. I will certainly hang onto – and fully label – the cap for nostalgia’s sake, but I did decide to replace it with the more traditional wooden plug. Neighbor-to-the-south Kirk Fox is a world-class woodworker (fine furniture, cabinetry, millwork) who has a number of lathes and happened to have a length of 4×4 black locust partially turned. There was just enough “unused” stock for my needs. He made a beautiful plug with a simple but elegantly contoured shape showing above deck. It is a press fit – but I will put a “keeper” on it, lashed below-decks, just in case it wants to jump out in transit.
I also did one thing I have never done before – I put the name of the boat on her port bow. Most of my gunning boats are known to me simply as “the grassboat” or “the sneakbox”. I have named a few – Sweet Gherkin, Canvasback and White-Wing – but the Scooter was always just “the scooter”. I think it was my cousin Gary who gave me the idea: “You have to name it after your Dad!” And so I got comfortable with the idea and finally decided to take the plunge. Also, I decided not to paint it on by hand. I have always done so on my “pleasure craft” – and so I knew how time-consuming and painstaking a task it is. Instead, I found diylettering.com on the web, selected my font and size, and happily paid the $12.95 (no shipping!) for both the time-savings and the excellent quality – vinyl letters perfectly spaced. I am happy with the decision and happy with the result – but the artist in me is a bit conflicted. I am thinking it would look better – less imposing – if I had used letters 1-1/2 inches tall – instead of the 2 inches I chose. On the other hand, I am pleased to think that anyone passing me on the Thruway or Expressway can easily read my Dad’s name as they come alongside.
Gallery 11 – Finishing touches


Sea Trials ?

Back to the “sea” – first time since 1993
When a boat is fully rehabilitated and the paint is fully cured – and the lines and anchors are ready to go – and the trailer is empty – how does one conduct sea trials when Great South Bay – in fact any open water – is about 5 hours away? Well – like anything else – you do the next best thing. What I really wanted was just to get some nice portraits of the Ted Sanford as finished. And, for an ice scooter, a photo session on ice is not a bad second. At least 3 other craft I can recall have had their first taste of water – albeit in liquid phase – right here on the farm, in a quarter fathom of “seas”, in the Hickory swamp or, as in this instance, the Hemlock Swamp. With about 9 inches of dense, greasy snow, only the Massey-Ferguson – with chains – could haul the rig.
Gallery 12 – Sea Trials


The Ted Sanford will not see any gunning until next winter. I still have 2 tasks before me. The immediate one is to put the Scooter back in the barn and measure it inside and out. I want to make both lines drawings and construction plans. I need about a full day to take the measurements – and a couple or three days to produce good drawings. The other job is to have a good pike pole before next year. I need to get – or have made by a blacksmith – a good “scooter hook” to mount on the white oak handle I have ready to go.

Measuring & Drawing
As far as I can tell, plans for a gunning Scooter have never been published. While there are several plans available for Scooters built as sailing yachts, I have found no plans for a “workboat-style” Scooter . I believe Benjamin Hallock’s drawings for this boat (and his many other Scooters) have been lost to posterity. And so, I have spent much of the month of March measuring, re-measuring and drawing the Ted Sanford.
All the Pieces
Before actually measuring, I carefully inspected the vessel for construction details – to document how this traditional plank-on-frame craft was originally put together. I would imagine that any new Scooters would be built with more modern technologies – cedar-strip, cold molding, composite (‘glass) – but it would be nice to see a replica built, too.
Gallery 13 – Construction Details


Measuring
I began by measuring the location of each of the frames within the hull. In addition to a Breast Hook (stem) in the bow and a Harpin in the fantail, there are 15 frames – of 3 different types. The smaller frames near each end are sawn from a single board, most likely 1-inch whitecedar. The frames forward and aft of the cockpit combine a pair of sawn “Hackmatack knees” for the hull and a steam-bent “rib” of White Oak for the deck. (Hackmatack knees are “grown crooks” – sawn out of Tamarack trees where the shallow roots turn outward from the trunk.) The frames within the open cockpit use Hackmatack knees for both the hull and to support the side decks. The keel is 1/2-inch White Oak and the hull planking is 1/2-inch Whitecedar. These are fastened to the frames in two ways. The flatter parts of the hull – the middle 20 inches or so of beam – are fastened with copper rivets and roves. Outboard of that, at the turn of the bilge, copper clench nails are used. The decking is 3/8-inch Whitecedar and appears to be fastened with iron (steel?) nails.
The next step was centering the boat beneath my chain hoists and over a nice long sheet (4′ x 17′) of heavy white paper supplied by a friend.; I then leveled it both left-and-right and lengthwise. For the latter, I used the sheer-line (upper edge of the sides) as my point of reference – and later as the base-line for all offsets. With markers, squares, tapes and plumb lines, I was able to draw the Plan View of the hull “life-size”. I marked this up with many notes, including the location of each frame, the dimensions of the sides, and the radius of the fantail.
The most intensive task involved the measuring of the hull and deck contours. I built a jig for this purpose. It allows me to accurately “pick off” the elevations of the hull at 4-inch intervals – the buttock lines – using the frame of the jig as a steady and level point of reference. Each point was recorded in a notebook for later transfer to the drawing board.
Gallery 14 – Measuring & Recording


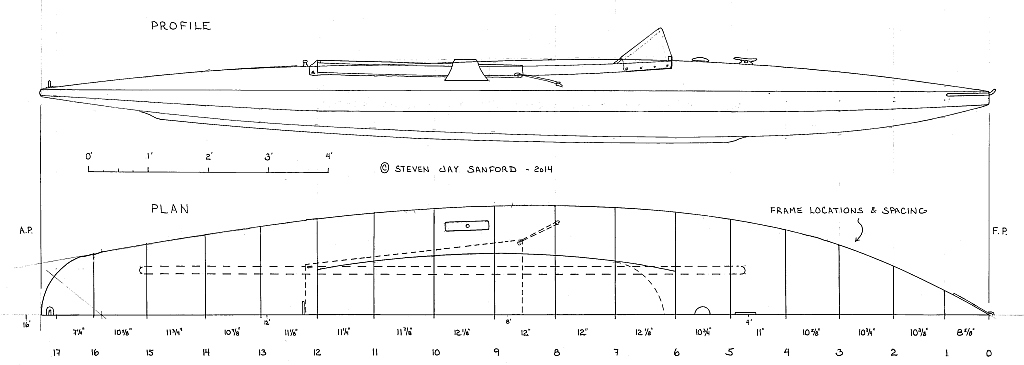
Drawing the Plans
Finally, I get to draw the plans. I do not have a drawing board (with T-square, etc) in my shop – so I really like graph paper for drawings where accuracy and precision are important. Also, I do not have “real” splines and spline weights for drawing all the curves on a boat. So, I improvised.
Gallery 15 – Putting It All on Paper


If You Want Plans
Anybody is welcome to take as much information from this page as they like – no charge! However, if you want to build a Scooter, I have already done a lot of work which would save any builder a day or two of lofting. I think the easiest thing would be to print out the 5 full-size drawings that I have had scanned. At this point, I am happy to provide them to potential builders for cost. I think the printing itself would be about $15. Add to that a mailing tube and postage and you would be ready to start. Just send me an e-mail and we can work out details.
![]()

nice work! I had one when I lived on the bay out of Amityville, LI from 1959-1978. Hunting Black duck. Wonderful times they were.
Tom Donnelly
Great job I love your read South jersey Sneakbox guy myself
well i have to say OUTSTANDING JOB well done.Id like a copy of them plans if ya get them made..
thanks for sharing..
sherm…
I have a Ben Hallock scooter built by L M Nickerson about fifty years ago. In great shape and due to age and illness, I am considering selling her. Any thoughts as to the fair market value of the boat? She is cedar planked over mahogany frames and currently located at my home in South Freeport, Maine.
Presumably Captain Daddy will provide potential purchasers of his craft with fair warning of the possible transfer of his genetically produced wildlife repellent which, although primarily focused on anti-bluefish actions, may very well include typical Scooter prey. No doubt the Morrison coda –neither fur nor fin nor feather– is still in effect.
Mr. Morrison,
If you are still looking to sell that old scooter, I will buy it from you and even drive up to get it from you. My grandfather worked at Nickerson’s boat yard building and repairing boats for the Suffolk county marine bureau, so he knew L M Nickerson well. My father has not been able to locate one of those old scooters so can you please reach out to me by email?
My father and grandfather, former residents of Center Moriches, used to own a few Ben Hallock scooters. If fact, my grandfather, Sidney “Vern” Hawkins was very good friends with Ben Hallock. They used to build those scooters together back then. My grandfather has blueprints for his own sneakbox as well, which became very popular to the few that owned them. If anyone can locate an old Ben Hallock scooter for me, please email me at ghawkins88@gmail.com. My father is retiring and I want to get him one for a gift so he can get back out on the Moriches Bay in good old fashion style.
Hi
Thanks for publishing this! I’m reading the Great South Bay chapter of Duck Shooting Along the Atlantic Tidewater, edited by Eugene Connet (Henry Fleckenstein’s copy!). Connet wrote the chapter and he described how the South Bay Scooter was used. It’s great to see your extensive construction photos of the boat. Thanks!
did you know my uncles and cousins the patins. they lived in Sayville ny. they built duck boats