
How to build one.
Born 1981, East Islip, Long Island, New York
I built my first coffin box in 1981 and drew up the plans at that time. I wrote up the building instructions a couple of years later and they were published in the newsletter of the South Shore Waterfowlers Association – “the voice of the Long Island waterfowler”.
Since that time, the plans have been revised (~1991) and re-printed in the same newsletter and years later posted on the internet. I have been very glad to see gunners from all around the country building these boxes – or some variant thereof. I am posting the plans and instructions here to encourage further use and sharing and variation. I have just built another pair this spring (2013) and have photo-documented each step in the process. The building instructions are presented both as a straight Narrative – albeit much more detailed than the original two-thirds of a page – and also as a Gallery/Slide Show. Although I am still pretty much an “original recipe” devotee, I encourage anyone to adapt the idea however best meets his or her needs.

Although the dimensions on the plans have not changed, some of the materials have. These are described in both the Narrative and the Gallery. If you print these out, I recommend you do so on 11 x 17 stock – which is there original size.
Please note that I am presenting here the Narrative first and then the Gallery/Slide Show. I you want to jump right to the Gallery, just scroll down through. Note, too, that the Narrative includes the history/back story of this box, the Gallery does not.
BUILDING A SANFORD GUNNING BOX
August 2013
These instructions are updated from the original plans and instructions. The plans were drawn in 1981 and were published along with building instructions in the July-August 1984 newsletter of the South Shore Waterfowlers Association, of Long Island, NY. I have revised these instructions based on experience – I’ve built or overseen the building of a dozen or so of these boxes – and on the availability of better materials.
The Story
Gunning coffins, or meadow boxes, or whatever you want to call them, have been around since the 19th century. I did not know this, however, when I hit upon the idea during a howling gale in probably 1967 or 68 – when I was 14 or 15. It must have truly been “a dark and stormy night” because there was precious little light as dawn came to Captree Island and the wind was roaring out of the southwest. I remember having to keep my head tipped down whenever I faced upwind, to keep from stinging my eyes. I do not remember all the details of the hunt; I do remember that my Dad and I were hunting along with Dick Simmons and his sons. I was with eldest son Richie at first light when we jumped a Snowy Owl within about 10 yards. Like most living things, the Owl had been hunkered down out of the gale. I also remember that there were Black Ducks everywhere and we certainly did not go home later empty-handed. What I most recall, though, is trudging upwind. I had no waders then, just hip boots, and so there was a lot of jumping of mosquito ditches and skirting the many potholes and larger ponds. Blacks were jumping from every little spot, usually surprising me, and almost always just beyond range. I do not recall if I even took a shot at these birds. But, I do recall thinking: If only there were a way to get down out of the wind and hide next to one of these potholes.
Of course, chasing ducks and geese on Great South Bay, we had the requisite grassboats and scooters. We generally hunted ducks over decoys and all learned to shoot by first lying on our backs and then sitting up when the birds presented the desired opportunity. So, what was needed for the interior of an island like Captree was something light that could be dragged out and then keep you dry and well-hidden when you lay down to shoot. A low profile was needed on the salt meadows. The salt hay seldom grows taller than your kneecaps during its growing season and usually lays down flat by the time the gunning season comes around. A Black Duck in a saltmarsh pothole can see danger coming from a long way.
The Design
I am guessing that I discussed my ideas with my Dad later that morning, perhaps on the drive home to East Islip, or perhaps over breakfast. My dad was always designing things right at the kitchen counter (which, of course, he had designed and built.) Most often he was drawing renovations to the house or custom woodwork for a customer but, not uncommonly, it was some sort of watercraft. Ted Sanford was not one to go out and buy what he needed – unless it was materials to build something he had first designed. Maybe this is part of being a duck hunter. In any event, I inherited or absorbed the same trait and can remember putting my first ideas on paper in my Junior High study halls. I drew something small, just big enough to contain me, and without rigid wooden decks. We had already added a canvas “cowling” to our Great South Bay Scooter – to hide our head silhouette and to keep the winds out of the cockpit. I used this same approach for the coffin. I wanted no “moving parts” but wanted to be able to get in and out of the box unhindered. Of course, thatching it with salt hay was never a question: the box and its inhabitant must be invisible to the birds. So, the “decks” would be made of fabric and would need to hold the grass. The other idea – an approach that separates this box from most other gunning coffins I have seen – is that it is built like a boat and not like a box; it is built like a hull and not like a cabinet – nor like a real coffin, for that matter. As a result, the bottom rockers up toward the bow and so it drags and tows easily. It is also fairly stiff and lightweight. And, like any boat, it is watertight.
Hull # 1
I did not actually build my first gunning coffin until 1981. I was working for New York State Department of Environmental Conservation in Stony Brook. As a young Wildlife Biologist, I had almost no money and my Dad still had all of our boats upstate, on Seneca Lake. I had a gun and decoys but only chest waders – no boat of any kind. I firmed up the design – making certain I could get it out of a single sheet of plywood. I laminated the headpiece out of clear red oak and Weldwood Glue. I sewed the cover out of heavy burlap and fastened it to the sides with thumbtacks – which I peened over inside. I taped the seams and ‘glassed just the bottom. I built it just long enough so that the soles of my boots would rest at a comfortable angle on the stern transom. As it happened, this size just fit inside my VW Rabbit, with the passenger seat folded forward.
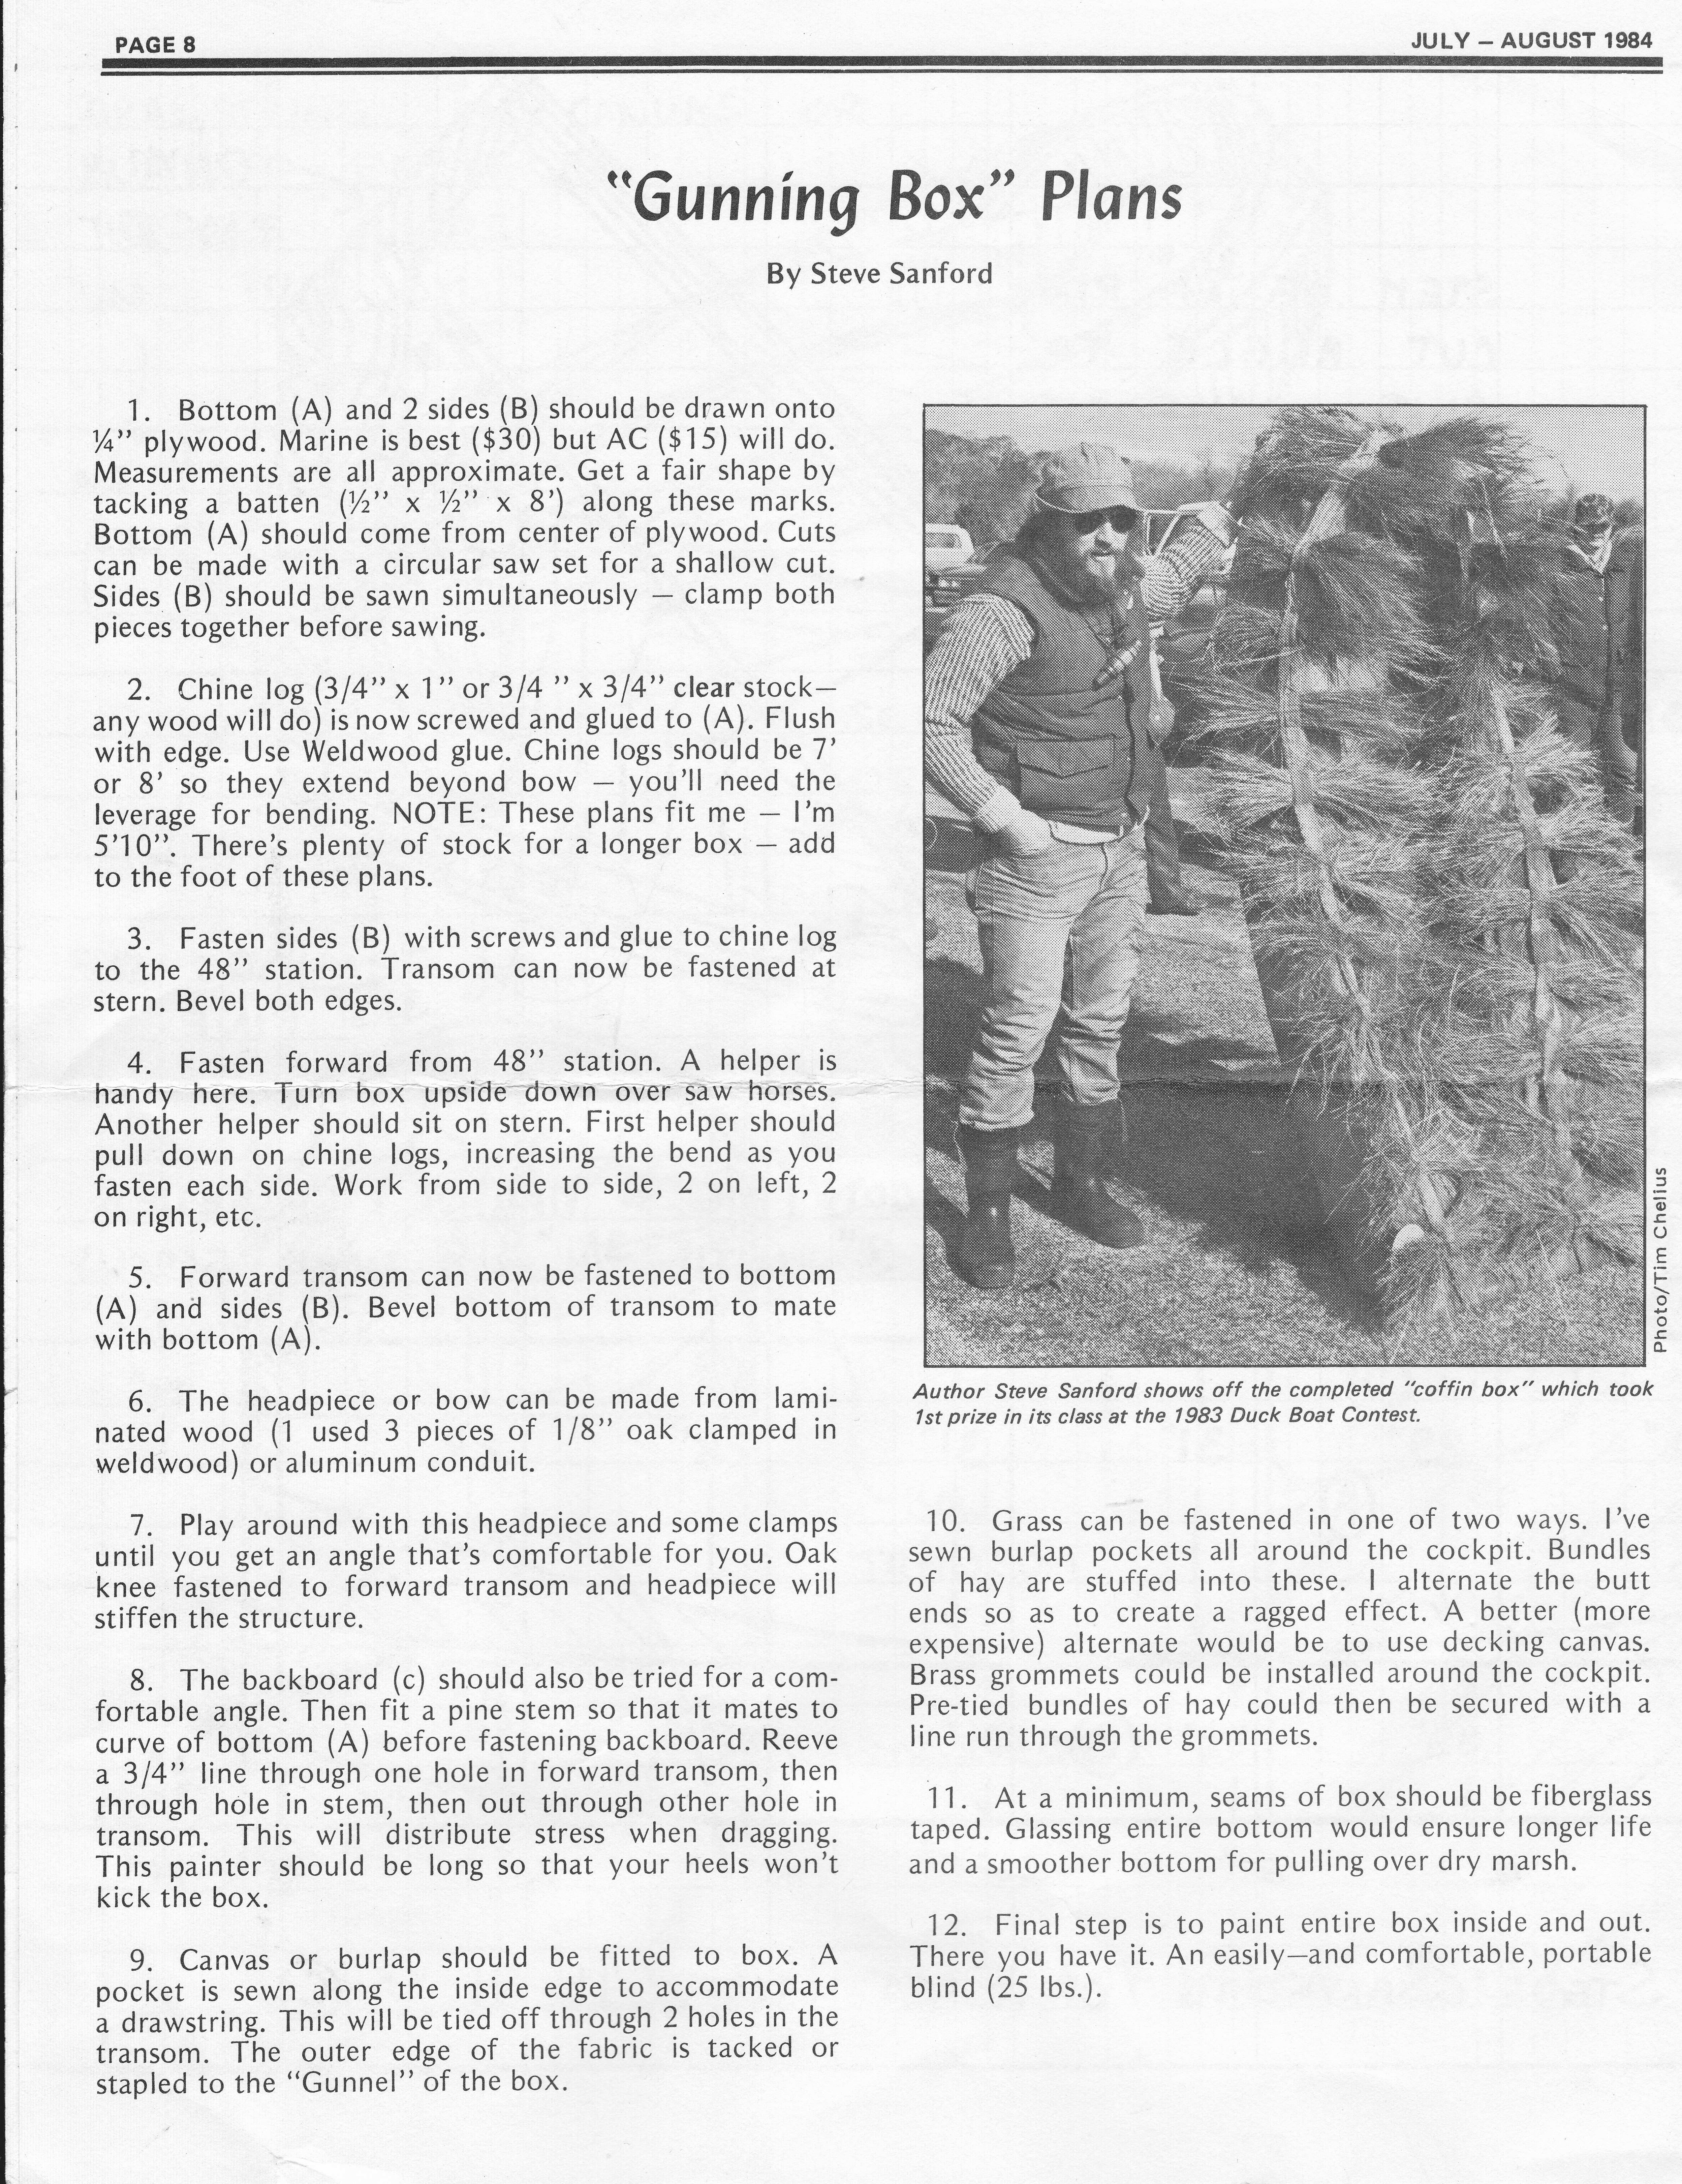
I shot a bunch of birds out of this coffin. Most were Black Ducks – including my first double on that species – but I’ll never forget my first drake Pintail, too. I entered the coffin in the 1983 Duckboat Show run by the South Shore Waterfowlers and took a blue ribbon. In fact, they created a Gunning Coffin category thereafter. Ultimately, I donated Hull # 1 to the Waterfowlers as a raffle prize. I built a couple more for myself and helped friends build maybe another 10 or so. I know that many others have been made from my plans. The New Jersey Waterfowlers and later the South Shore Waterfowlers have published one version or another of these plans, first in paper then later on the web. I have seen them around Long Island and at the Tuckerton Show. Thanks to the web, I just recently saw a post about a guy in Washington State ‘glassing his “Sanford-style Gunning Box”.
Hulls #2 and #3
Of the newer pair I built for myself, I had to abandon one during a storm. NJ Waterfowl Biologist Paul Castelli and I were hunting Thatch Island in one of the strongest winds I have ever hunted – at least from a boat. The northwest winds were certainly well into the realm of a full gale. I remember taking a nice drake Gadwall. We had motored out with my 2-man sneakbox, towing 2 coffins. They tow well with a long (~40’) towrope to keep them behind the wake and some stool in them to give them some ballast. We ran into trouble on the return trip. The tide had gone off and the motor was tipped up into shallow drive, churning the sandy bottom and making precious little headway. We labored our way up into the lee of Gilgo Island, but just barely. The second coffin – which I had built full-length to accommodate my taller gunning partners – kept capsizing whenever it caught a crosswind. We still had to get across Reynolds Channel to get back to the trailer. So, we made Gilgo and I hauled the longer coffin onto terra firma. I tied its painter to the base of a hightide bush, flipped it over, and hoped it would be there when I could get back several days later. Well, Paul and I surfed into a memorable (!) landfall at the launch site – the wind was direclly astern with a ferocious following sea. I never found the stashed coffin. I hope it is still being used to fool unsuspecting fowl somewhere in Great South Bay. The coffin I did tow home – Hull #2 – is still in use. For a number of years, I “thatched” it with cornstalks for ducks and geese hereabouts. It is now back on Long Island, in the capable hands of Ryan Chelius, who shot his first duck – a nice big Black Duck – from it in 2011.
I hope these plans continue to be used by many, far and wide. Please let me know if you build one. – SJS
Step 1 ~ Bottom (A) and both sides (B) should be lofted (drawn full-size) onto ¼ inch plywood. A good quality AC grade is sufficient; no need for marine-grade here. However, I do recommend that you put the bad (C Grade) side out. Any voids or flaws can be filled and then covered with ‘glass.
The measurements in the plan are approximate. Draw a center line down the length of the plywood then mark and measure the half-breadths on the bottom (A) and the elevations on the sides (B). Get fair shapes (no lumps or hollows in the curves) by tacking a batten (a piece of light quarter-round moulding works well) along the marks then drawing the line with a pencil or fine-tip felt marker.
NOTE: These plans fit me – I’m 5’10”. There is plenty of stock for a longer box – just add any length to the foot of the box.
Step 2 ~ First saw out the bottom board (A). Use a jigsaw with a good sharp blade or even a circular saw set to a shallow depth. If you are building more than one box, just stack all of the plywood sheets together so they can all be sawn at the same time. I have done as many as 5 at once.
NOTE: If you do stack sheets, keep them from sliding around as they are sawn. Two or 3 deck screws driven through scrap areas will prevent any movement.
Step 3 ~ Saw out the sides (B). As above, these pieces should be stacked. Even with a single box, the port and starboard sides can be sawn at the same time. Use a jigsaw, circular saw or bandsaw if you have one.
Mark the outside and inside of the bottom (A) and the sides (B). Mark the sides port and starboard as well. If you use AC plywood and ‘glass the entire exterior of the box, you can put the C side out and fill any voids (with Bondo or thickened epoxy) before ‘glassing.
NOTE: Steps 4 through 7 describe conventional construction techniques. This box, though, could be easily built using the “stitch and glue” method which uses epoxy, fillers and ‘glass tape instead of chine logs and fasteners. Steps 8 through the Finale apply to either construction method.
Step 4 ~ The chine logs must be clear stock with no wild grain. Many woods will do but I like cypress, Philippine mahogany (lauan) or vertical-grain fir; I would avoid yellow poplar because it is so rot-prone. They should be ¾ X ¾ X 7 or 8 feet long. If you want to get fancy, one corner can be rounded over with a router. This is most easily be done after the chine logs have been fastened to the bottom.
The chine logs should be “glued and screwed” (or nailed, stapled) to the inside of the bottom board (A), flush with the outside edges. Work on your bench with the outside facing up and the chine logs beneath it.
Titebond III or Weldwood glues are sufficient. Rather than using actual screws (3/4 flathead or deck screws), I prefer bronze boat nails, like Anchorfast, #14 x 7/8”. (I usually mail order mine from Jamestown Distributors or Hamilton Marine but I’m sure there are other places. In fact, when I built my first box, my local lumberyard had them in bins, to be purchased by the pound.) They are superior to screws for plywood construction because they do not require a countersink that unnecessarily removes wood right where you need it. And, they make for quick work. Another possibility would be a pneumatic stapler.
Start fastening the chine log at the head end; leave about 1 inch overrun so the first screw, boat nail or staple does not split out the chine log. Start the first fastener about 2 inches in from the forward end because the forward ¾” of the chine log will be cut off later on. Most important: start all of the boat nails in the plywood before you start driving them into the chine log. Start them every 3 inches for the first 30 inches and then every 4 inches thereafter. As with the first fastener, drive the final one about 2 inches before you get to the foot end. Starting the nails saves lots of frustration and makes driving the nails home a one-handed job – which is very helpful because you will probably be forcing the sides into place with your “free” hand. Clamp the first nails as soon as they are driven. Let the glue cure fully (usually overnight) before starting the next step.
Step 5 ~ If you have not yet rounded over the inside corner of the chine logs, now is a good time to do it with a router (I use a 3/16” roundover/bullnose bit) or chamfer it with a block plane. Also, if there are spots where the bottom (A) is a bit “proud” of the chine log, fair them of with a plane, rasp or sander.
Next, trim about ¾ inch from the forward and aft ends of the chine log. This is a step that, if done right, separates the boatbuilders from the carpenters (!). The cut needs to be a compound miter. Use a dovetail or Japanese pull saw. The top bevel is cut on a line parallel to the leading edge of the bottom board (A). The side bevel is cut on a line parallel to the leading edge of the sides (B). The purpose is to allow the bow transom (E) to fit in place without having to notch the corners. If this joint is not tight, it’s OK to just bed the bow transom into a filler (caulk, thickened epoxy) so that moisture – and potentially rot – cannot get a foothold in this space. The bevels at the foot are cut in the same way except that the stern transom is installed with rearward “rake” (beveled 2 inches off vertical).
NOTE: When completed, the sides lean in (i.e., they have “tumblehome”) along the forward portions of the hull. This can pull the plywood sides away from the chine log. To avoid this, the chine logs should be beveled inward before fastening the sides. With the bottom board clamped to your bench and the chines hanging out in space, it is easy to plane the bevel. Start from 48 inches back from the bow and work forward. Plane a bevel (inward) to about 3 degrees. This increases to 6 degrees at 36 inches and then to 9 degrees at 24 inches. The bevel straightens back up to 6 degrees 12 inches back from the bow transom; at the bow it is again plumb. (BTW: This is how “real” boats are built.)
Step 6 ~ Fasten the sides (B) to the chine log. Start at the head end. Work with the bottom side down but clamp the forward end down to the benchtop. It’s very useful to have a helper for this step but bar clamps can do the trick. Use the same glue and screws, boat nails or staples as described above. The outside edge of the sides (B) should be flush with the inside of the bottom board (A). As with the bottom board, fasteners should be driven every 3 inches. Try to stagger them so that they “miss” the fasteners in the bottom board. If you are using boat nails, “start” each one first – as you did on the bottom board. Then, after driving the first one, clamp the side (B) to the chine log until the glue is fully cured.
Step 7 ~ Fabricate the bow transom and the stern transom. Use ¾-inch pine, cedar or cypress; again, I would avoid yellow poplar. Note that all 4 sides of the bow transom must be beveled so that it mates with the bottom board (A) and the sides (B) and so that the upper edge does not chafe the canvas. The stern transom must be beveled on its lower edge and both sides. Both transoms should be fastened and glued the same as the chine logs.
Instead of a separate handle on the stern, I cut a hand hole in the stern transom. I make a slot by boring 2 1½-inch holes 3 or 4 inches apart and then connecting them with a jig saw. It is easiest to cut this hand hole before you install the stern transom. And, although you will eventually round over the edges of this hole, it is better to wait until the box has been ‘glassed to do so.
OPTIONAL ~ Some gunners have added either inwales (on the inside) or rubrails (on the outside) along the gunwales. My original box had none, but, they are useful for stiffening the box and fastening the canvas. Obviously, they add some weight. Either way, now would be the time to install inwales. Rubrails would be better installed after ‘glassing the box. Fasteners can be boat nails, panhead s/s screws or heavy staples. These rails can be thin, perhaps ½-inch thick by ¾-inch wide.
Step 8 ~ Fabricate the headpiece or bow (D) to support the canvas according to the dimensions shown on the plans. I have made them out of laminated oak (three 1/8-inch-thick pieces glued with Weldwood or epoxy) but also out of ½-inch thinwall conduit. Bending the conduit around a jig takes just a few seconds. I clamp the conduit at top dead center and then pull both legs toward me. I flatten the ends with a vise and a ballpeen hammer. I then round off the raw steel on a bench grinder and then sand the edges so that they won’t be cutting gunning clothes – or the gunner. Then, I drill a 3/16-inch hole so that a pan head machine screw can be used to fasten the headpiece through the gunwales.
Step 9 ~ Mock up both the backboard (C) – which can be cut out of the plywood – and the stem. The Plans show the stem and the knee made as separate pieces, from lumber. You may prefer to make it a single piece, from ¾-inch plywood. Either way, play around with the angles and dimensions so that you are comfortable and can see well. I like a backboard vertical enough so that I can see my toes (and thus my rig) without craning my neck. Note, too, that the backboard really supports just your upper back (shoulder blades) and not your entire back like some layout blinds I have used. Once you firm up your measurements, fabricate the stem and knee and then install them with glue and by screwing into them through the bottom board and the bow transom.
The backboard, too, can be fastened now but you might want to wait until after the inside of the box has been treated with either wood preservative or paint.
OPTIONAL ~ Having your towline (painter) pull through both the bow transom and the stem is the best way to distribute the stresses. This is the way I have built my earlier boxes. However, if you will be towing your Gunning Box behind a boat, the holes in the bow transom can allow water into the box. On my latest box, I have fashioned a wooden “cleat” through which my painter will be spliced. After the box has been ‘glassed, bolt it through the transom and back the nuts up with s/s fender washers.
Step 10 ~ All of the outside edges and corners should be rounded over. I used a 3/8-inch roundover bit in my router followed with a rasp and coarse (60 grit) sandpaper as needed. The bottom edge at the foot is difficult to round over with a router because of the rake of the stern transom. I use a rasp and a Surform for this area. These edges all need to be rounded both to prevent the unavoidable nicks and dings but also to accept the ‘glass.
Step 11 ~ You can cover the entire Gunning Box with ‘glass or tape just the seams and ‘glass just the bottom. Either way, I recommend first sealing all edges and corners with epoxy resin, thickened to fill any voids as needed. And, if you put the “bad” (Grade C) side out, fill those voids, too. Once that has cured, sand lightly with 80 grit then complete the ‘glass job. I would use 6-ounce cloth and epoxy resin.
Step 12 ~ Once the ‘glass is cured, you can: install any bow hardware or the towline (painter) itself. The painter should be heavy enough to be comfortable in the hands (no less than ½-inch diameter) and be long enough so that your heels do not kick the box when you are dragging it over a half-mile of saltmeadow. If you are boring holes in the stem and bow transom, round the edges of each hole to avoid chafe, reeve the line through all 3 holes and then splice the line about 6 inches ahead of the bow transom – so it can serve as a lifting handle when your box is full of decoys and other gear.
Step 13 ~ Protect the interior with either wood preservative or paint. I used to mix a little duckboat paint with Cuprinol Green to both protect the wood from rot and darken the raw plywood. I imagine some of the products for protecting decks might be a good choice – or just thin whatever duckboat paint you will use on the outside of the box.
Finally, if you want to put rubrails on the box, now is the time to install them. You could fasten with boatnails and glue or panhead s/s screws with an adhesive caulk. The caulk is better because it can better prevent moisture from hiding in there – probably only important if you store your box outside during the off-season. I use ¾ inch cypress fastened with 5/8 inch staples and thickened epoxy. Once fastened, the upper edge should be rounded over to prevent chafing the canvas.
Step 14 ~ The canvas should now be fitted to the box. Or my first box, I used burlap (the dense weave, not the open stuff). I first sewed the pockets around it to hold bundles of salt hay. I also sewed the inner “hem” to take a drawstring (actually ¼-inch nylon line). Burlap is fine but will only last a couple of seasons. Canvas, especially Sunbrella boat canvas (which is polyester) will last a lifetime. On my current box I used Sunbrella with 2 rows of 3/16” shock cord that runs through pairs of brass gromments around the box to hold hay (or cornstalks). Rather than stuffing hay into pockets, I will tie the bundles to the webbing. The grass breaks less if it can move a bit. And, I have also started to make a “snow coffin”. It’ll be painted white and will need no pockets for camouflage.
Any canvas can be fastened to the edges of the box in a number of ways. If you have inwales or rubrails on the gunwales, you can use panhead screws or even snaps. If you just have the ¼-inch plywood sides, I would use ¼-inch Monel staples and an adhesive caulk. Once the canvas is attached along all 4 edges, the drawstring should be run through 2 holes bored through the stern transom. Once it is pulled taut, it will keep the canvas over the headpiece.
OPTIONAL ~ One other feature I add is a set of handles in the middle of the box. They are very helpful when lifting a box over the side of a pickup bed, for instance. I locate them by balancing the box on a single sawhorse. Then I use the nylon webbing fastened 2 inches either side of the balance point and just long enough to fit your gloved hand.
Step 15 ~ Now paint the outside of the box. I like Parker’s Marsh Grass but lots of finishes will work, including flat latex paints or a solid (opaque) stain of your choice. I also paint the canvas, thinning the paint as needed.
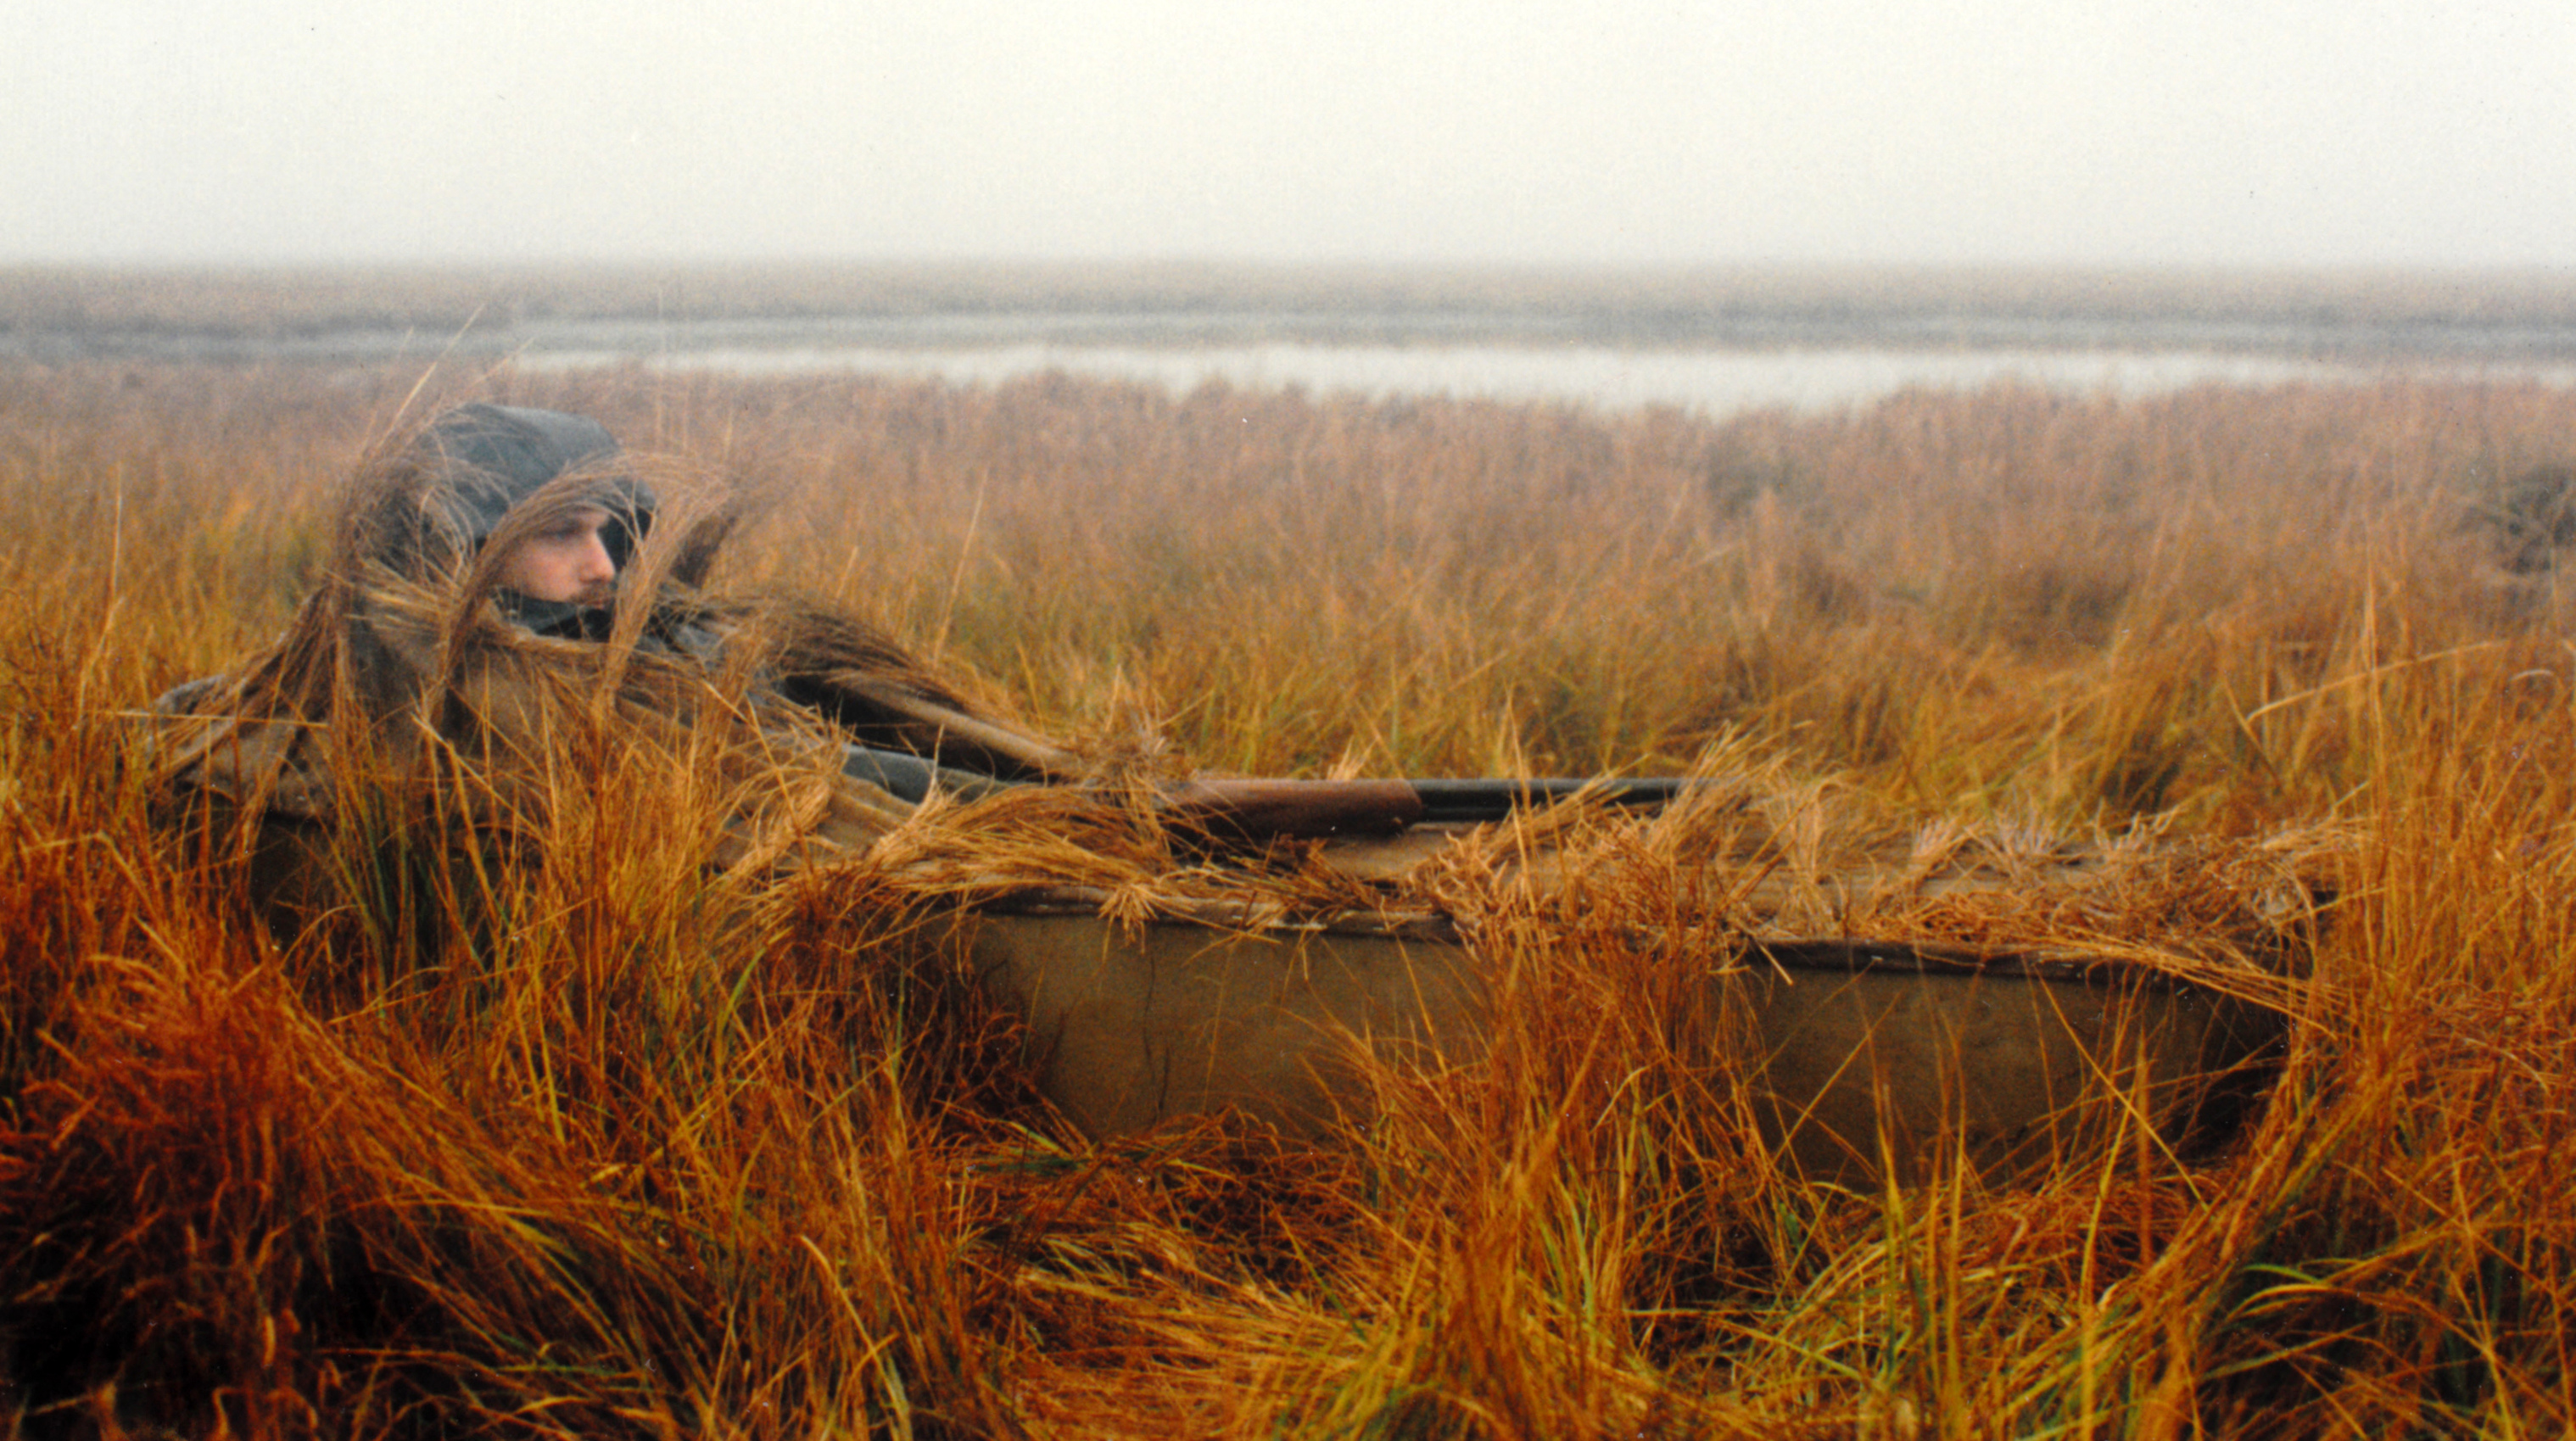
FINALE ~ Now you are ready to thatch your Gunning Box. When I use salt hay, I alternate the ends of the hay in each bundle to maximize the “ragged” effect. Also, when I am actually setting the box to shoot from, I usually grab some wrack (eelgrass, sea lettuce, marsh grasses washed up along the high tide line) and place it over one corner of the box and maybe somewhere up near the head – to break up the symmetry and outline. But, I will say, over the years, there have been plenty of Black Ducks that had no idea I was anywhere on Great South Bay…until I sat up to shoot.
Gallery/Slide Show Building Instructions
Below are 6 Galleries – in order of construction – that include images and a caption for each step.
Gallery # 1 – Layout & Cutting


Gallery # 2 – Assembling Bottom & Sides


Gallery # 3 – Transoms & Stem


Gallery # 4 – Fairing & ‘Glassing


Gallery # 5 – Headpiece & Gunwales


Gallery # 6 – Paint, Canvas & Thatch


![]()

I think this is one of the most significant information for
me. And i am glad reading your article. But want to remark on few general things, The site style is wonderful, the articles is really excellent : D.
Good job, cheers
The plans adapt really well to stitch and glue. I’m finishing one up now using that technique and it has been really easy to put together even for me.
Hello my name is josh and just built a box from your design and its outstanding. Paul Castelli is my neighbor and I had bought a duck machine sneak box from him about 6 years ago. Small world when it comes to duck hunting I guess.