
One Bean’s Coastal and dozens of Herter’s
Having received numerous requests in recent years for a painting tutorial on Canada Geese, I will take you step-by-step through the repair and re-painting of a single cork decoy made and sold by LL Bean. Just before I developed my habit of photo-documenting each step in most of my projects, I had repaired and re-painted about 3 dozen Canada decoys – all made by Herter’s.

Rigs re-painted in 2013. L – R: Herter’s Model 92, Herter’s Model 81, Model 81’s with pine heads
I have often thought it ironic that 2 of our most common waterfowl species – the Mallard and the Canada Goose – are also the most challenging to paint. One reason is that these birds are very familiar to us – so we know if something’s not right. More important, though, is that satisfactory paint jobs – even for simple gunners – requires blending the paint, mixing patches of color right on the decoy itself. The concept of blending can be a bit daunting for anyone unpracticed with brush and palette, but – like many things – proves to be easy once you know how. I will try to convey that “know how” here.
Start with the repairs
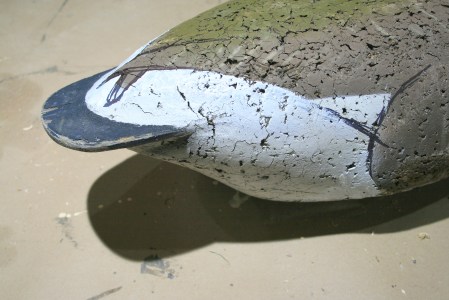
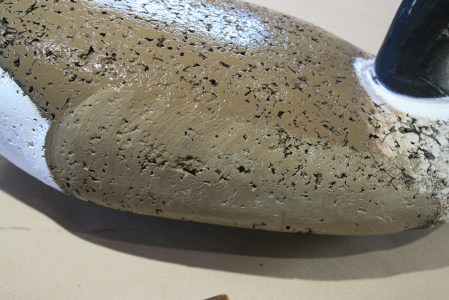
This single LL bean Coastal Canada Goose came to me with good paint but a beat-up head and the usual signs of wear and age.
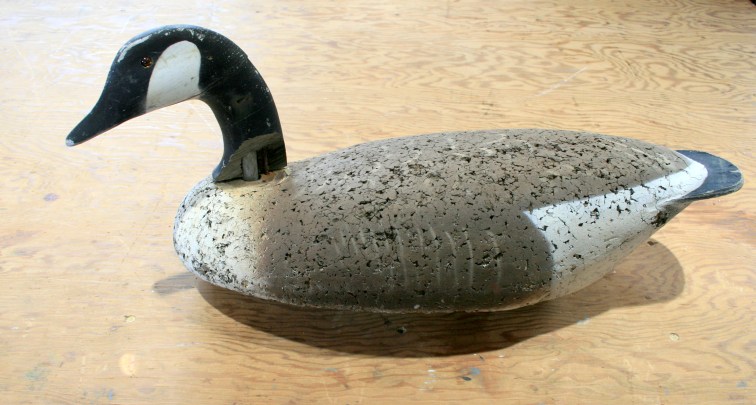
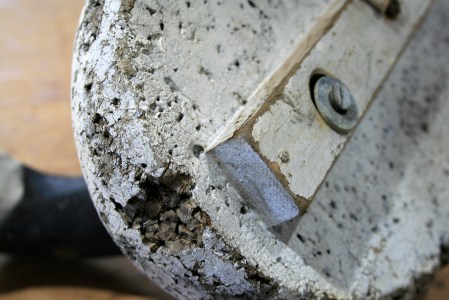
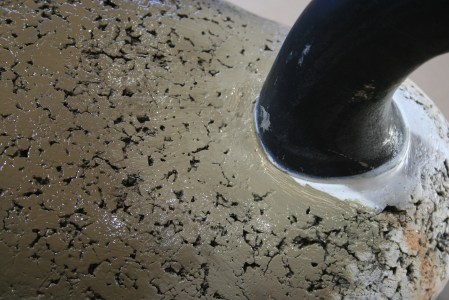
Bean’s heads are held in place with a dowel and a metal pin. The wood screw on the bottom can be loosened and the head turned to positions located by the pin. The big missing chunk of the Pine head shows the steel pin that was placed in the “straight ahead” socket in the body.

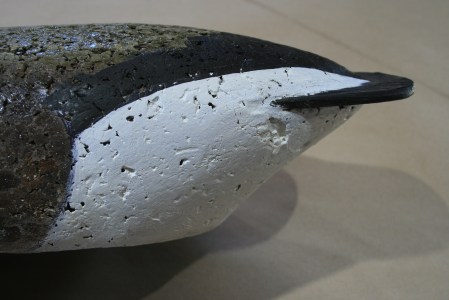
The body is in fair shape – but there are a few areas where the missing cork will need to be filled.

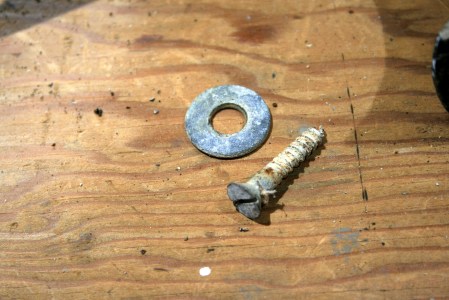
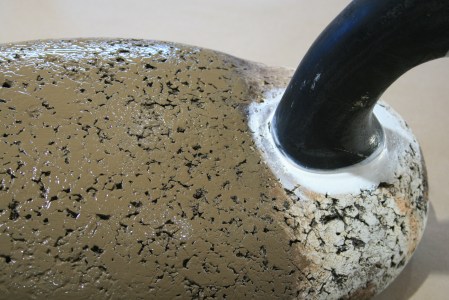
A galvanized steel wood screw and washer hold the head. These will be replaced with stainless hardware during re-assembly.
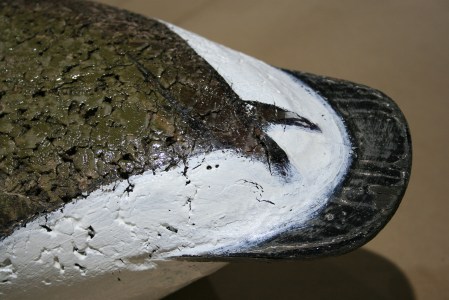
The steel pin – probably a common nail – was pitted and brittle from rust. Steel and saltwater do not get along well for very long.

Replacing the missing Pine is made more challenging because the dowel could not be easily removed.

This head has suffered numerous indignities over the years.
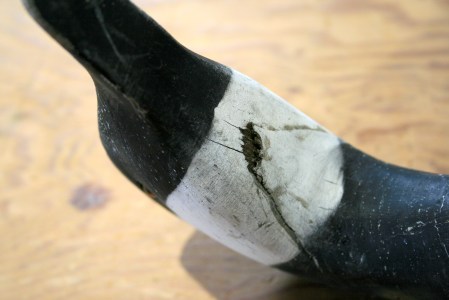
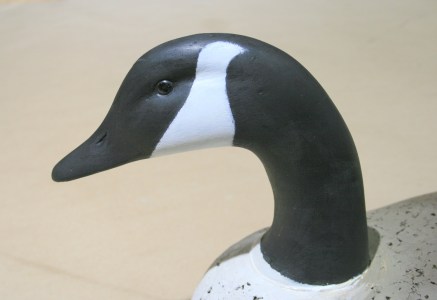
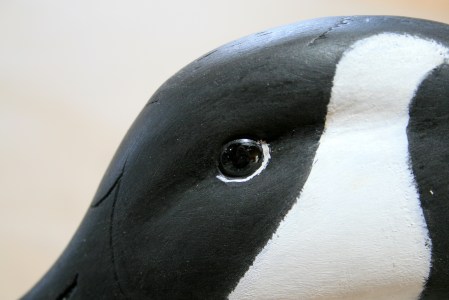
Canada Geese eyes are dark brown – almost black – so these amber eyes will be replaced when I carve the head.

After carving the missing area generally flat, I notched a new piece of White Pine to fit around the dowel. I used U S. Composites’ marine epoxy (1:3 Medium Hardener) thickened with their Fairing Compound – a mix of phenolic microballoons and fumed silica (aka Cabosil). A large spring clamp provides enough clamping pressure for this job.

Here it is re-carved and with a coat of Black Gesso on the raw wood.

I carved an “eye channel” and installed black eyes. I also burned in the bill details. These are features appreciated only in-hand – when you are setting or picking up the rig. They do not take much time but provide an added sense of care and quality. The entire head is painted in its final colors before it is sealed with spar varnish. I do this on most gunning birds because use and wear can easily expose raw wood. This provides one more level of protection.

The stock keels have hard edges. I always round them over – with plane, rasp and sandpaper – to protect the paint on other decoys. You can also see the sealer coat of spar varnish here.

The missing cork areas were filled with the epoxy + Fairing Compound mix. I mix it fairly stiff – to peanut butter consistency – so it will not sag during the cure. The microballoons – which give the red color – in the mix make it easy to sand afterward.


A light sanding of the cured spar varnish with 80-grit and we are ready for re-assembly.

I bored the pilot hole deeper – to receive a #10 x 2-inch S/S self-tapping panhead screw.
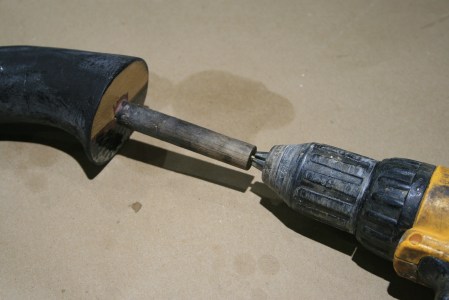
I replaced the rusty steel with a length of 1/8-inch brass rod.

The heads on Bean’s Coastals were originally fastened dry. I use a paintable caulk for 2 reasons. First, I want to make sure there is no space between the head and the body into which the anchor line can get wedged during use. Also, I think it’s healthy to keep water out of the area, potentially finding its way into unsealed cork. I do not use a strong adhesive caulk – like #M 5200 or PL – because I want to be able to remove the head easily should more repairs be needed in the future.

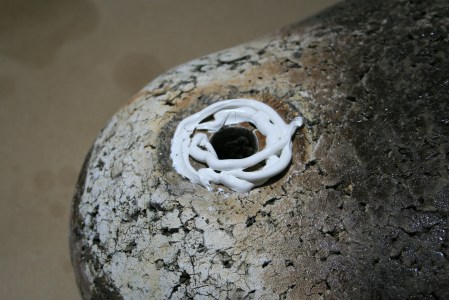
The panhead screw is joined by a S/S fender washer – all set in the caulk. Make sure there is plenty of “squeeze-out” so the head-body joint is tight.


An index finger is the best tool for fairing the caulk around the neck.

The Painting
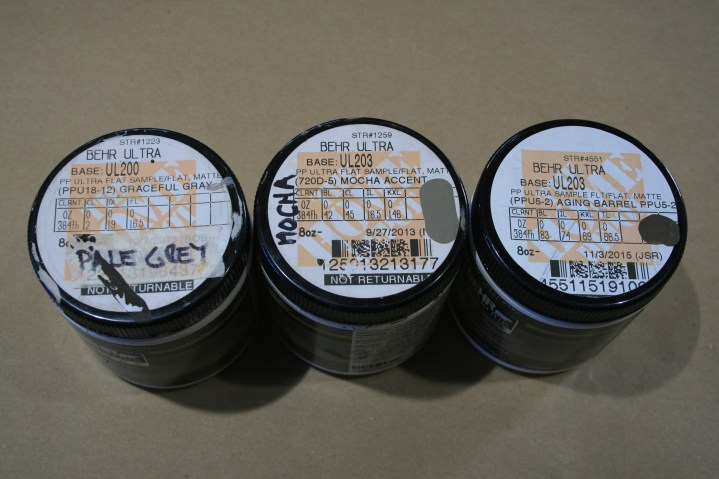
My usual approach on cork birds is to seal the entire bird with spar varnish, then lightly sand – with 80 or 100-grit sandpaper. My topcoats are flat latex house paints. I have adopted Behr paints from Home Depot for 2 reasons. One, it is available in 8-ounce sample jars for just a few dollars each. So, I do not have to buy – and store – and waste – quarts of colors I rarely use. The other reason is that most gunners have a Home Depot nearby. Since mixing colors can be challenging, I try to save that for others by selecting from Behr’s available colors.
Here are the colors – in addition to Flat Black and Flat White – that are needed for a Canada Goose. Happily, these colors can be used on other species as well.
Aging Barrel – PPU 5-2
Mocha Accent – 720D – 5
Graceful Gray – PPU 18-12
I use just 3 brushes for the simpler paint job. The general rule is: Use the largest brush you can. Also, stiff “flats” – square-tipped bristles – allow you to both pull and push paint around on the decoy. When “dry” – with most of the paint wiped out of the bristles – they are also handy for blending and stippling. The largest brush below is an old “chip brush”. I cut its bristles short so I have more control. The angles brushes allow me to get crisp edges when I want them.

Always begin to paint at the tail and work forward. This mirrors the overlap in actual feathers and helps to achieve a natural look.
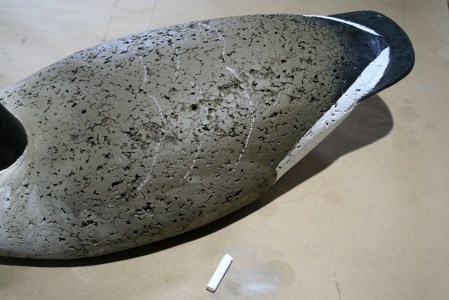
There are numerous ways to handle the tail section on Canada Geese. Here is the rump on a Herter’s Model 92 – their oversize Goose decoy. Note how the tips of the wings (primaries) end before the black tail feathers.

Here is the Herter’s Model 81 – their life-size Goose decoy. Here they molded the wings all the way out to the end of the tail feathers – but spread them to reveal some of the white upper tail coverts.
I initially set out to show crossed wingtips and some of the white upper tail coverts. I went so far as to paint the entire white tail section – but then changed my mind. Notice, though, that I did carry the line on the wing feathers right down to the side feathers – whereas Beans had curved them upward too soon.
I applied the Flat White with a 3/4-inch “flat” – a stiff-bristled, square tipped brush. Flats are handy on gunning decoys because you can both pull and push the paint where you want it.

After observing scores of photos on Google Images and because the Beans Goose body is a bit small for the head – in my opinion – I carried the flight feathers – primaries and secondaries – all the way aft onto the black tail feathers. It improves the apparent proportions of the decoy.


The primaries and the rear edges of the secondaries are dark. So, I drag the back color – Aging Barrel – onto the Black primaries and secondary edges with a dry brush.

I paint the entire back with Aging Barrel and also carry it about half-way down the sides.

Stop just behind the base of the neck.
While the back paint is still wet, paint the lower sides and lower breast with Mocha Accent. Drag it up along the side feathers to suggest the slightly curved edges of the side feathers. The curves are upward and forward.
The lower inch of the breast gets the Mocha Accent, too.

Paint behind the neck with Mocha Accent and blend it into the back color.
Paint the breast Graceful Gray and blend it into the lower breast, the sides and behind the neck.
Bring the Graceful Gray up onto the forward part of the neck base.

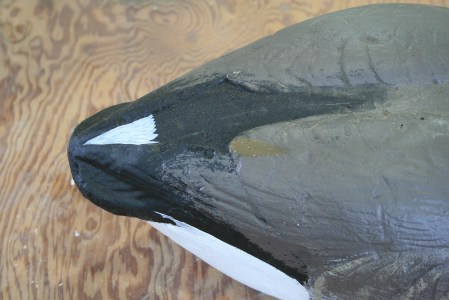
There is a lot of variety in the Canada’s iconic White chinstrap shape; it is worth studying Google Images. However, the chinstrap generally starts just behind the base of the bill, forward of the eye and ends above and behind the eye. I ended it in a trailing point just for the fun of it.
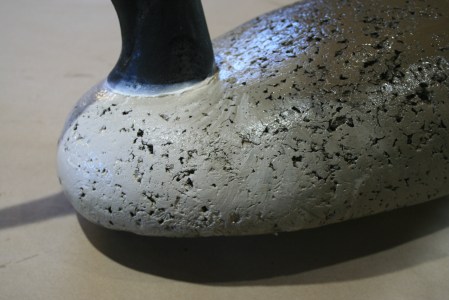
Final job is to paint the bottom. I use a Grey Primer. I like Grey because I can use a black marker for my or the owner’s name. (And, although primers are not designed for continual exposure, most decoys do not spend very many hours outdoors over their lives.

Here is the finished bird – with the simple gunning paint job – on the bench.
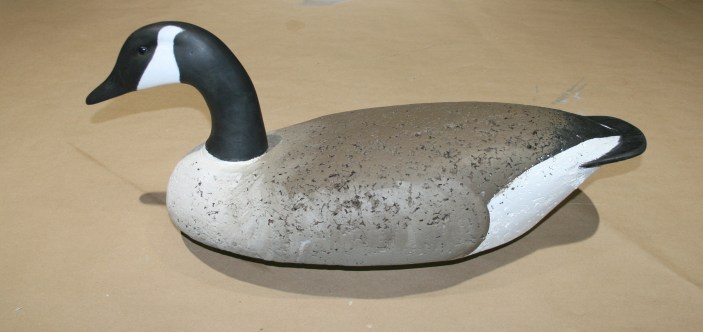
Here it is afloat – with paint sufficient for most purposes – and certainly if you have dozens to do.

Going the extra mile
If you want to add a bit more detail – to add “depth” to the look of the plumage – and to give that little added thrill each time you handle them – here are a few details to add.
Use Graceful Gray to edge some of the back feathers. On gunning birds, you do not need to put in all of the feathers that the actual bird has. The trick is to suggest the look with as few as you can get away with. So, begin with a piece of chalk and lay out the edgings you want.
Start on the back. Note that the biggest feathers – the secondaries that reach all the way to the tail – do not have pronounced edges. So, start a third of the way forward. Put in 3 rows of edgings. They curve outward and forward from the center of the back.
And, the distance between the lines gets smaller as you move forward.

I use a #6 round brush for the edgings. You will probably need to dip the brush in water to help the paint flow.

Here is the back with paint. Notice how the ranks of edges are more crowded further forward.
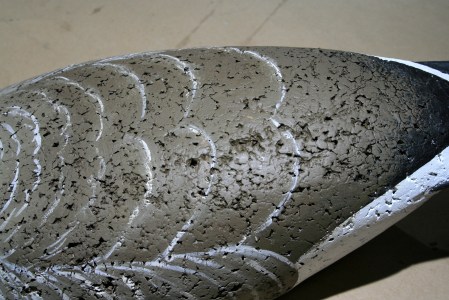
Note how the line are a bit broken up – not continuous curves.

Start the sides aft. The edges are almost as tall as the sides – and curving upward and forward. Put in 3 big edgings here.

As you move forward, each edging should be shorter. They do not reach from the top of the sides to the bottom.

As you approach the breast, note how the curves are first vertical and then “lean” backward.
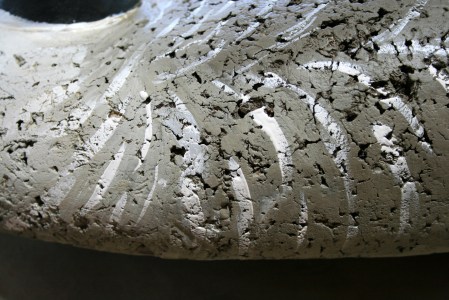
All the curves converge at the base of the neck.

And – as long as you are going to all this trouble – you might as well paint in the lower eyelids. Use the Graceful Gray and a small round brush to paint them from about 3 o’clock to about 8:30…..
Afloat and ready-to-hunt.

Hope this helps!
![]()

Read every word. That was great. JCW
Steve, Great job on the goose decoys repair & Repaints Because of my breathing problem ,I know longer us Ronan oil Paint . I use custom colors in the small jars from Home depot as you do. Very Nice tutorial. Paul From: Steven Jay Sanford To: duckguy723@yahoo.com Sent: Wednesday, November 11, 2015 7:42 AM Subject: [New post] Painting Canada Goose Gunners #yiv8692236125 a:hover {color:red;}#yiv8692236125 a {text-decoration:none;color:#0088cc;}#yiv8692236125 a.yiv8692236125primaryactionlink:link, #yiv8692236125 a.yiv8692236125primaryactionlink:visited {background-color:#2585B2;color:#fff;}#yiv8692236125 a.yiv8692236125primaryactionlink:hover, #yiv8692236125 a.yiv8692236125primaryactionlink:active {background-color:#11729E;color:#fff;}#yiv8692236125 WordPress.com | Steven Jay Sanford posted: “One Bean’s Coastal and dozens of Herter’sHaving received numerous requests in recent years for a painting tutorial on Canada Geese, I will take you step-by-step through the repair and re-painting of a single cork decoy made and sold by LL Bean. Just ” | |
Thanks for the tutorial. This process works very well on canvas decoys as well.