
No good deed goes unpunished.

Craig Kessler and Fred Wertz on a pleasant January afternoon.
It was bound to happen. After a wonderful 2-day hunt in January of Ought-thirteen, I offered to refurbish the entire Brant rig for good friends and hosts, Craig Kessler and Fred Wertz. They shoot over a nice rig of old Herter’s Brant stool – mostly Model 81s and some Model 92s. Both decoys were originally conceived as Canadas by Herter’s but were easily transformed into a very nice Brant toller with the substitution of a well-modeled Brant head (Does anyone know who carved the masters for Herter’s decoys?). Although I always think first of the “leaning forward” posture of the feeding Brant, swimming into the current of a falling tide, Herter’s high-head Brant looks “right”. In the re-print of their 1966 catalog – how many catalogs were ever so much fun to read? – Herter’s offers the smaller one – the Model 81 – in “Black Brandt”. I think they offered the larger Model 92, too, as a “Brandt” later on. In any event, they are a very serviceable and effective decoy.
When shooting Brant, it seems inevitable that some individuals will wind up swimming amongst the decoys. We tend to not take just any old shot that presents itself. We like something with a bit of challenge – speed, distance, angle, maybe the double or even triple. (I’m not talking “scotch double” here. This species is notoriously easy to take in multiples with a single shot because of the way they can bunch up over the rig – you actually need to guard against downing extra birds at times. “Double” means two shots, two birds.) So, it is not uncommon that a single will stool right in with no welcome from the shotgunners. Such individuals will frequently stay awhile, comforted by the unalarmed presence of their peers. This affords a fine opportunity for studying the birds at rest – and especially in comparison to the decoys themselves. One can assess how well the faux paint jobs can pass for the real thing.
As with every aspect of this grand pastime, there are different schools of thought about how much detail rightly belongs in a gunning decoy. Clearly, a gunner needs to be built sturdily enough to withstand the rigors of its job. Many believe that every decoy must self-right – probably a good idea in this species – because it demands a large rig in demanding conditions of wind, tide and sea. When it comes to paint, many subscribe to a minimalist philosophy. Herter’s delivered their “Black Brandt” with only Black and White paint having been sprayed upon them. Brant were painted this way for well over a hundred years and I will happily concede that untold thousands have been shot over the B&W versions. Dr. Edgar Burke, writing in one of my favorite books – Connett’s Duck Shooting Along the Atlantic Tidewater, provides this advice about painting gunners: “Remember that it is not so much the appearance of the bird in hand but the effect half a gunshot off that counts.” My own standard is in the same vein, I think. Any of my decoys should be painted such that the “effect” fools me when the decoy is half a gunshot off.
And, so I got a kick when, in the lowering afternoon sunshine, I watched a live Brant amongst the rig, right next to a decoy I had painted more than two decades previously. Back in the late 80s or early 90s, Fred had asked me for advice on re-painting the Brant. I remember that I used Benjamin Moore flat latex house paint at the time. So, I borrowed a bird from Fred and returned it freshly painted, with notes on the colors. (I’ll bet I still have some of the dried-up cans down in the cellar; I cannot recall the name of the brown I used for the backs and barring on the sides, but, I think the sides were base-coated with Moore’s Sandpiper.) I was pleasantly surprised to see this decoy again because it brought back a distant memory and – more important – because it still did a fine job of matching the live bird next to it. It met my test – it fooled my eye.
The rig still looked fine – and it certainly did its job during my hunts – but many had suffered the inevitable indignities of extended service. As is so common with Herter’s styrofoam (Durlon) geese, the foam tends to compress under the strain from the screw eye and washer when the birds are lifted by their heads. The heads first start to wobble then advance to the drooping stage. Not only does it tend to spoil the intended ruse, but such loose heads trap the anchor lines and confound the setting and picking up of the rig. (I have “glued” the heads on all of my Herter’s decoys – using an adhesive caulk so no gap can form between the head and body.) A couple of the heads had broken off completely. So, after the season, Craig dropped all the Brant off at my Mom’s house and I picked them up in March. After a thorough bath at our local do-it-yourself car wash, they went into the shop and got repaired and repainted. All were returned to Craig the next time I was down on Long Island, later that spring.

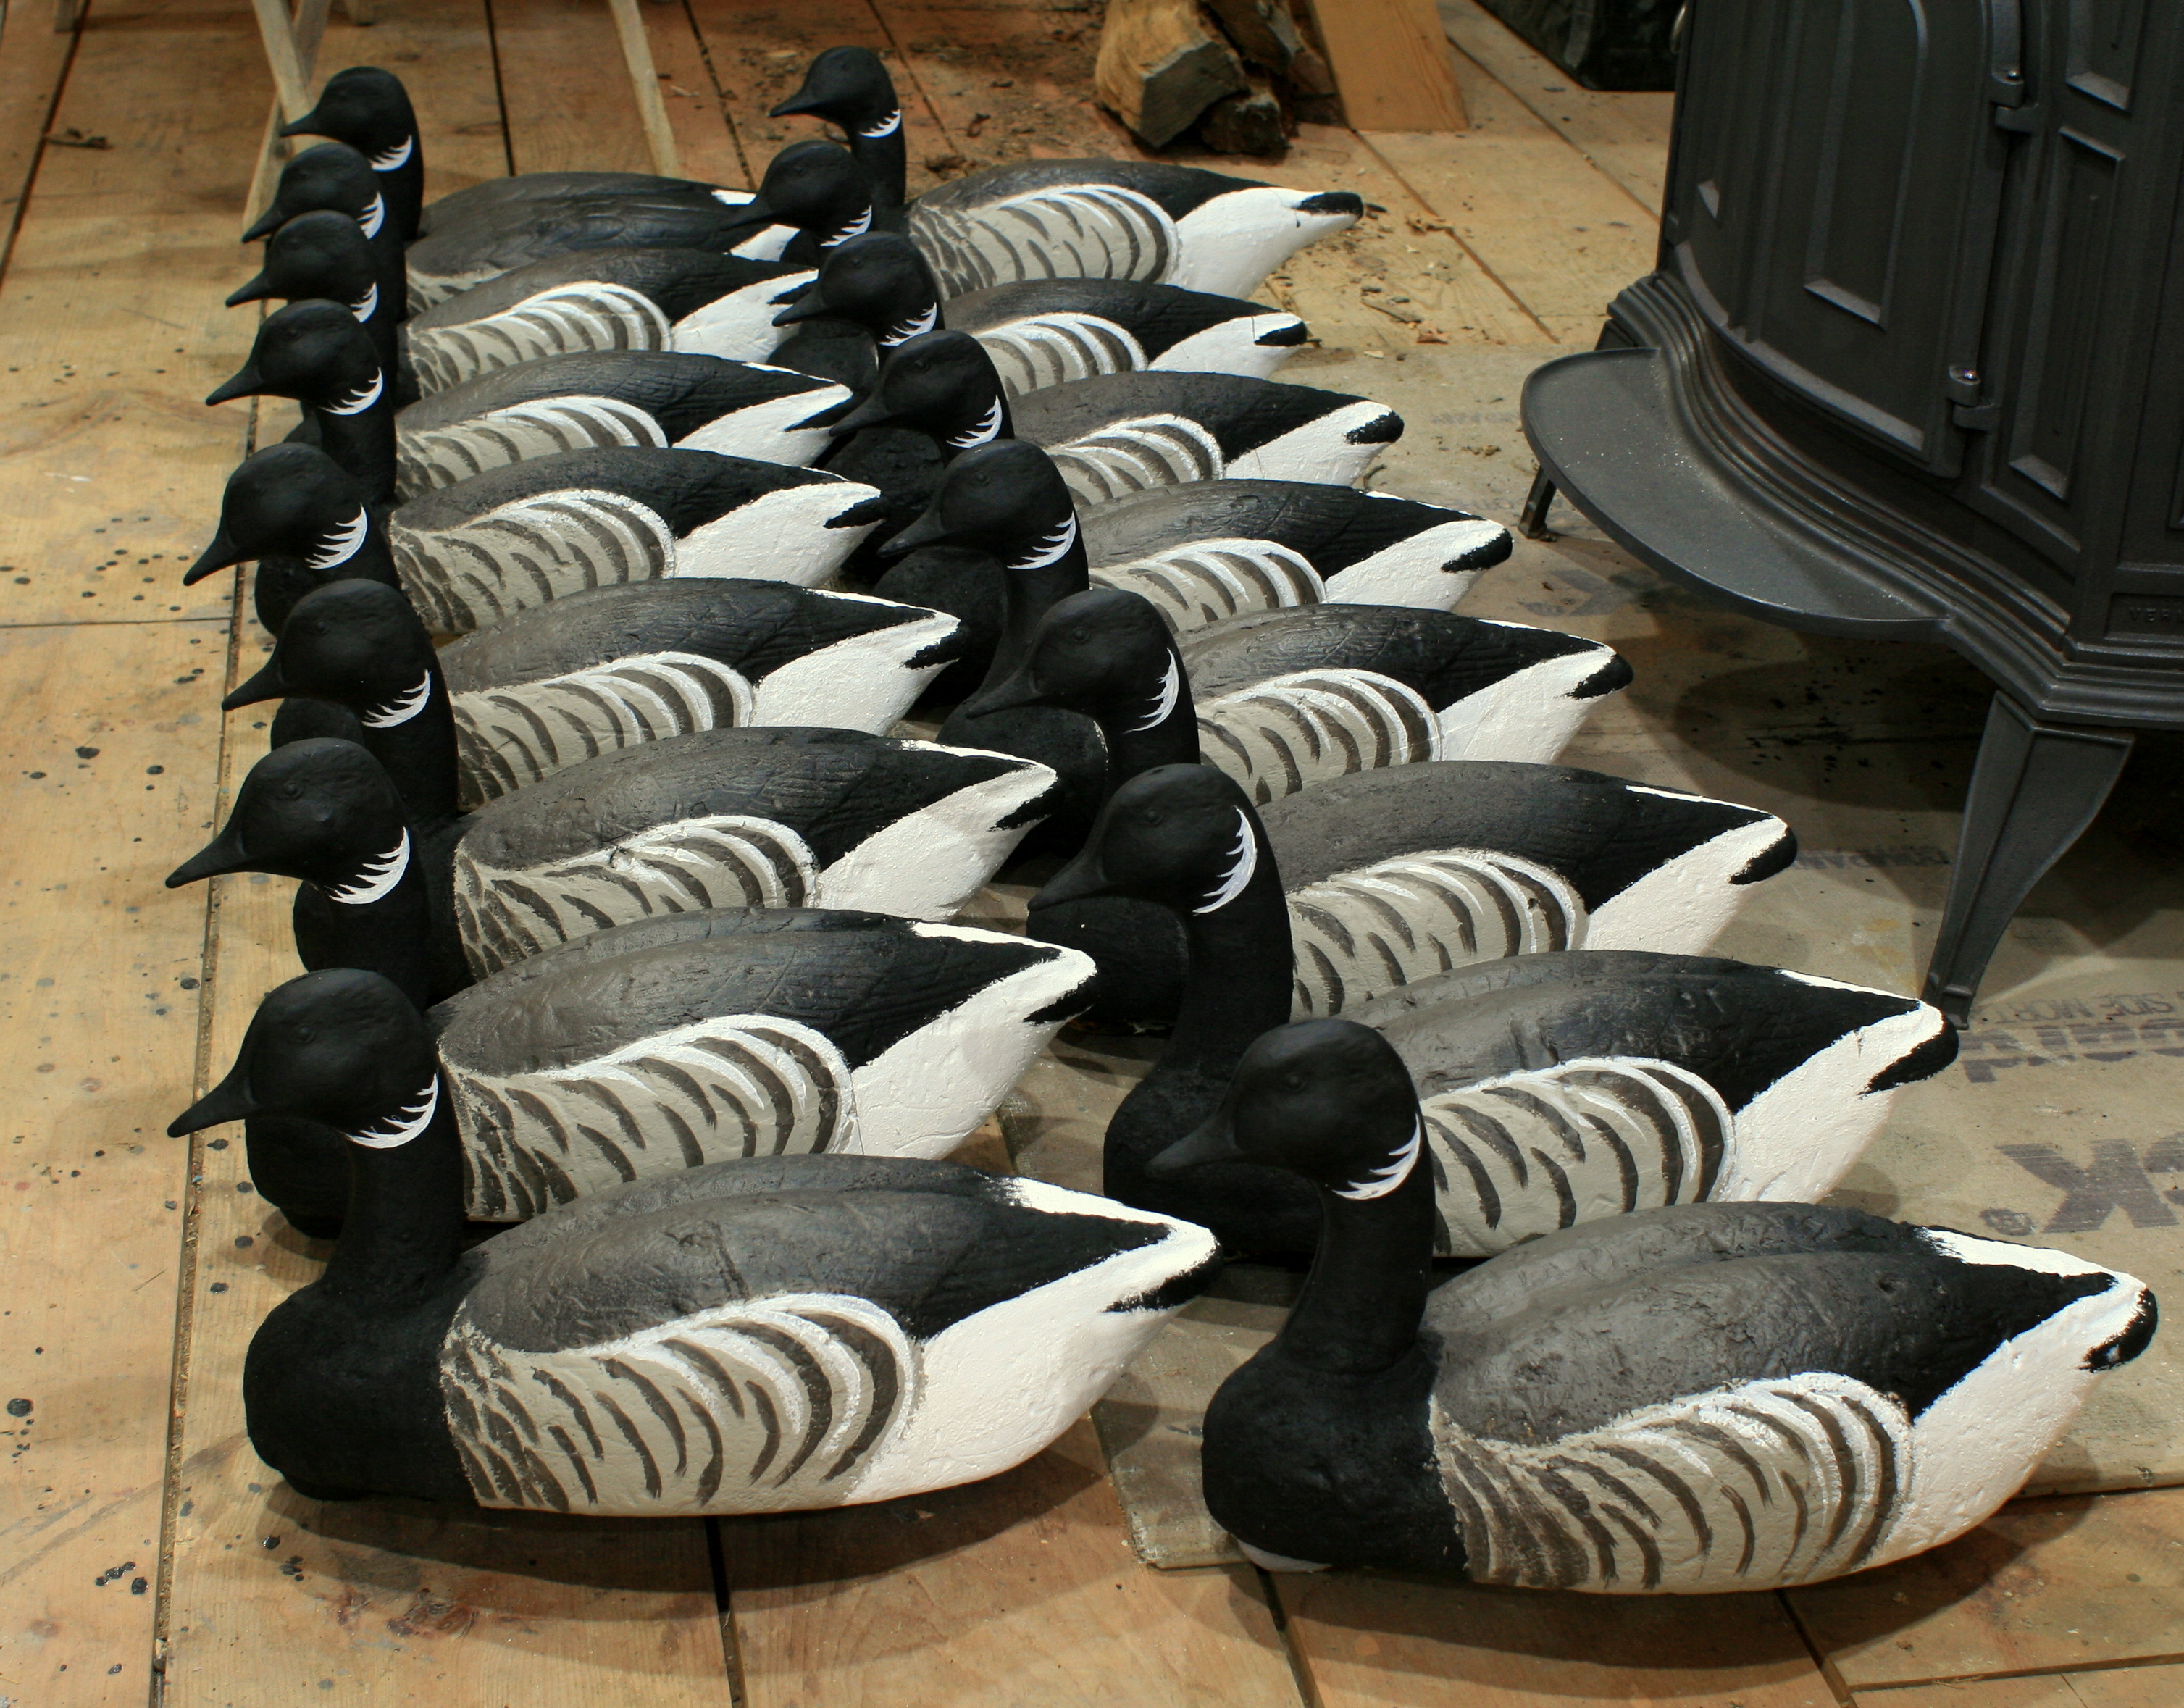
Here is the rig on its way to the car wash – and here is about half of the finished product.

I always look for help from the Next Generation when finishing the paint on gunners.
And so, a few weeks later, I got a call out of the blue from Red Oster. Red is a bayman and a duck guide out of Sayville. I met him a few years back and soon learned that we shared many acquaintances, going back a couple of generations. We also share a passion for the traditions of saltwater gunning, especially as practiced on Great South Bay. Red runs one of the last big “Scooter rigs” – an open bay rig used for divers, using a Great South Bay Scooter as a layout boat and tending it with both a “stool boat” and a “mother ship”. Such rigs were commonplace – and every Broadbill gunner’s dream – when I was young.
Red called to get some technical advice on repairing Herter’s Brant. I explained my process, which relied on a variety of caulks, adhesives, fillers and coatings, depending upon the damage. Subsequently, as far as I knew, Red was taking my advice and returning at least some of his more forlorn Brant to active duty. However, when I stopped by Red’s house in mid-September – to pick up a 2-man Scooter that I would be rehabbing for Craig – I could not help but notice three truly forlorn Brant stool in his driveway. Just like birds suffering from lead shot poisoning, these birds exhibited the classic “limber neck” symptom. Sure enough, the screw eyes had worked their way through Herter’s Durlon foam and so the heads flopped around in a very undignified way. After the Scooter was strapped to my trailer and plans for its resurrection fully discussed, Red asked if I would repair his three Brant. Well, anyone who knows me knows my answer. I cannot help but say “yes”. Putting old gunning gear back into working order is one of the great pleasures in life – especially in the month of September when the cool, dry air – great “working weather” – only helps the anticipation that comes to every gunner in the fall of the year. Susan and I drove back to the farm on Saturday and I started taking the Brant apart on Sunday. What follows is a step-by-step description of the process.
The repairs.
The three birds included two stock Herter’s Model 81 Brant and one with a nice wooden head on a Model 81 body – the pine swimmer head had been carved by Harold Hamon, of Newcastle, Delaware.
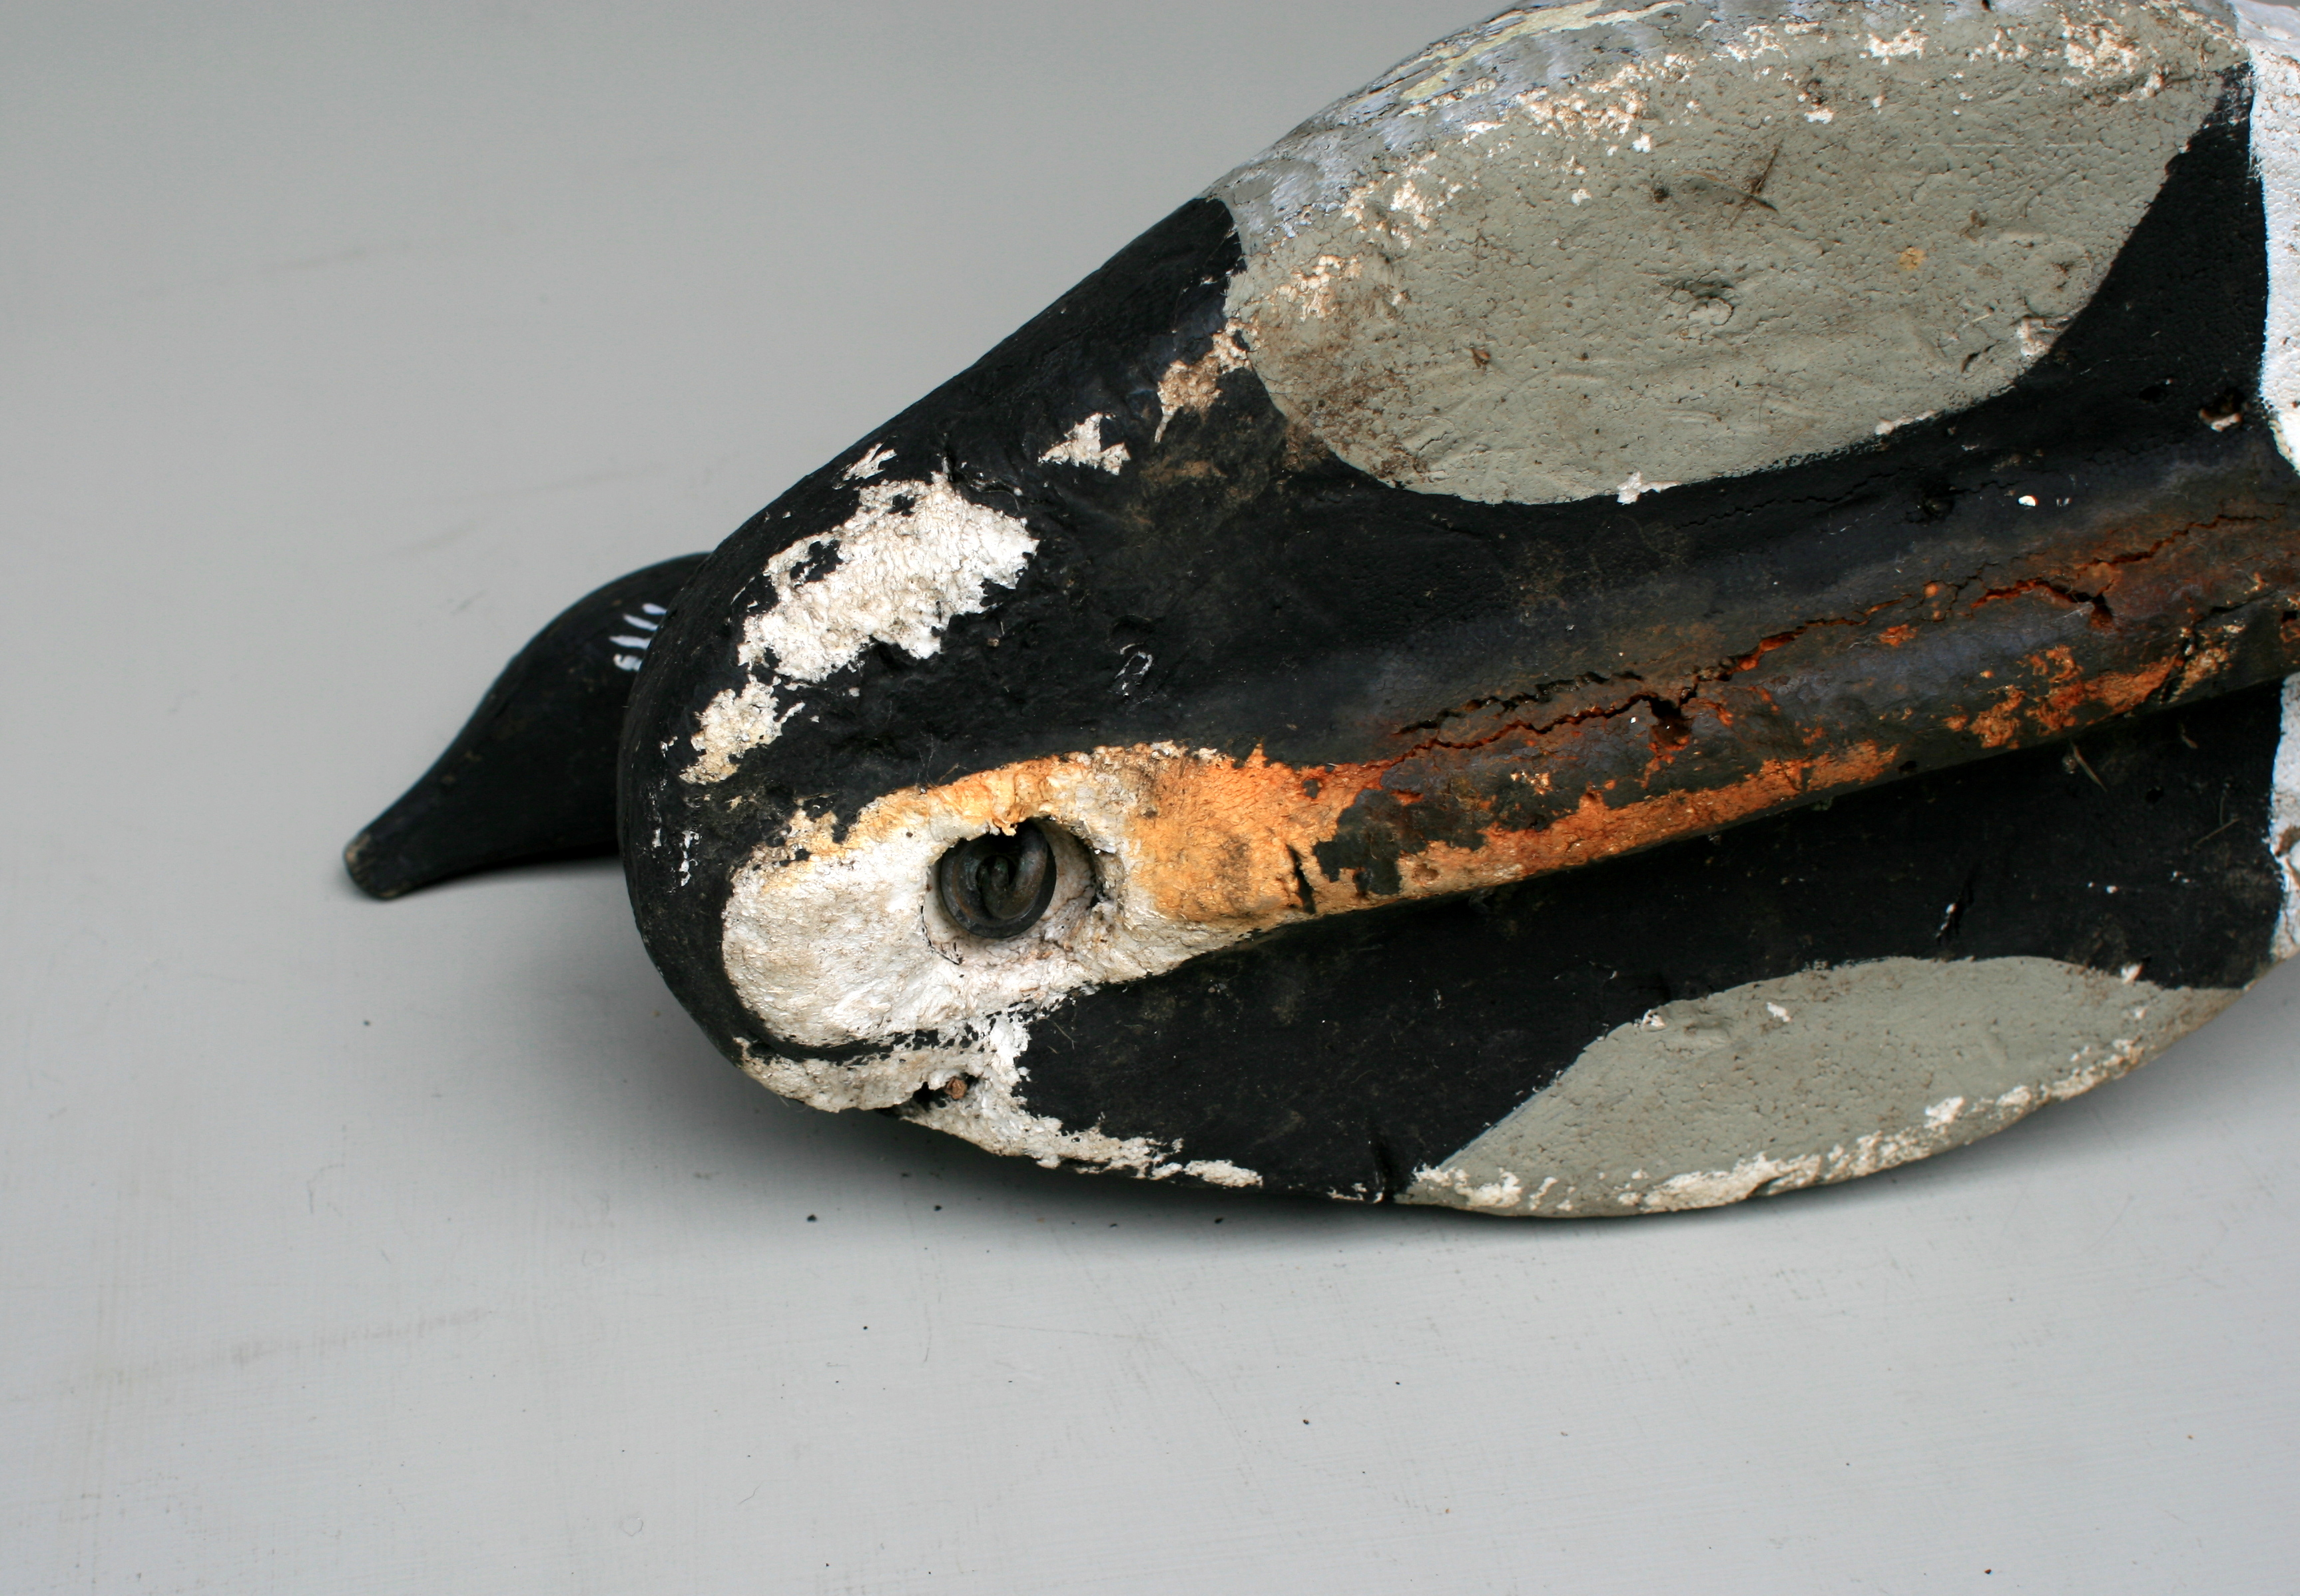
I began by backing out the screw eyes from each head. Fortunately, these were the older Herter’s with the brass screw eyes. (The later steel screw eyes usually snap off when you try to remove them – the saltwater doing its work on the cheaper metal.) One of the “stems” from the molded plastic head had long ago broken off, though, so a straight refastening was not an option for that head. The heavily rusted keels were also working their way out of the foam.


I first coated all three bodies with straight epoxy resin. I have had good luck with a variety of both brands – Raka, W.E.S.T., System Three – and suppliers, but am now using a medium-cure resin from U. S. Composites. The purpose of this coat is simply to seal the foam because the old foam can be fairly porous.
The next step was to fill the neck holes – now about an inch in diameter and most of the way through the body. I mixed up a stiff batch of epoxy and filler – mostly the red phenolic microballoons (the light, sandable filler) and some 1/4″ milled ‘glass fibers. I filled the holes flush top and bottom and used the same filler to replace missing foam around the keels and other body gouges as needed.

Once the filler cured, I bored holes through it to accept the screw eyes. I do not countersink the lower end because I want to retain as much structural strength in the neck area as I can. And because I needed longer screw eyes, I used a couple of new SS screw eyes from Bob’s Rigging. Each head was refastened into a bed of thickened epoxy – again with the microballoons and the milled fibres. I carry this mixture up onto the necks and out onto the breasts to spread the reinforcement over a large area – and to distribute the forces the bird will encounter when used.


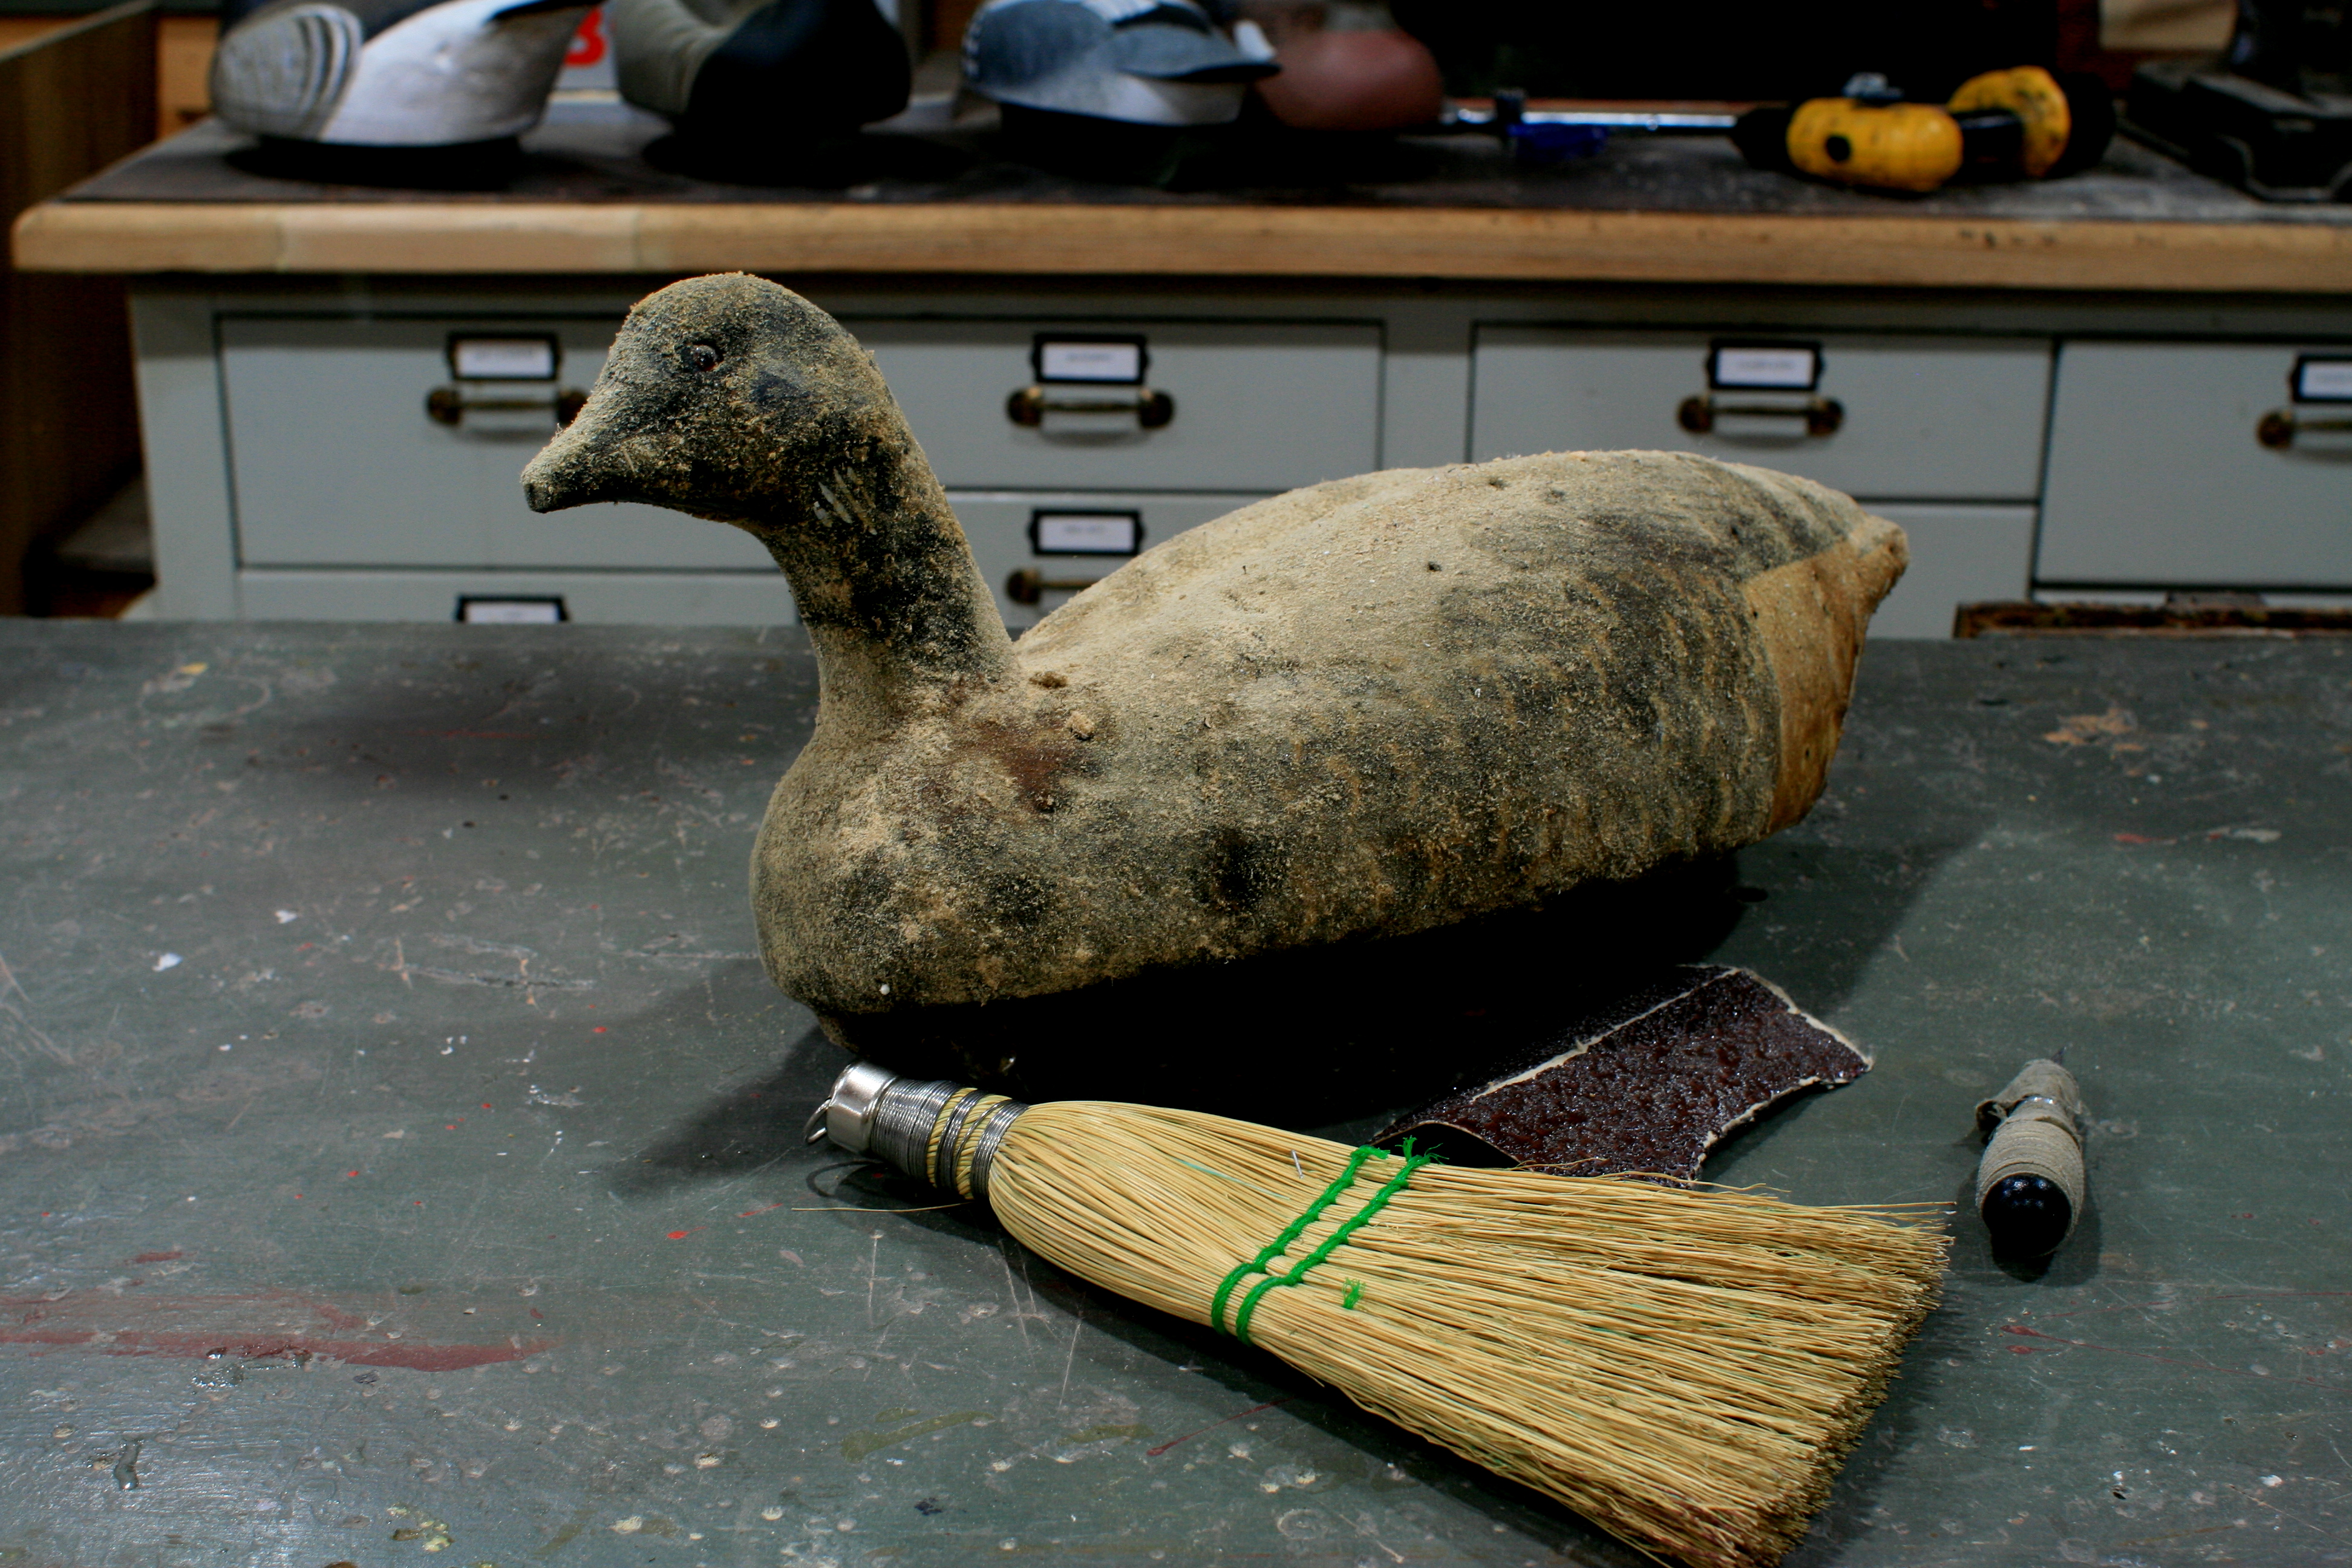
Before the finish coat of epoxy and sawdust, I rough sand the whole bird to make sure there are no sharp protrusions. Rough is good, sharp is not. The finish coat is epoxy with some colloidal silica (aka Cabosil or fumed silica) added to prevent running and to also toughen the decoy’s new skin. I brush a coat over the whole bird and then, holding the bird over a tub of fine sawdust from my bandsaw, sprinkle sawdust over the entire bird – except for the bottom. Once coated, I hang each bird to cure. I made a rack over my bench for this purpose. The galvanized wire (16 gauge?) is bent up when not in use so as not to poke an eye.


The painting.
Once the epoxy has cured – usually overnight – I use a whisk broom to remove any loose sawdust. Most of the sawdust should have absorbed enough epoxy to cure into a hard, miniature point, so that the surface of the decoy now feels like 80 grit sandpaper. It is ready for painting without sanding or priming.
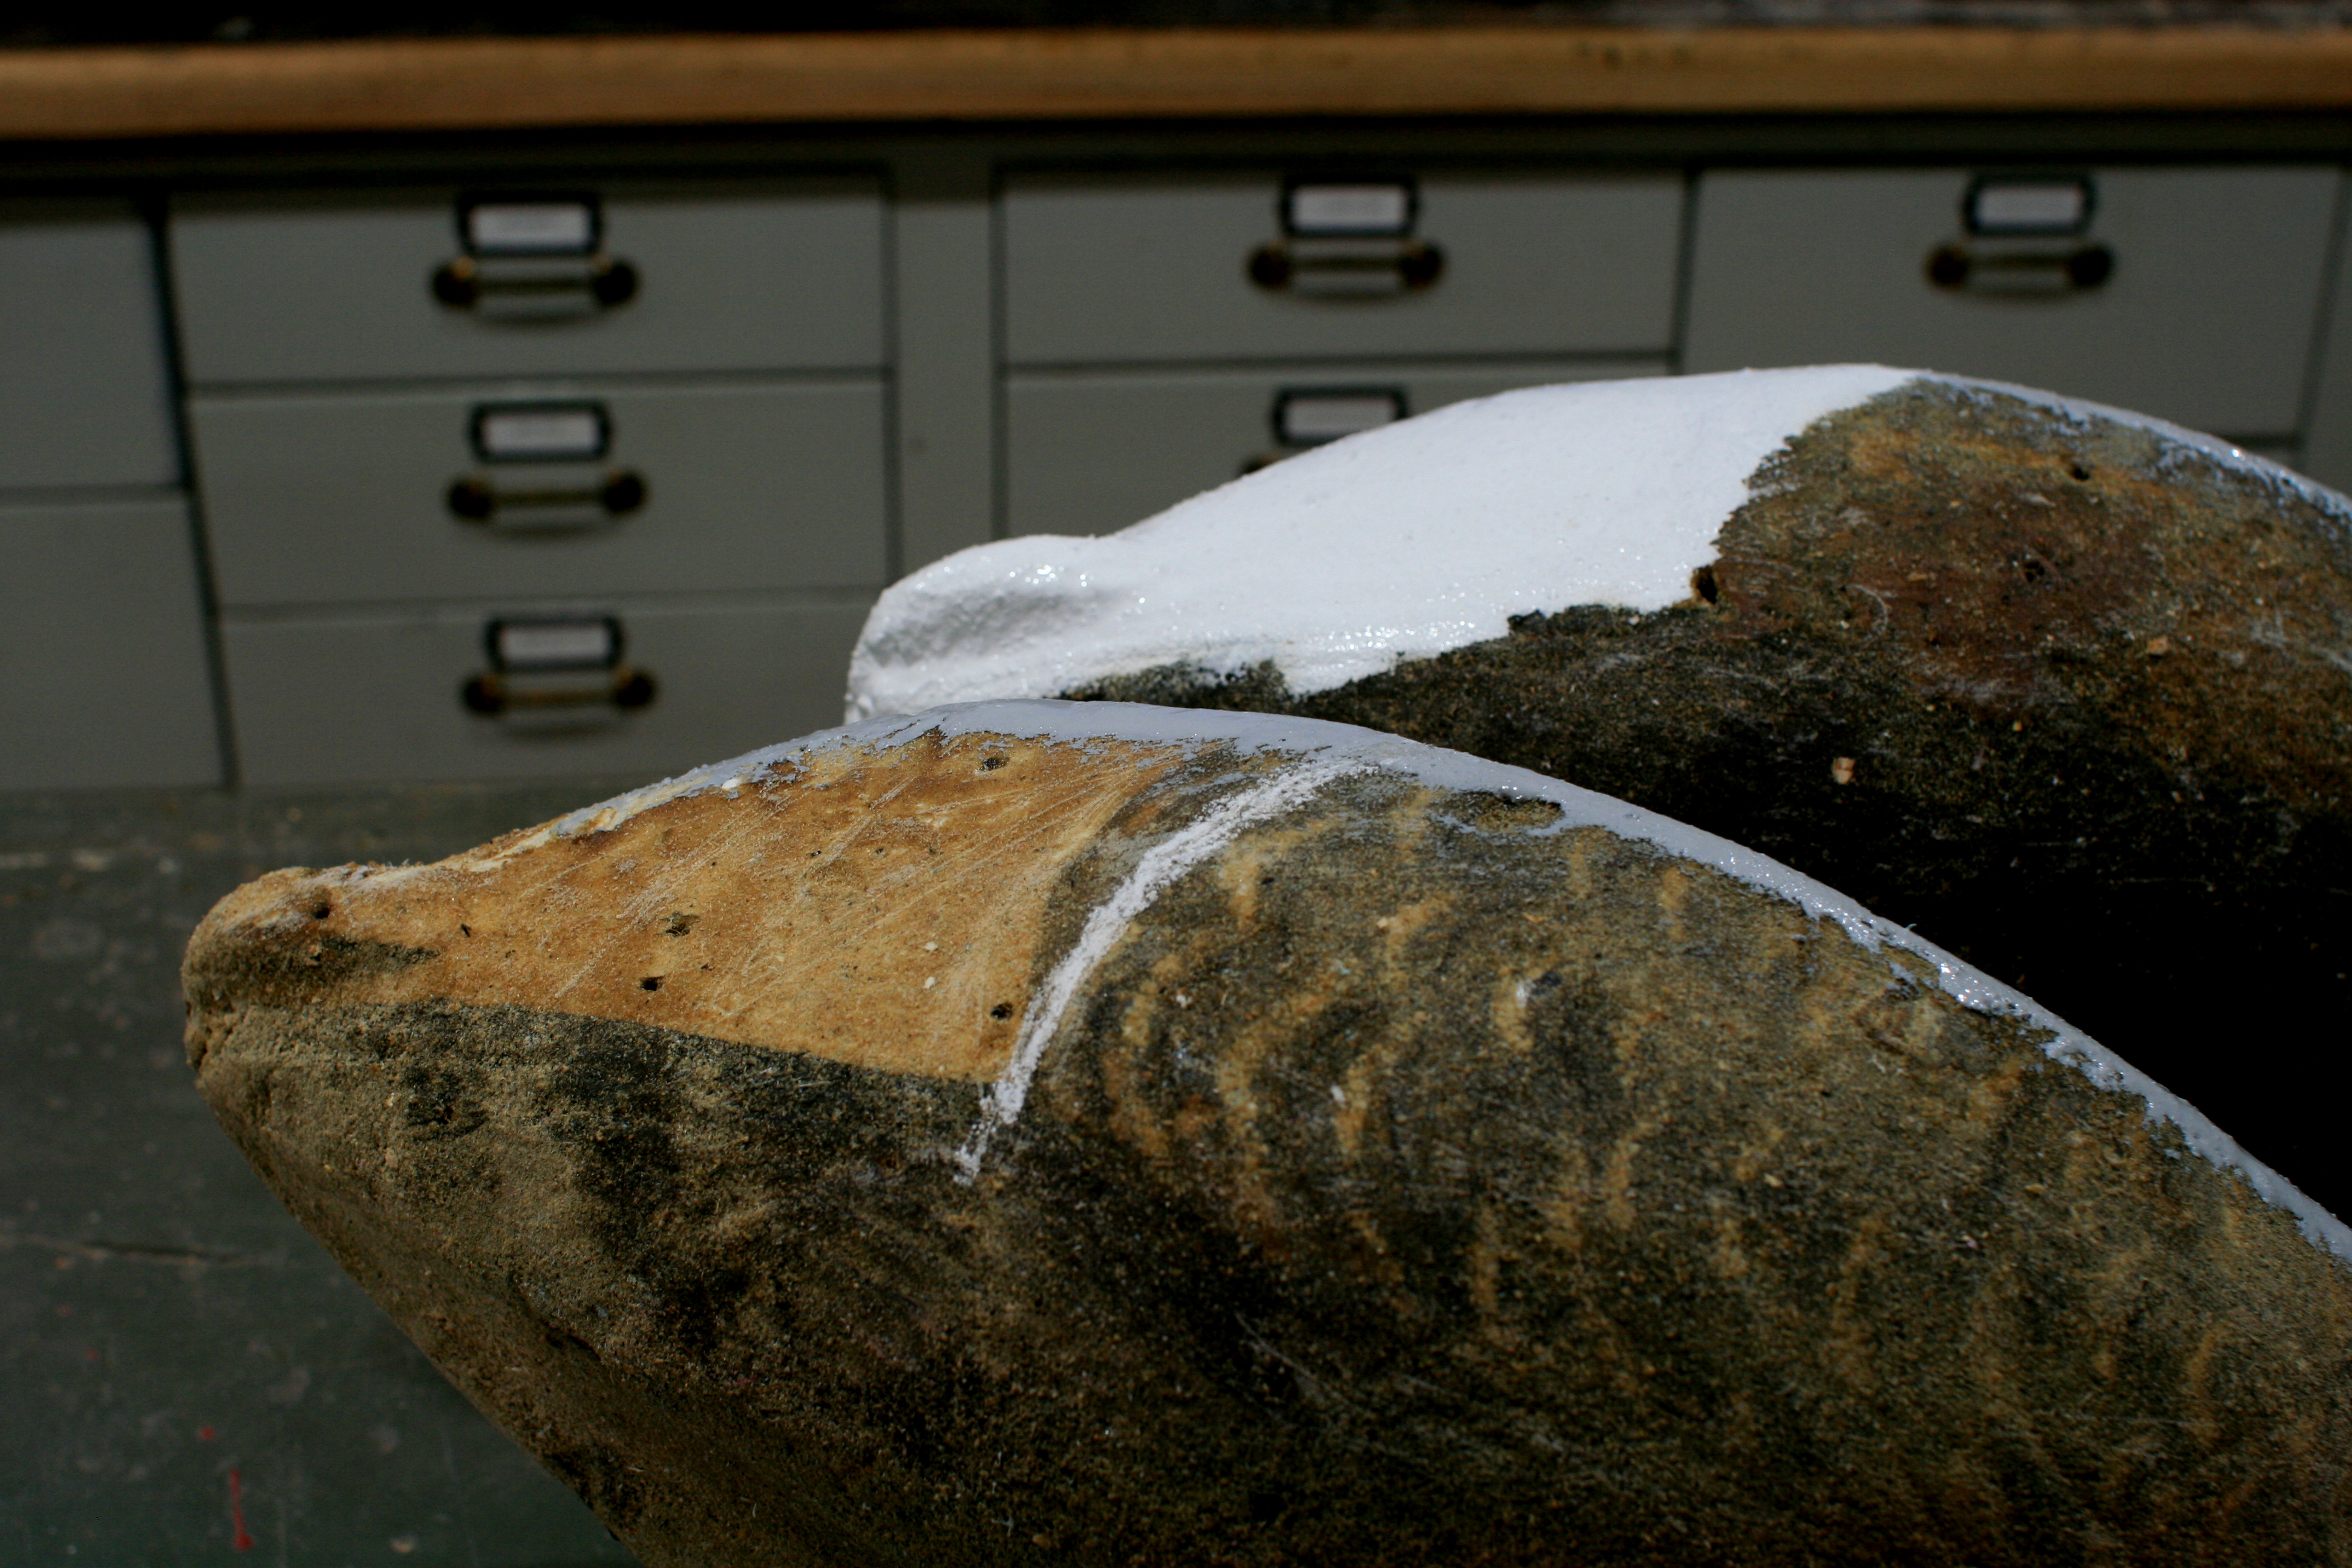
I use acrylic latex – flat house paints – on my gunning birds because they are easy to work with (water cleanup) and readily available in any color – thanks to the availability of 8-ounce samples from big box and many hardware stores. I begin by painting the bottoms of each bird – I like Glidden Gripper Grey. One advantage of a lighter color is that you can put the owner’s name on with a large felt pen (Magic Marker and the like). I push the paint into any smaller holes and crevices and especially around the screw eye. I use an 1-1/2″ “chip” brush for this job – and I let them dry thoroughly.


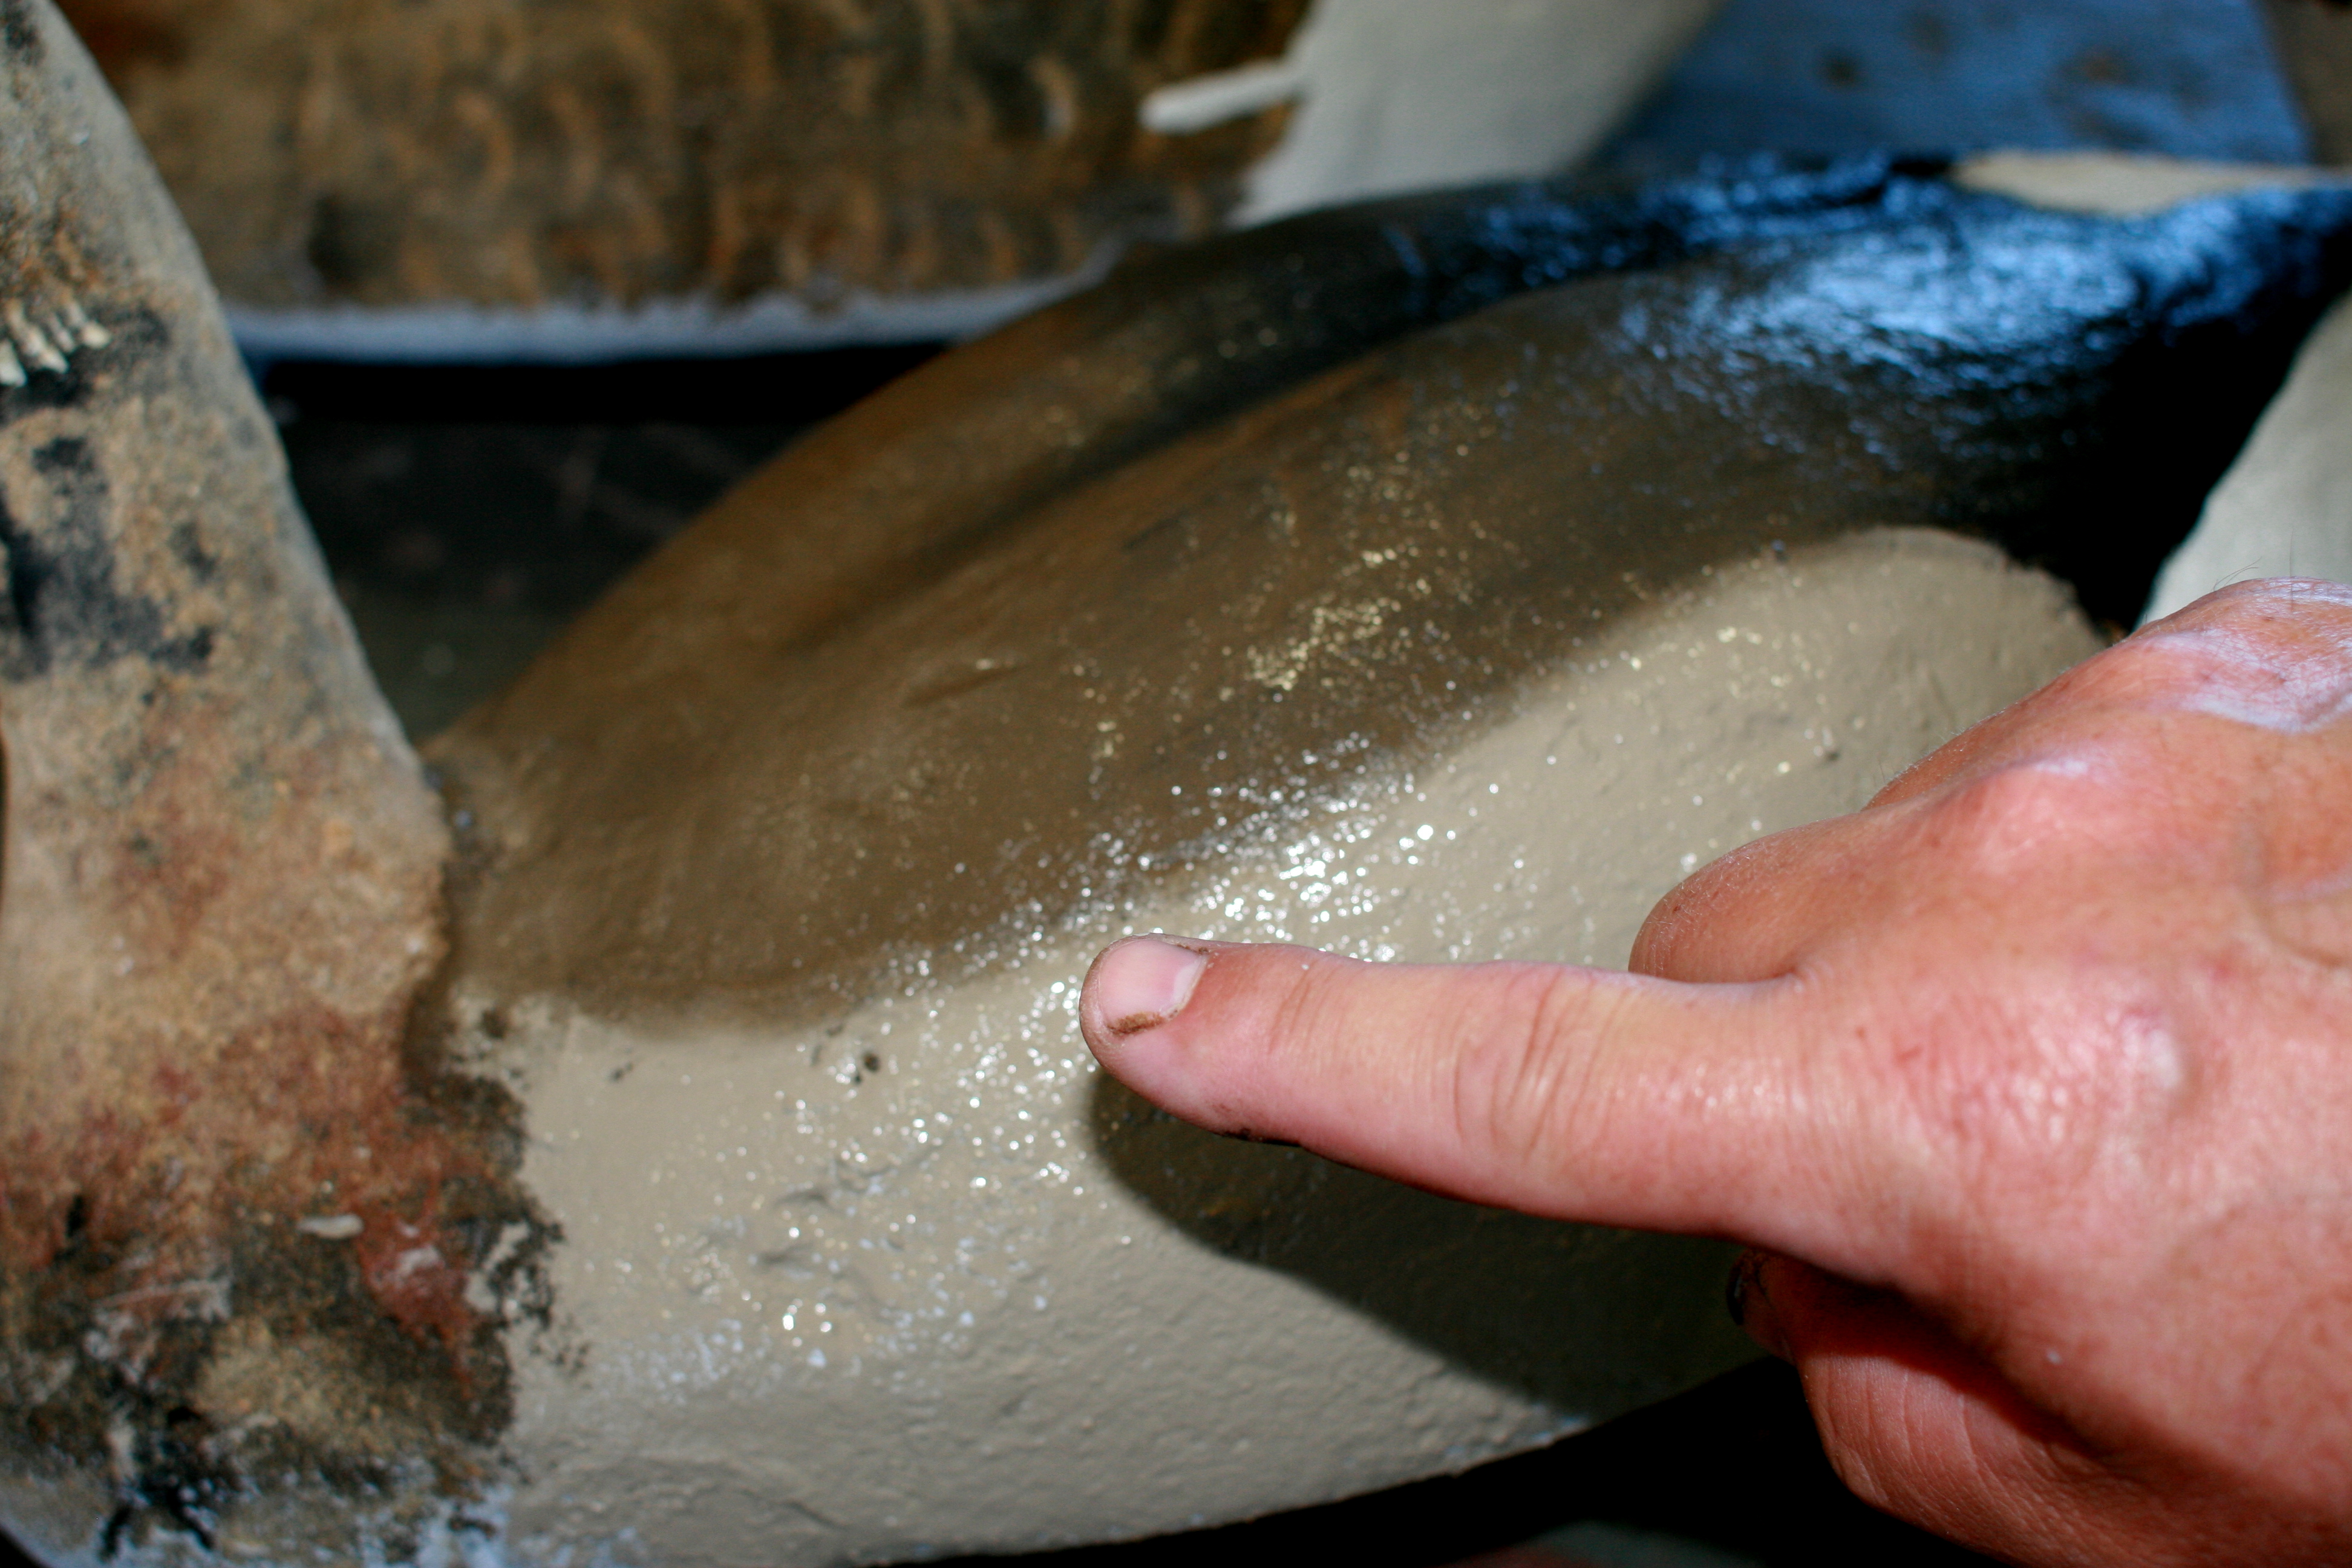
I do most of my painting with a large (~ 3/4″) square artist’s brush with stiff bristles – these are known as “flats”. A Brant shows a lot of white on its stern. Notice how the chalk mark carries the white further forward than the molded-in side feathers. This is because the body is made for a Canada and not specifically for a Brant. I use a White latex primer for my whites – mostly because I always have some in the shop.

Carry the White up between the wing groups on the back.


I do the Flat Black on the tail and wings now – but save the Black on the head and breast for later. The Brant shows just a little bit of Black on the tail feathers – because it has very long upper and lower tail coverts, which are White. Paint the primary (wingtip) groups Black, curving the line gently as it goes forward and down. The Black also covers the mid-back area – softly feather it onto the white rump with a dry brush – and the tertials and secondaries.

While the Black is still wet on the tertials and secondaries, paint most of the back feathers a dark, muddy brown. I use Behr (from Home Depot) “Fedora” (# S-H-740) . Basically, it is a raw umber. Do not use a reddish brown as I have seen on some decoys. Drag the Black and Fedora into each other so that you get a nice gradation, from brown to black as you go aft.

Apply the base color to the sides soon after. The sides are straight “Mocha Accent” (Behr # 720D-5) but the same paint should be used just behind the neck – dragging it into the brown back feathers for another gradation.


Now I paint the head and breast with Black. The edges between major color groups can be softened slightly – with a brush or fingers – whatever works. I let the decoys dry thoroughly at this point.

The sides are not uniform. They are a pale greyish-tan barred with a dark brown. They are marked differently along their length. I add the markings in four separate steps. I start at the rear of the sides with three curving bars. Each starts at the top of the “side pocket” and curves back and down, almost all the way to the waterline. I use the dark brown “Fedora” for this and apply it with an angled brush.


Once I put the three bars on one side, I jump to the other side and put them there, too.

There are also dark bars at the forward end of each side. These bars are short and curved down and back and cover maybe a fifth of the side.

Now I use a paler grey – Behr’s Ashwood (# 720D-4) to represent the feather edges. Geese – especially the adults – have much squarer ends on their body feathers – compared with ducks – and so the edges are nearly vertical and also closely spaced. Start by adding a pale edge to the rear of each of the three bars painted earlier.

Then move forward and paint in several pale edges along the top of the side pocket. This top tier drops down a third or more of the side.

Add a middle tier, similarly curved, and interspersed with the pale edges in the top tier.
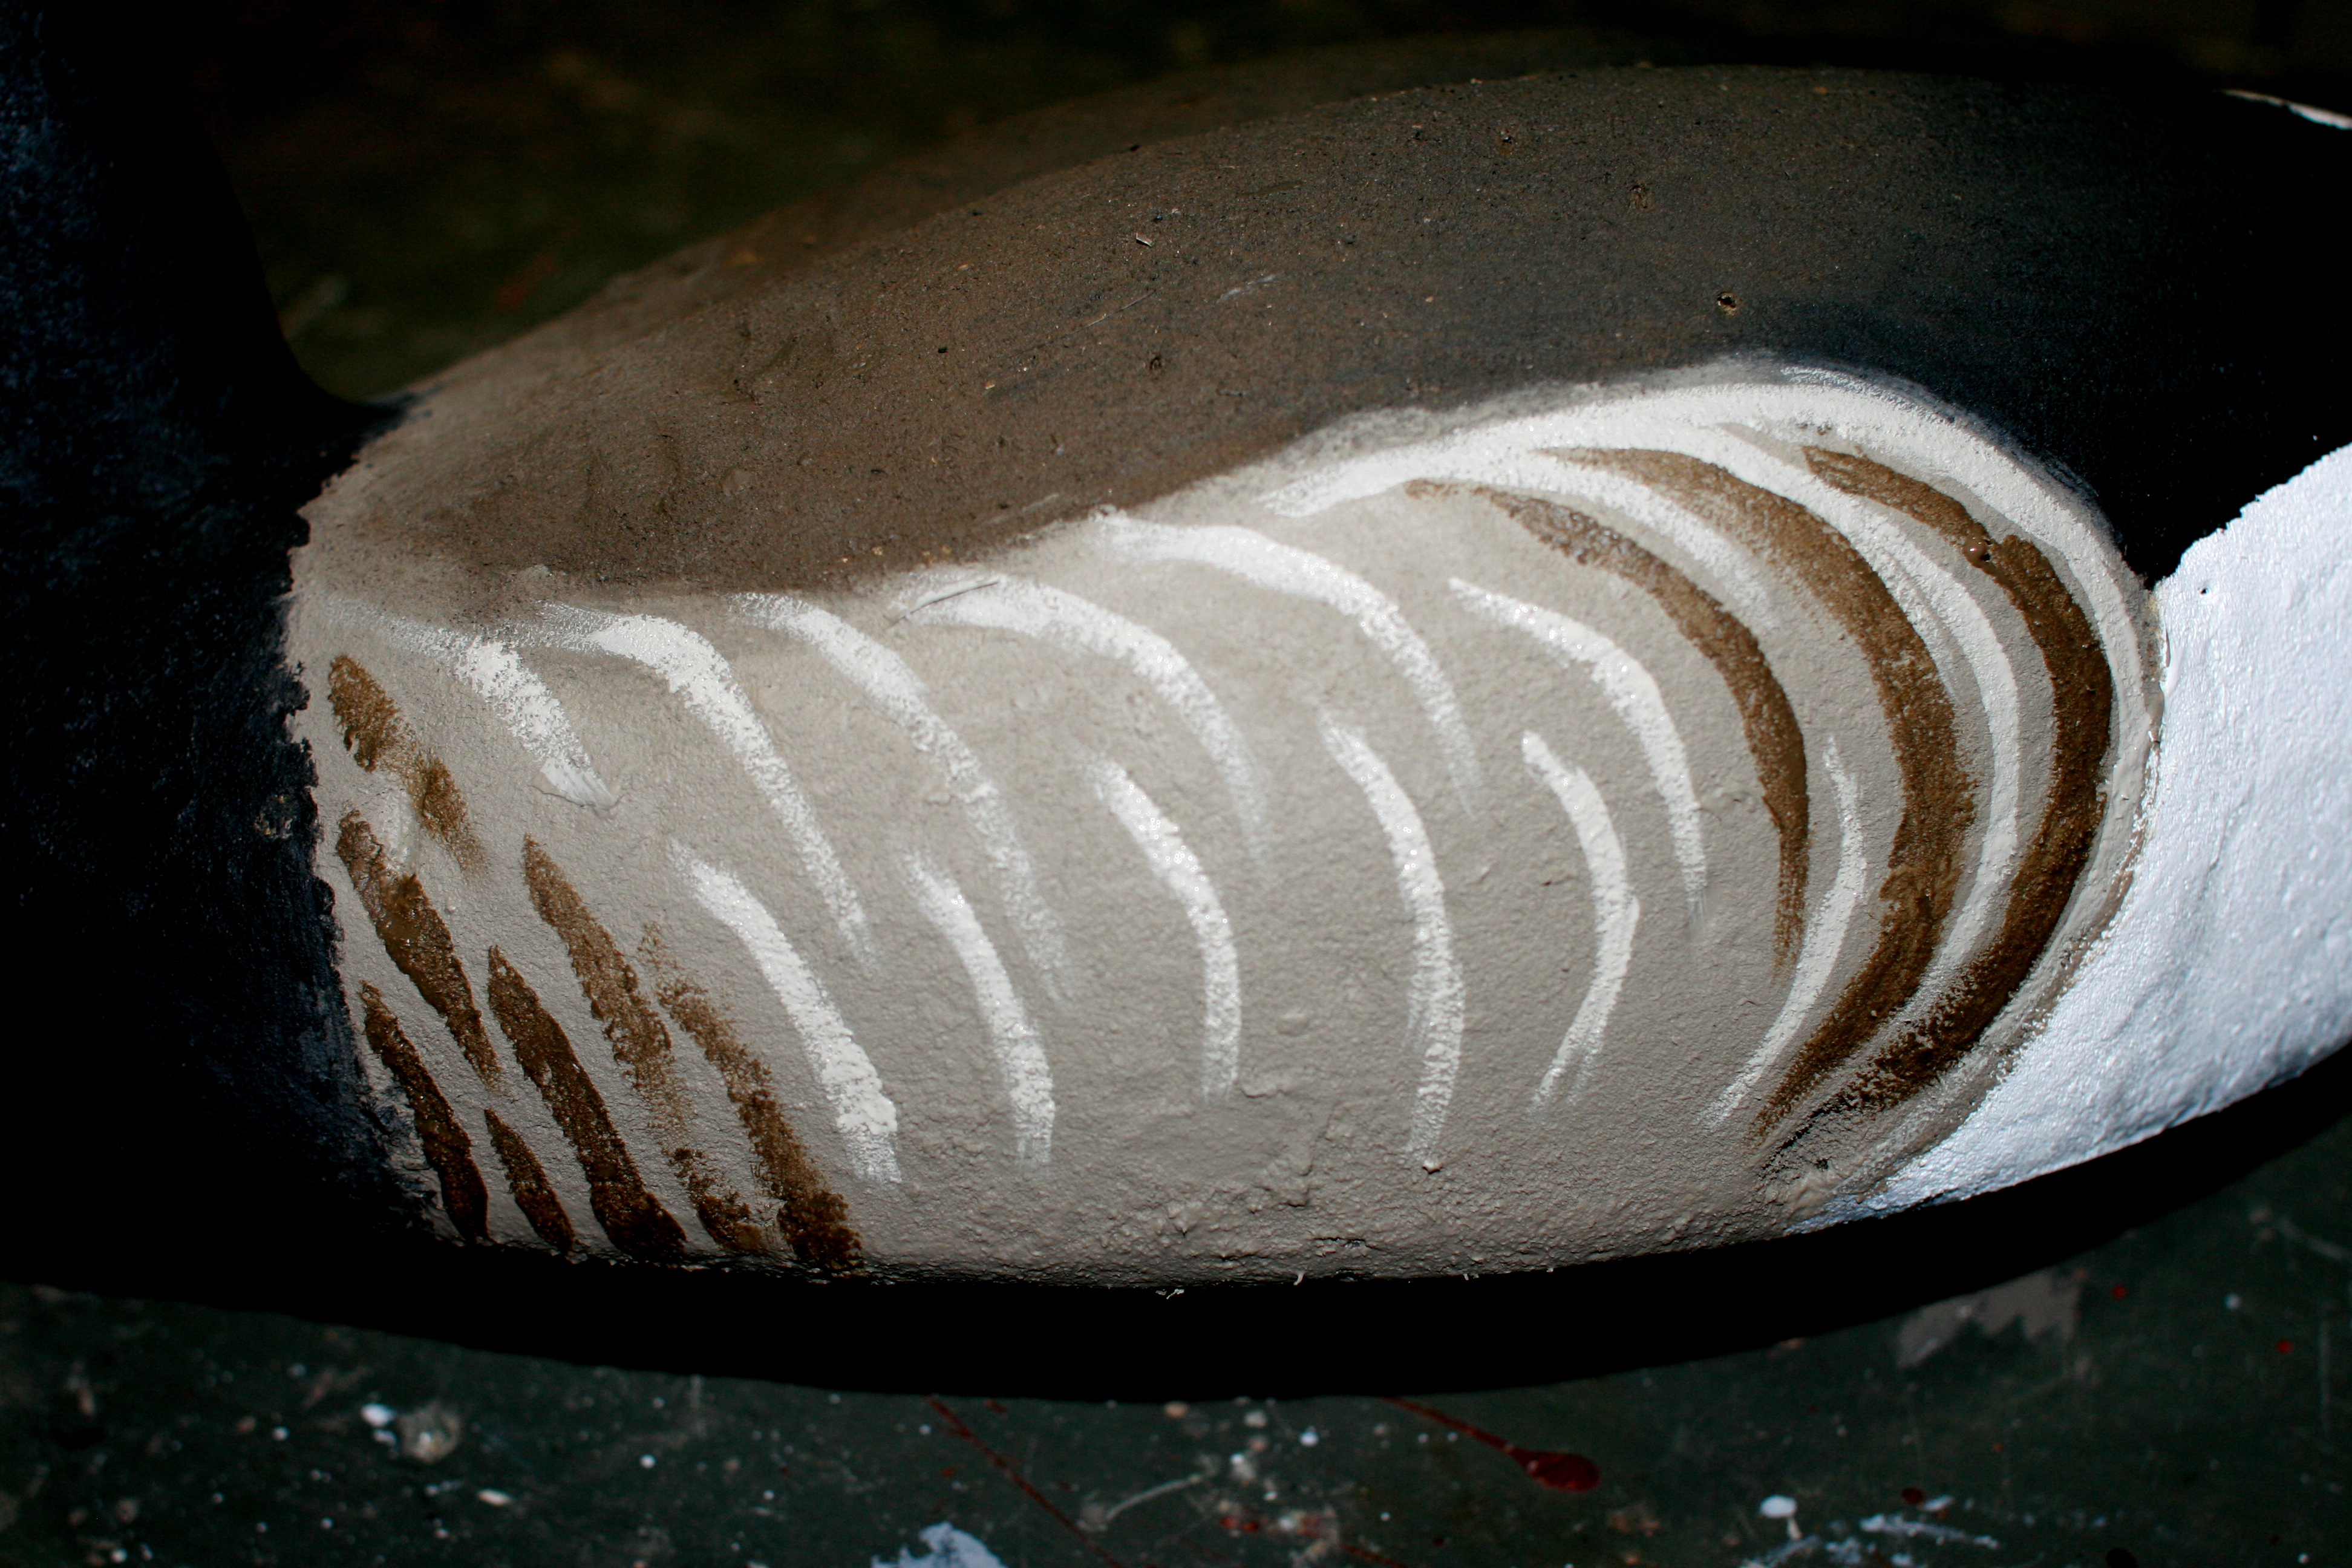
Now add a lower row – also interspersed with the middle tier markings.

Finally, add light edges to a few of the dark bars up forward and “connect” – more or less – the light edges along the top of the side feathers.


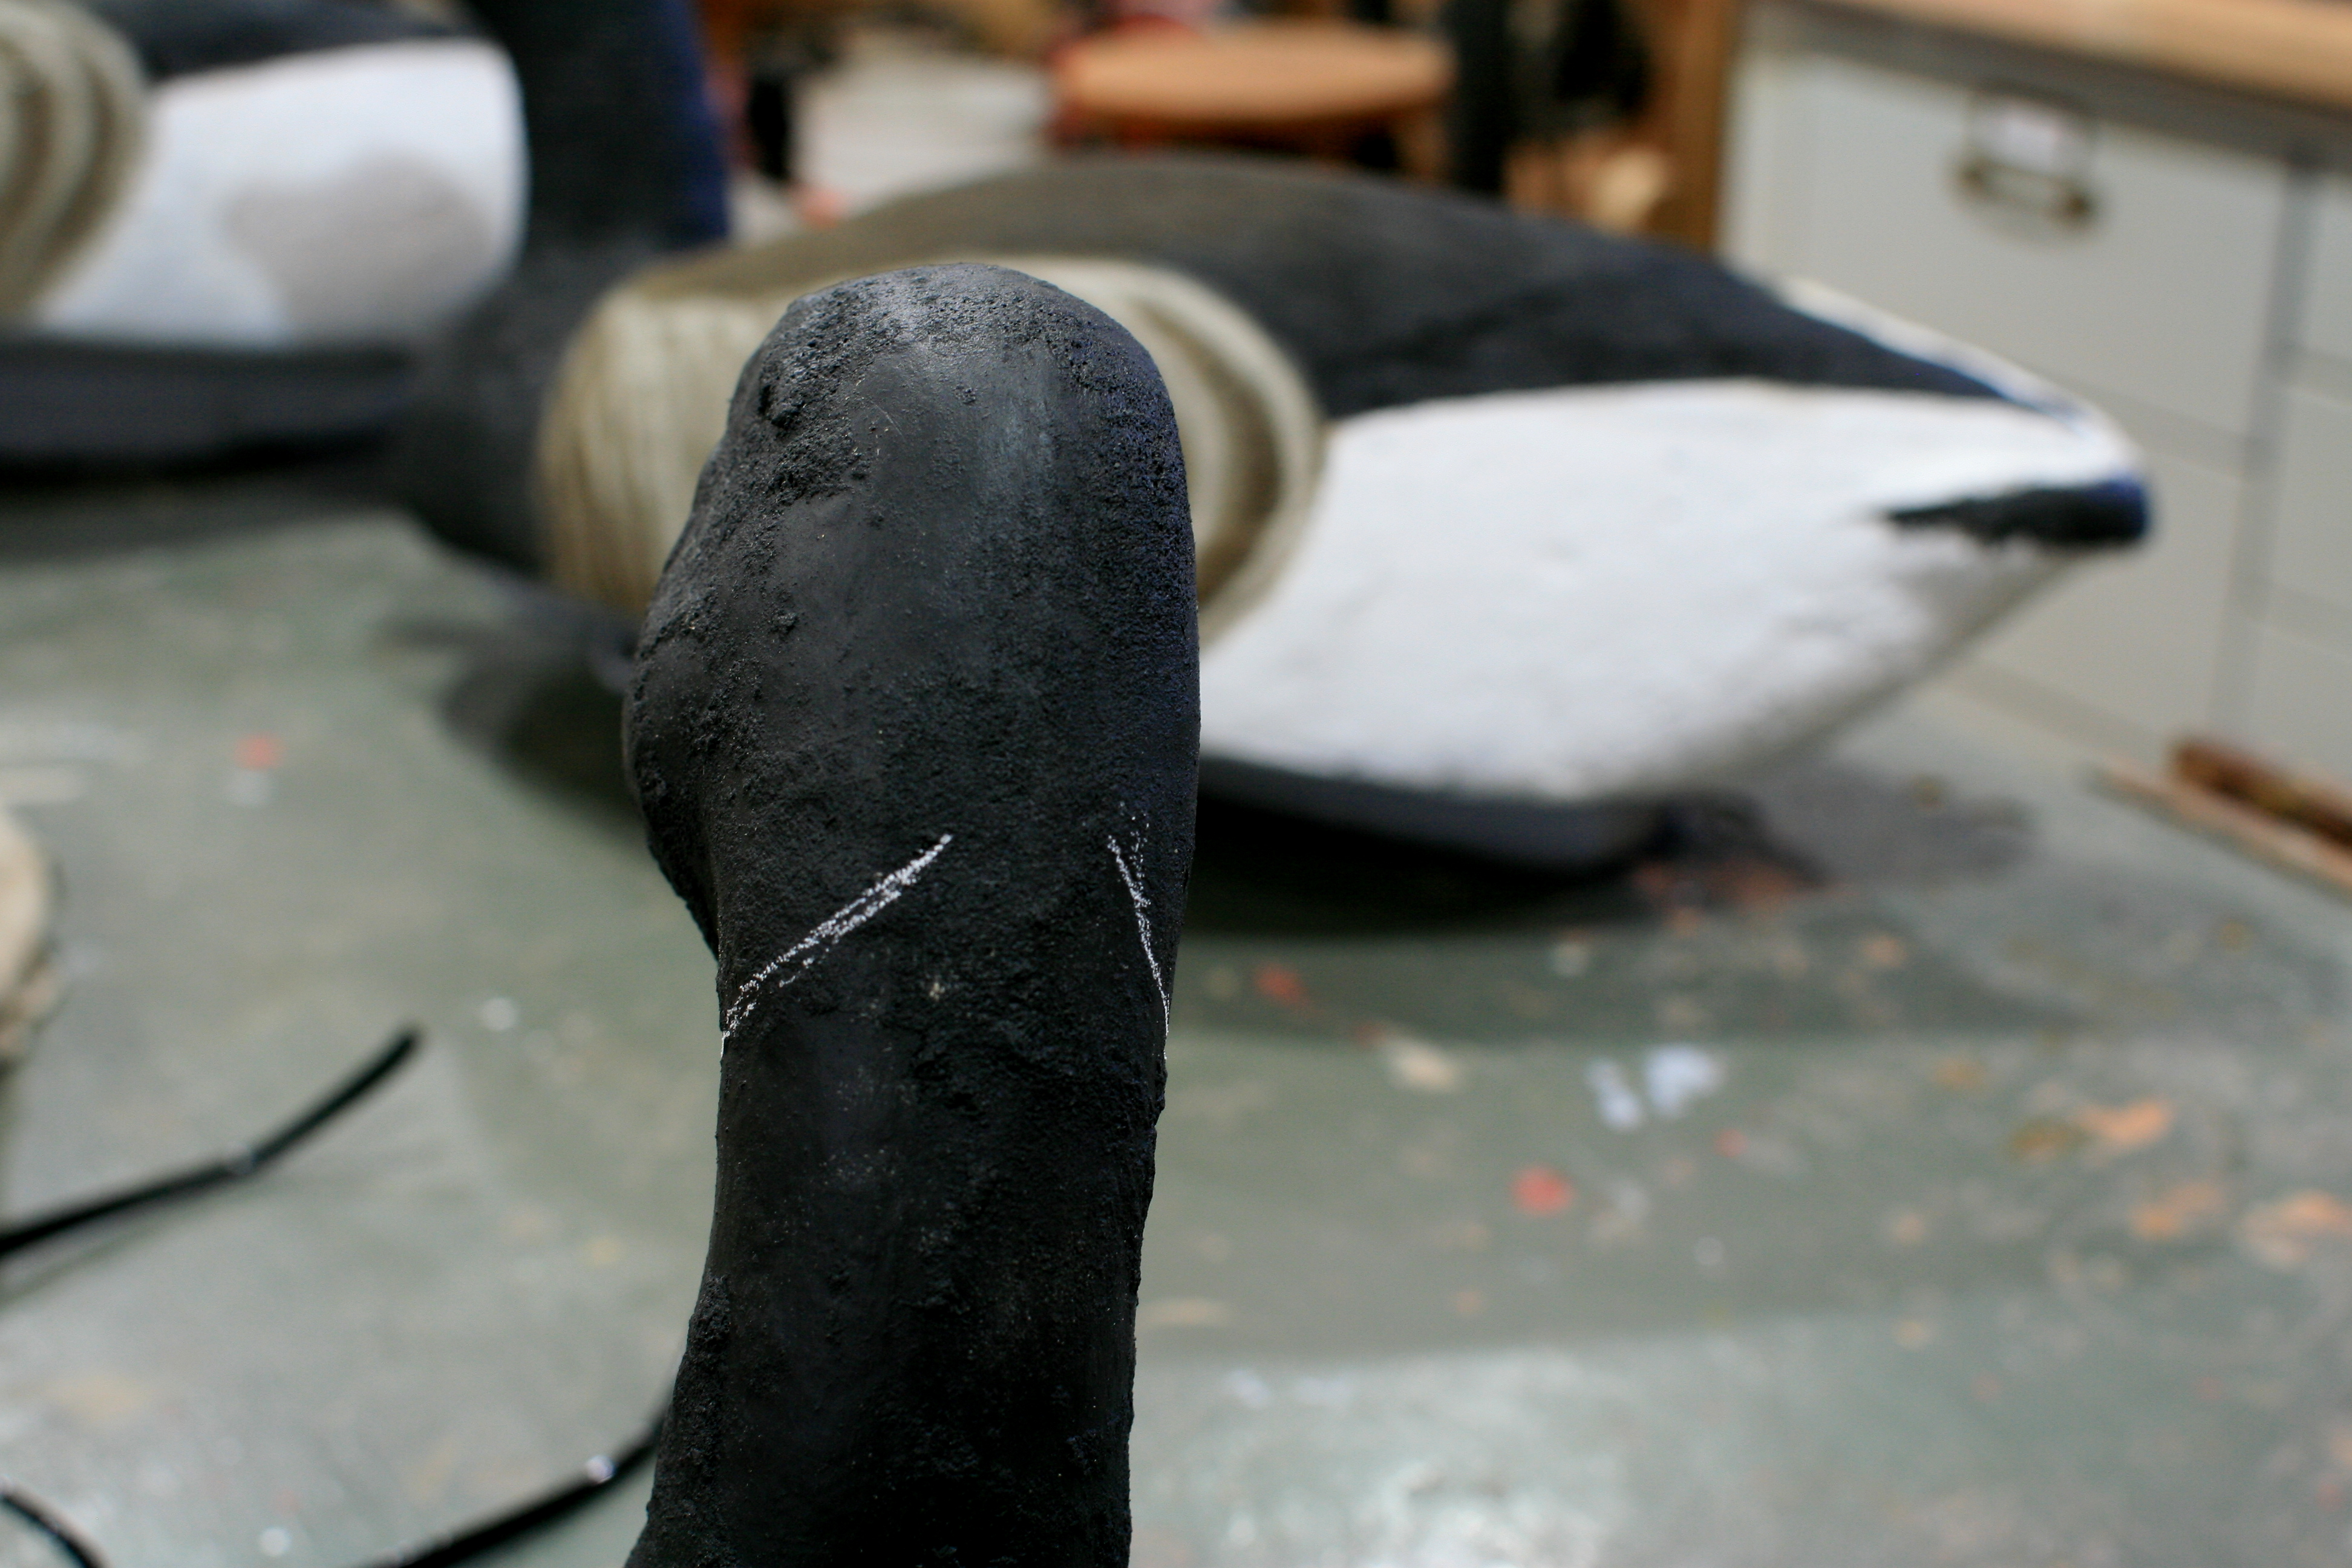
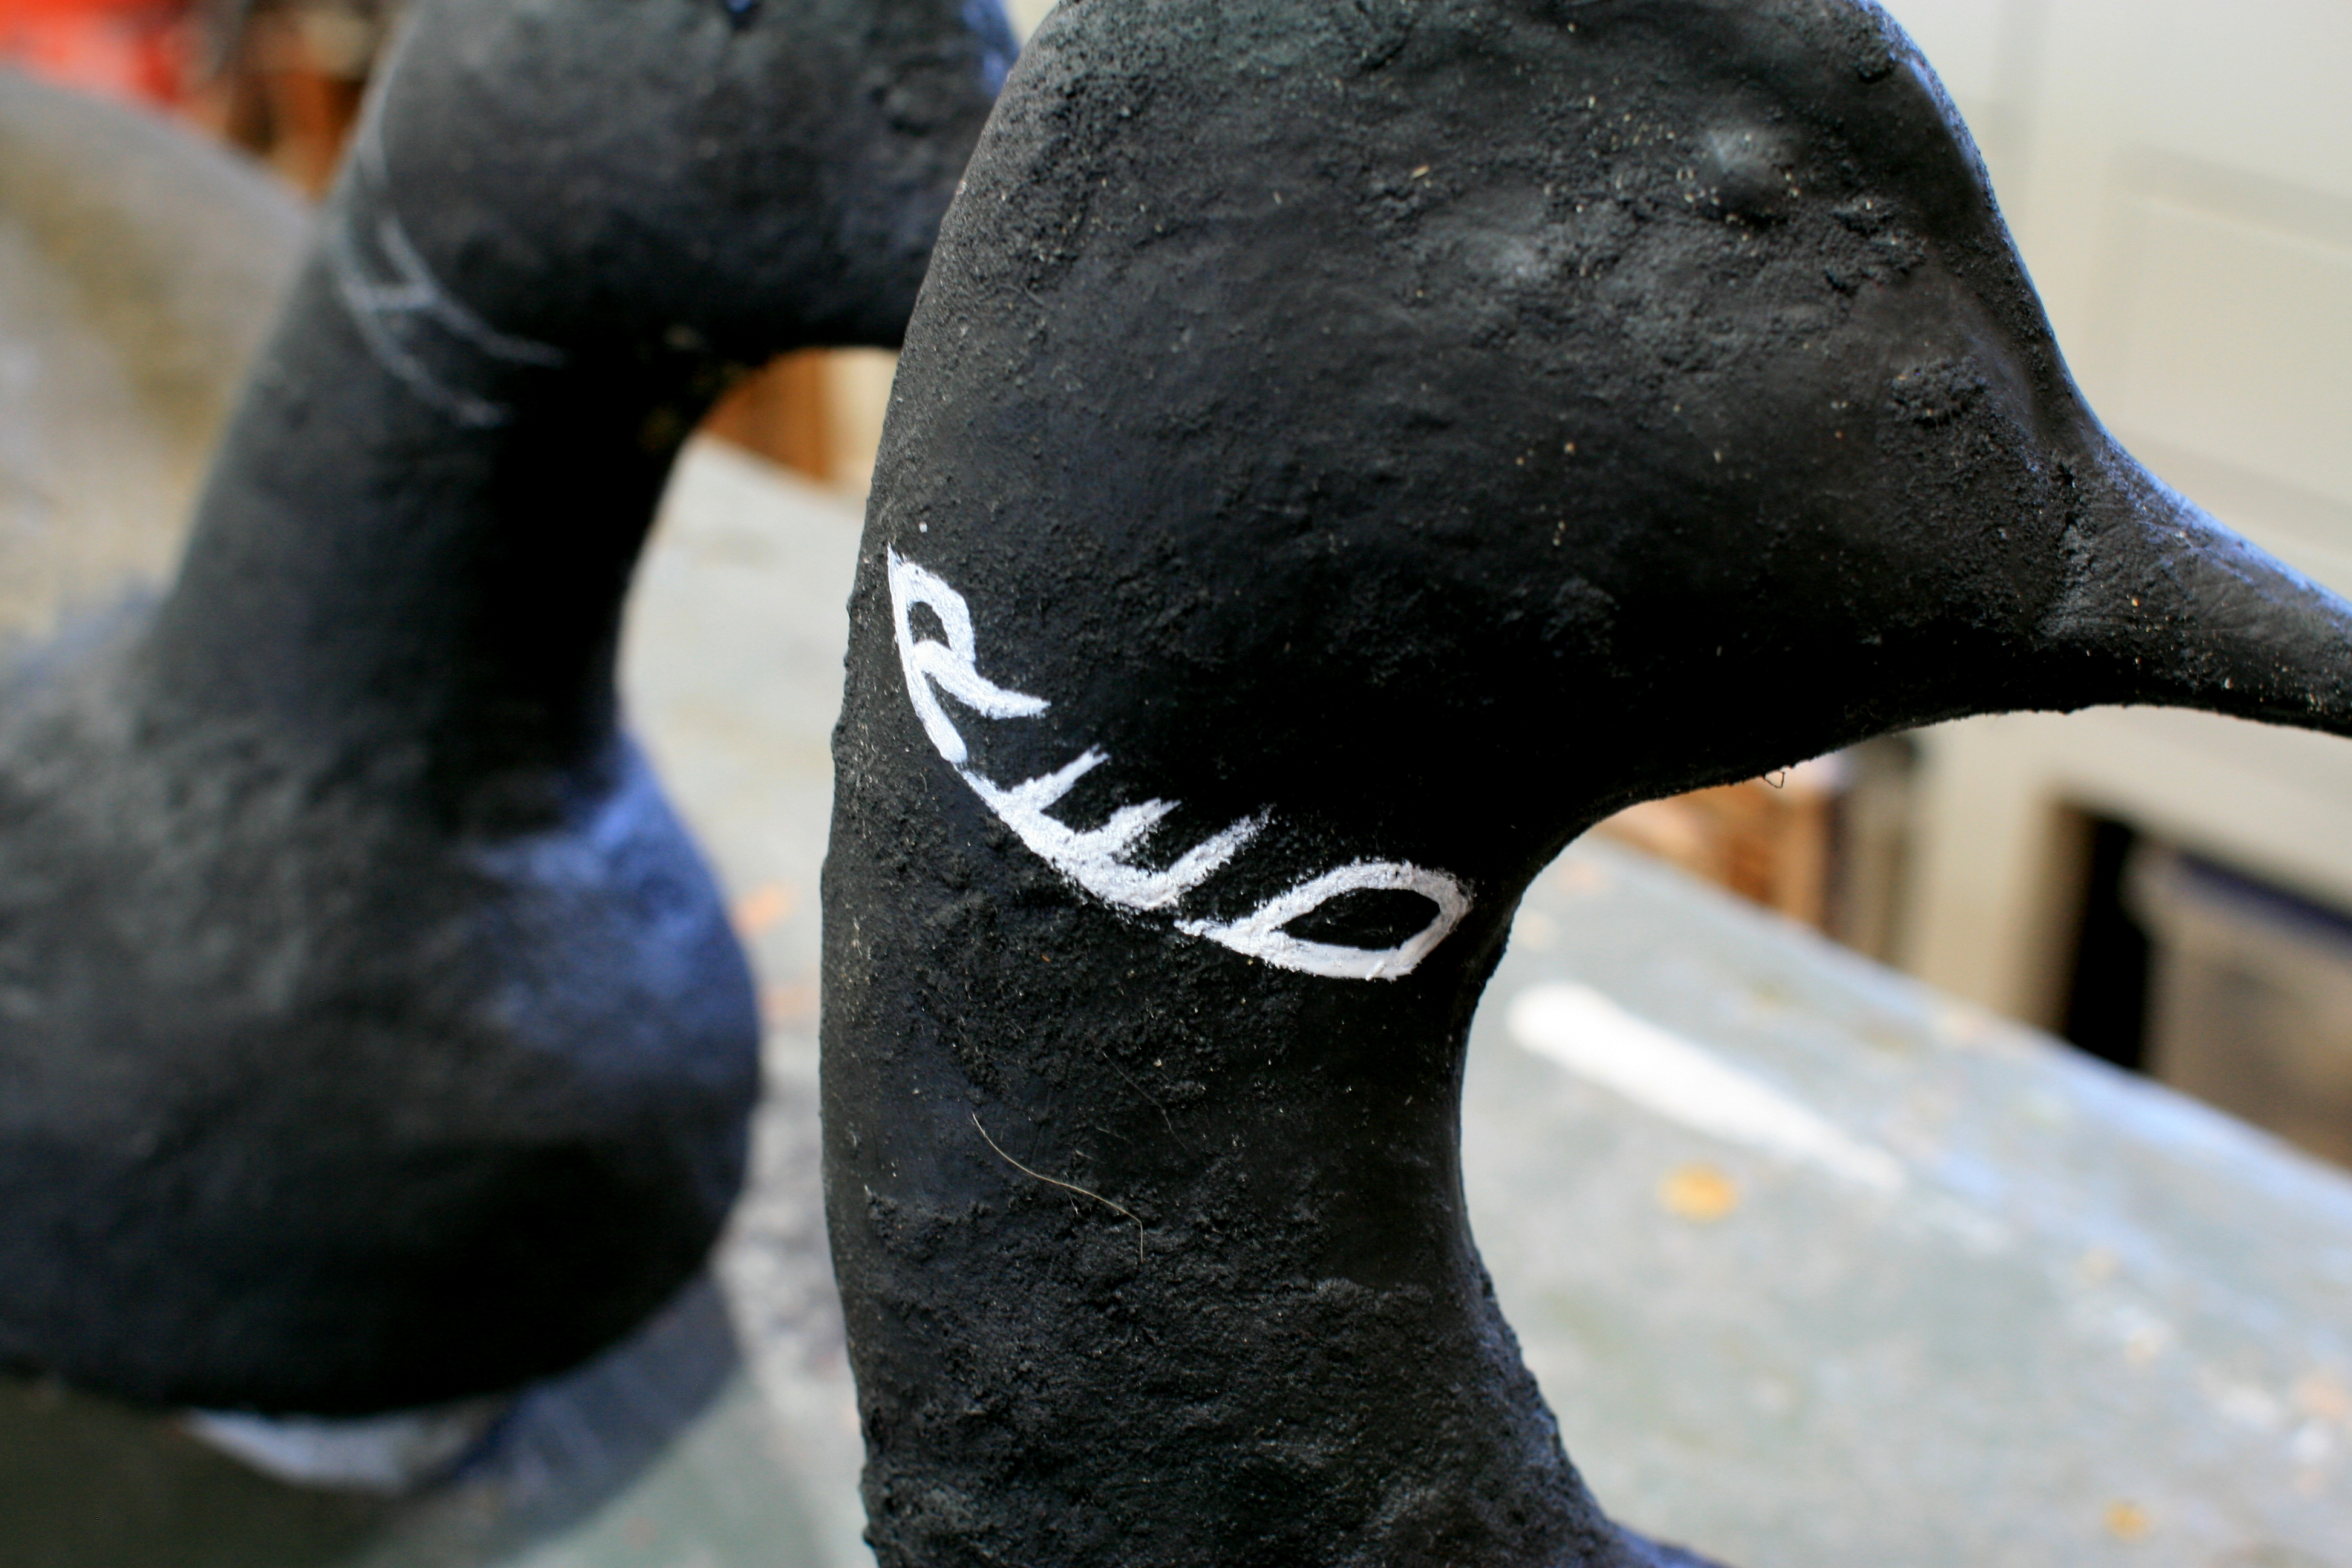
Now we are ready for the necklaces. I start by marking the location with chalk.

Then I paint the “baseline”.

I then sweep each point forward, with a fine, round brush.
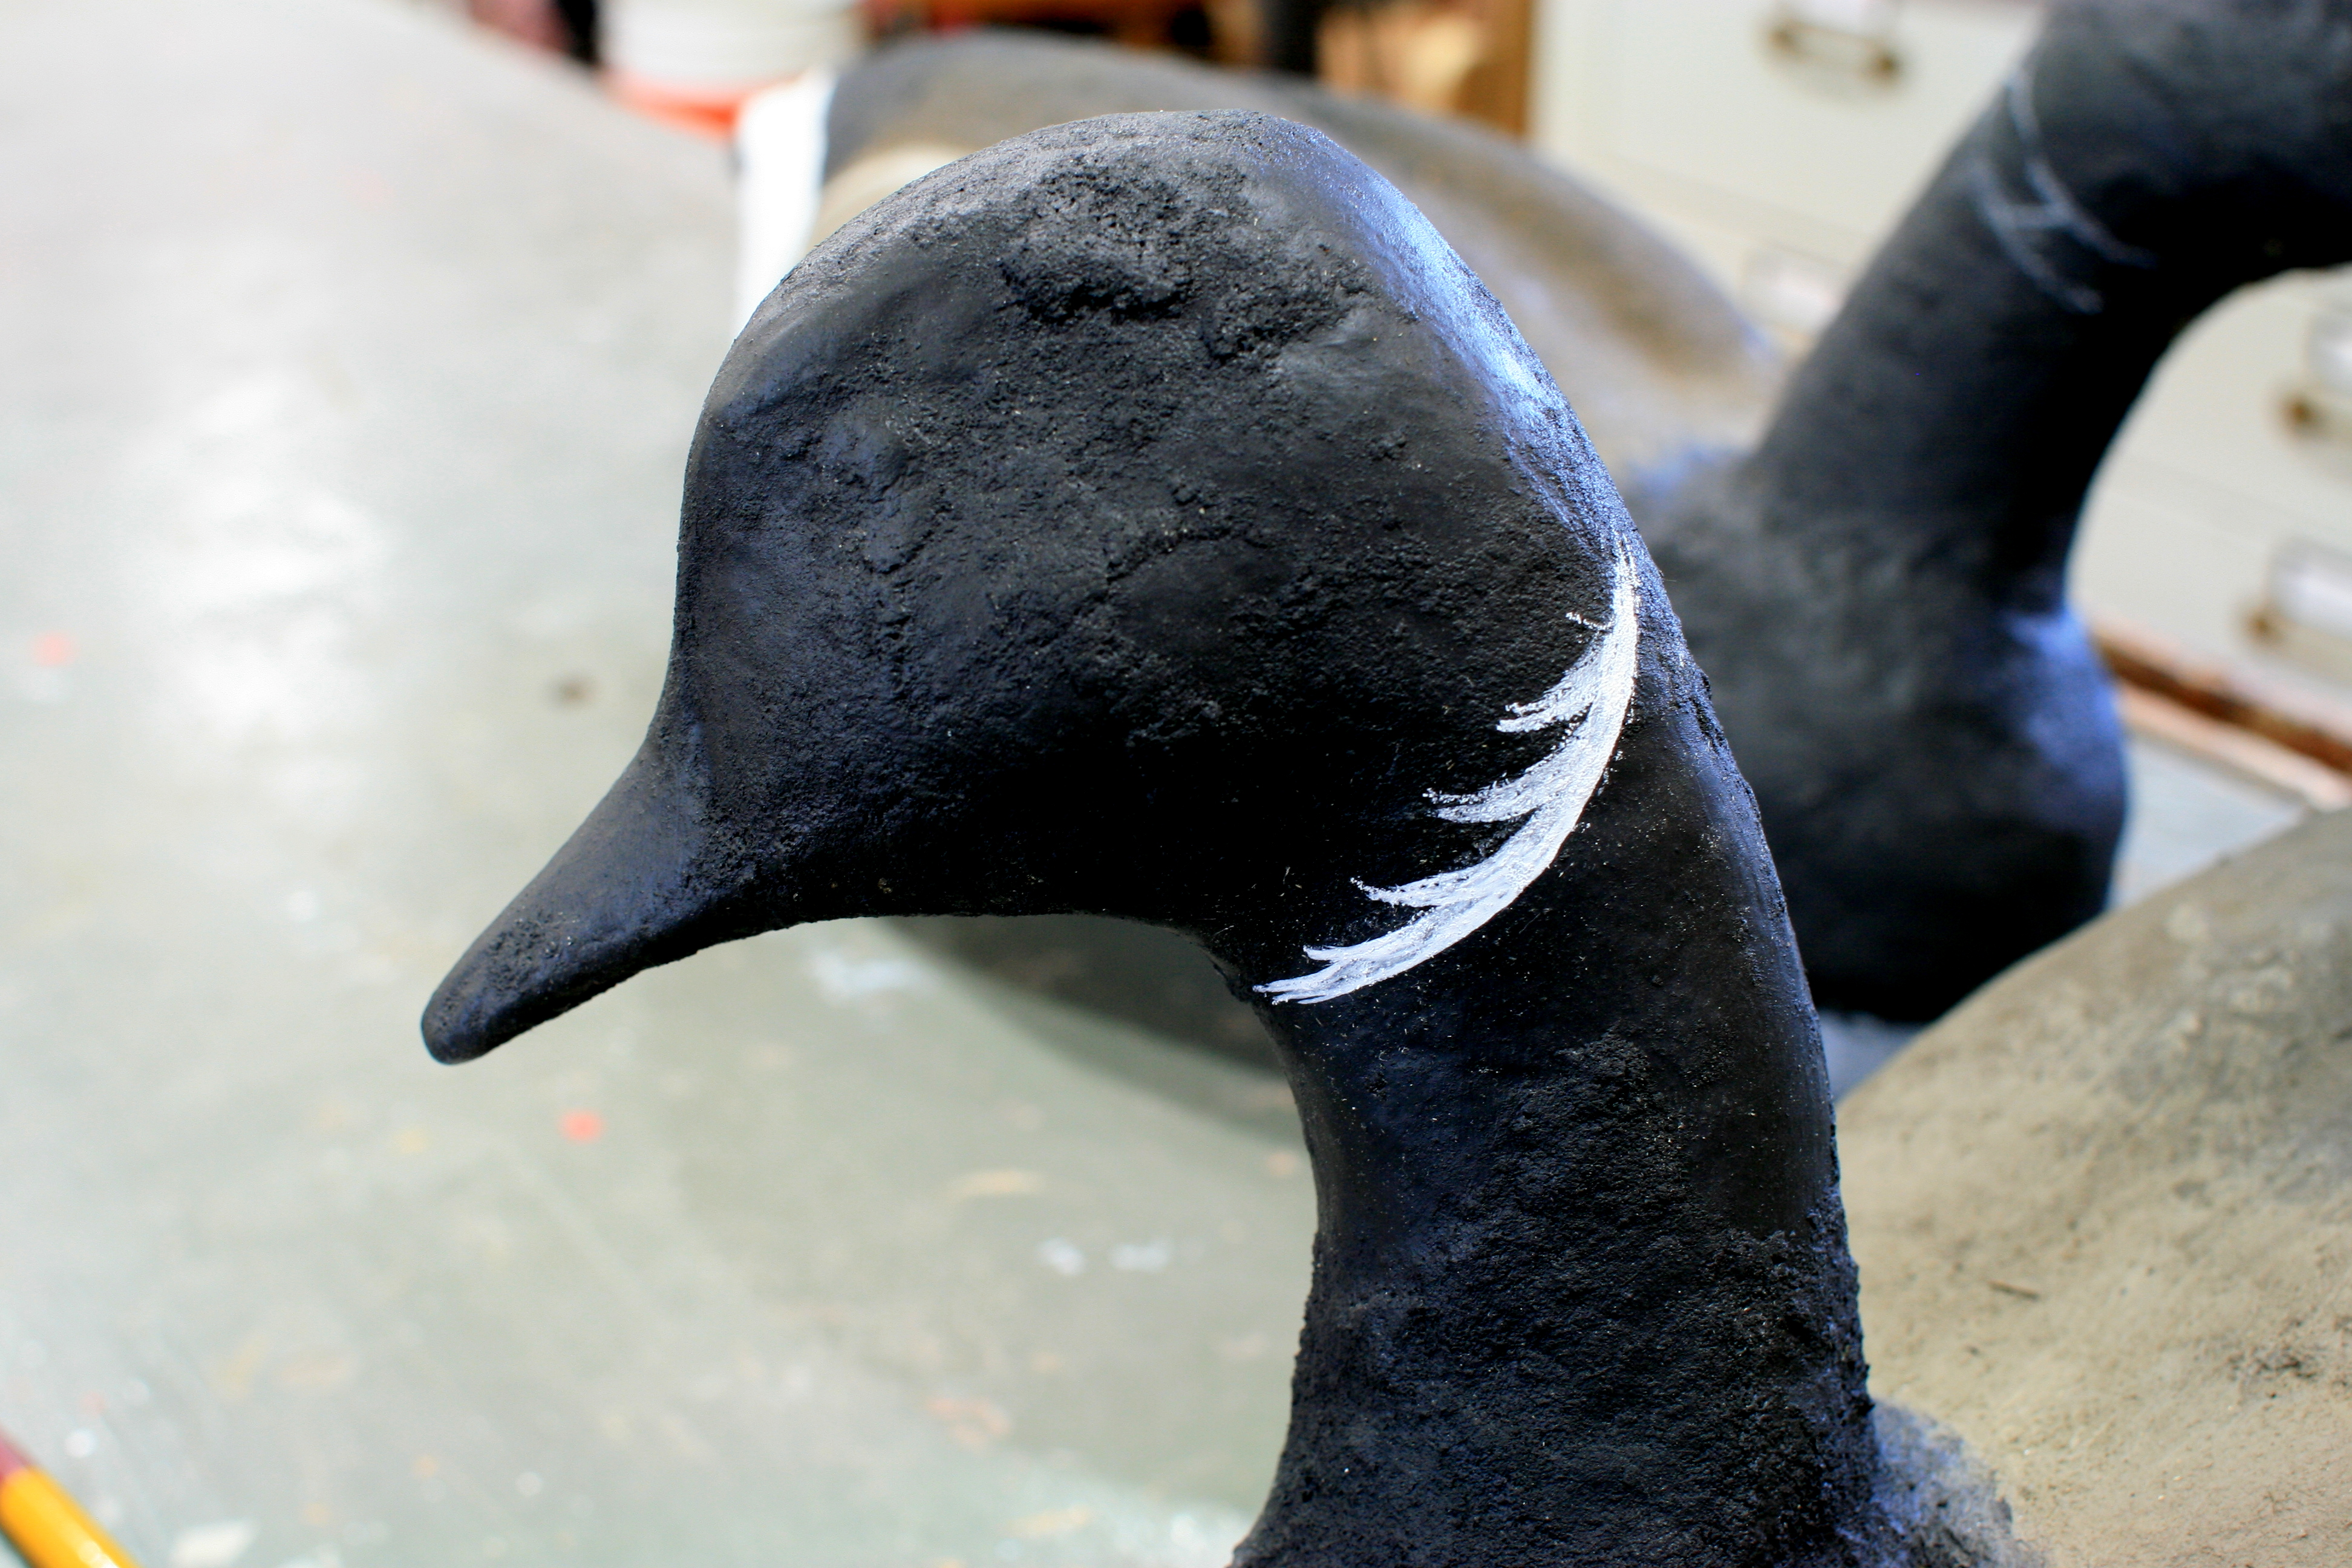
And, because the exact shape of the necklace varies among live birds – and doesn’t really matter at that “half-gunshot” range – I sometimes have some fun with it. I am hoping Red Oster will enjoy this necklace.
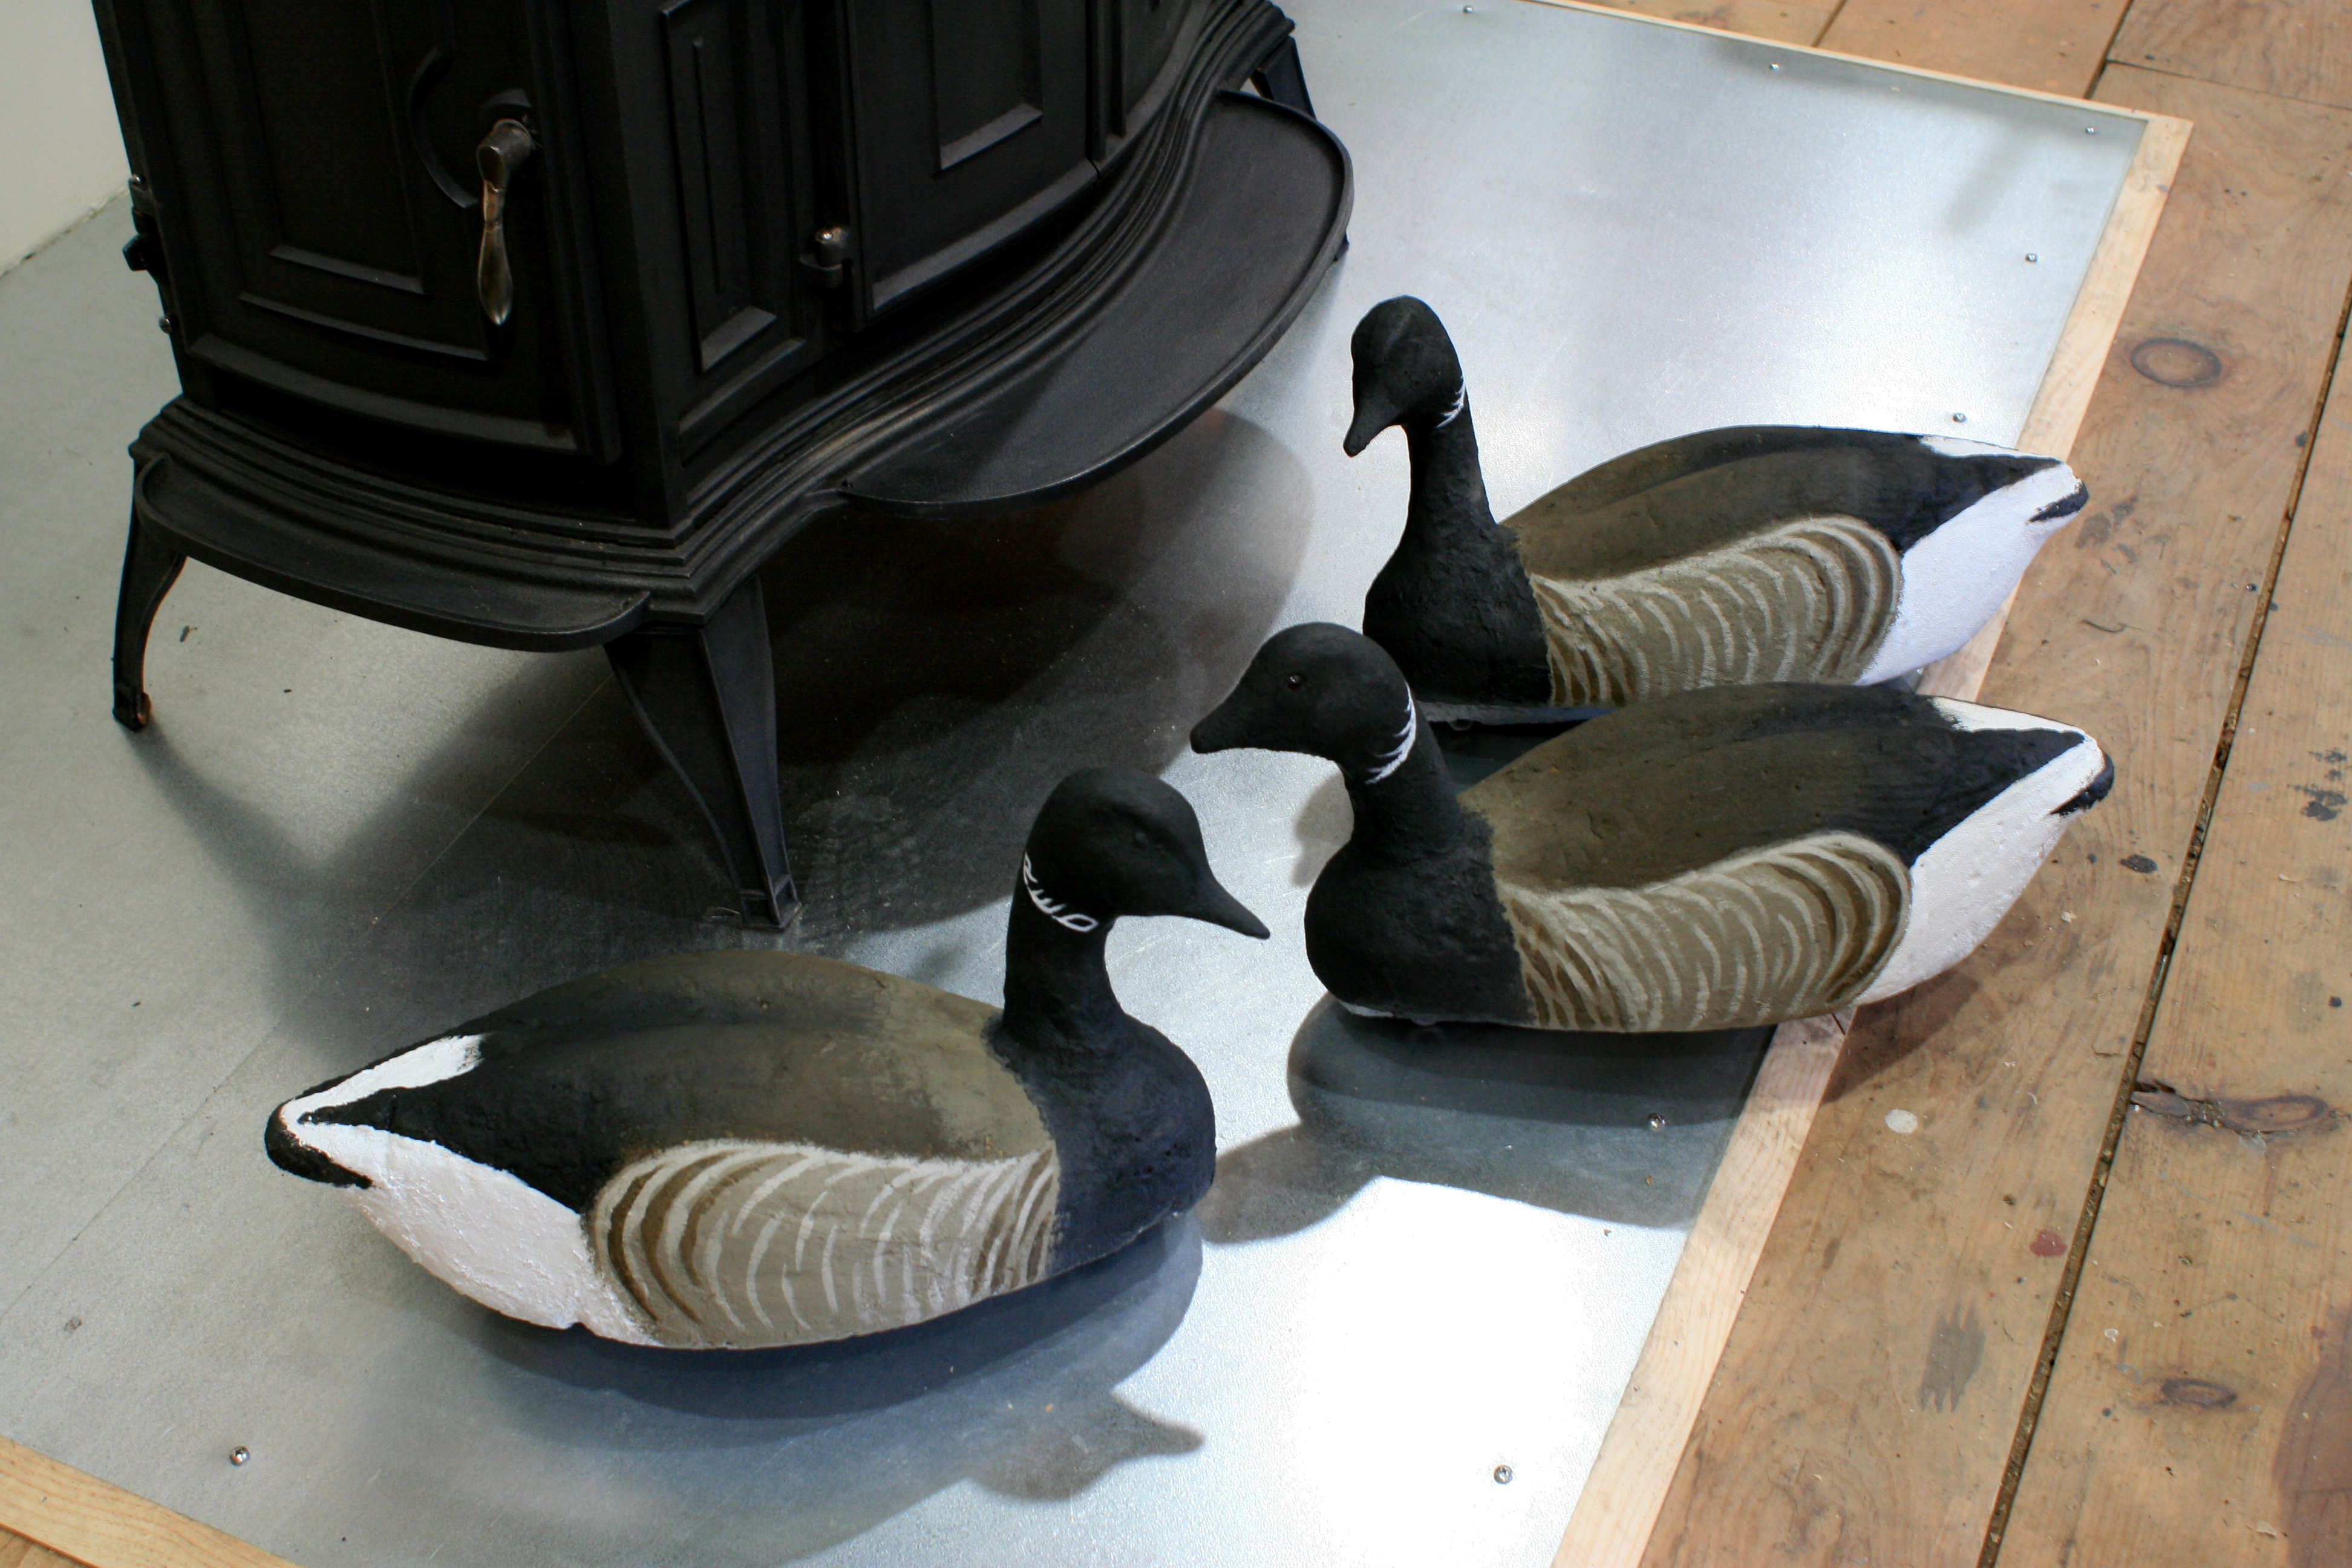
Here’s the completed trio. Couldn’t find any saltwater nearby for the portrait….
![]()

great job thanks
js.hartman@outlook.com
Awesome
Right out of Bulkhead Drain ! The Sgt. would love ’em !
Many thanks for your fantastic blog! I am on the west coast of Canada readying my rig of about 40 Herter’s decoys that are likely over 50 years old (or more??) for our short Brant season (March 1-10, of which I can generally manage 4-5 of those days to hunt between work, a young family, etc.). I have a sentimental attachment to my decoys as they have been passed down through a couple of generations, but the overall “busy-ness” of my life makes maintenance of the decoys a bit of a chore because they get pretty beat up every year despite only getting used for 4-5 days. I just finished touching up my decoys for the upcoming season and came across your blog because I was pondering investing in modern plastic decoys that would not require painting. I am truly amazed at your dedication and amazing talent with refurbishing old and beat-up decoys, such as my own, and just wanted to say thank you for re-inspiring me to keep maintaining what I have! Given the relatively small following of us waterfowlers (even smaller when talking about Brant…), your eye, skill, and dedication is truly admirable. Thanks for sharing,
Stew Pearce
Nanaimo, British Columbia
Very nice job!